After we’ve removed all of the panels and peripheral components in a Dell laptop, we start on the top-down disassembly. First this guide walks you through the process of removing the hinge cover, then the keyboard, and finally, properly disconnecting the variety of cables you will find beneath it.
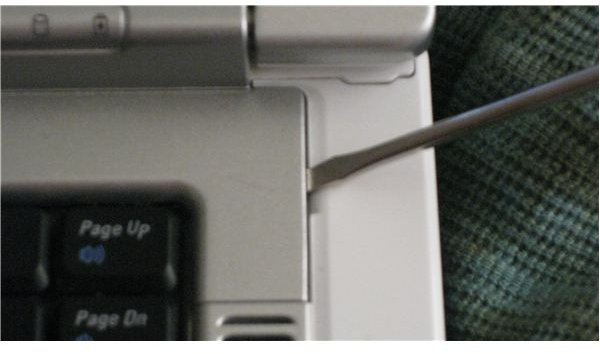
Remove the Hinge Cover
Once you’ve got all the peripheral components out, like the memory, wireless cards, and drives, its time to start top down disassembly on your Dell laptop. Open the laptop as you would to use it, but instead push the screen all the way back so that the laptop is, in effect, open flat.
Using a pry tool, such as a small flat head screwdriver, insert the pry edge under the notch in the hinge cover and gently lift it up. Once that side has released, use your fingers to carefully pry up the hinge cover until it is completely removed.
Note about other models: The hinge cover notch will not always be in this exact place on Dell laptops, though this is the most common location. Sometimes it will be on the right side. In very rare instances there is no notch, and you must pry the cover up much more carefully - and often forcefully. Regardless of where the notch is (or if there even is one) this hinge cover must come off first, one way or another.
Remove the Keyboard

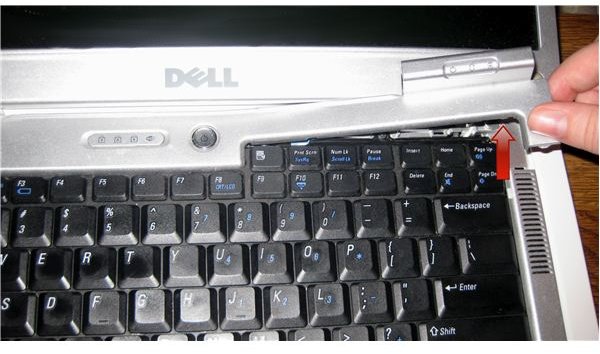
After you’ve got the hinge cover off, the keyboard screws will be exposed. As shown in the image, there are two screws securing this keyboard. Remove them, and set them aside. Keep them separate from other screws. The keyboard is lightly “snapped” in. Lift up from the back, gently. There will be a ribbon cable connecting it to the motherboard below, so rotate it until you have access to the connector.
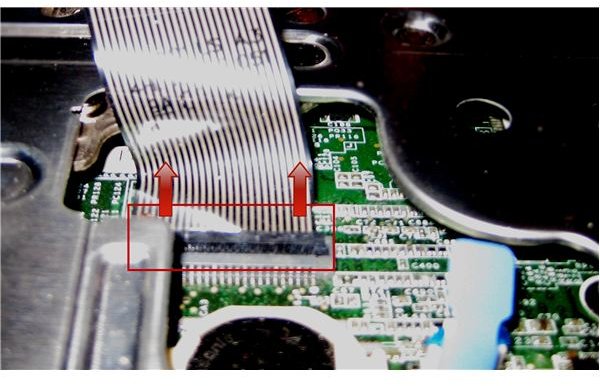
This type of connector is very easy to work with. It is something of a hinge, snapped into place over the ribbon. Lift it up to release the ribbon, then slide the ribbon out of the slot. (When you go to put the keyboard back later, the line printed on the ribbon will show you where the edge of the black hinge should rest when it is properly secured).
Note about other models: The number and exact placement of keyboard screws can vary. Three is most common. Some models use no screws at all. Additionally, the type of connector the keyboard ribbon cable uses can vary. Sometimes it will be a basic push plug that has to be carefully pulled out. Other times the ribbon will be inserted into a slot, then a plastic mold will raise up or down around it to secure or release it.
Disconnecting Wires

Very soon we will be removing the screen from the rest of the laptop. But first, we need to disconnect all the wires running between the two. In all laptop models, including the Inspiron 1501 we are using as our example, a thick black cable connects the screen to the motherboard. This is the cable that sends power and data to the LCD screen. Most of the time (but now always) a small silver screw with a wire attached to it will be connected to this cable. This is a grounding screw, and it needs to be disconnected before we can unplug the cable. After the screw is out, simply grab the plug by the blue tab and pull upwards to disconnect it.
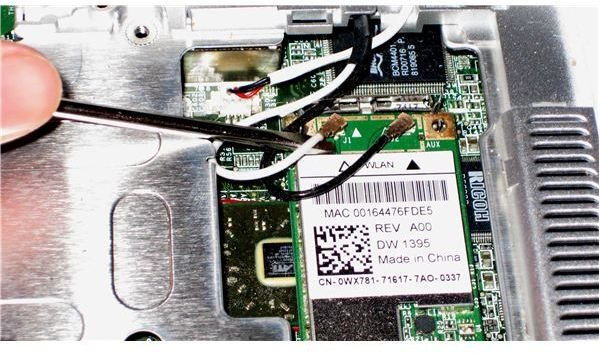
In almost all cases, there are two thin wires - one white and one black, also running from the screen to the rest of the laptop . (Very rarely there will be four wires, one white, one black, and two varying shades of gray). These wires go to the wireless card(s). If the wireless card was installed under the “C” panel on the bottom of the laptop, all you have to do is carefully feed these wires through to the other side. In our example, however, the wireless card is instead installed under the keyboard, shown in the image on the right.
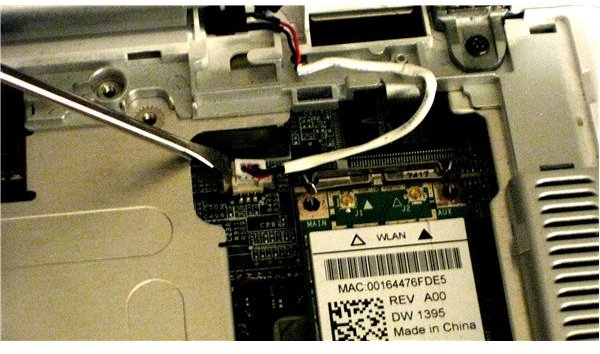
To remove these wires, as shown on the right, simply use your fingers or another tool to lift them off of the copper plugs. Later, when you are reconnecting them, all you have to do is position the connectors over the plugs and push down ’til they snap into place. Which wire goes where is marked by white and black triangles.

You’ll also notice in this image that there is another plug running from the screen area to the motherboard. You may or may not find something similar on your model Dell laptop as is here in the Inspiron 1501. If present, this or similar plugs need to be carefully unplugged. Using a flathead screwdriver to gently lift each edge a little at a time is the safest method.
After all this is done, you’re ready to move to the next step: Unscrewing and removing the screen!
This post is part of the series: How to Install a New Motherboard in a Dell Laptop
In this series of articles we use a Dell Inspiron 1501 as an example model on how to replace the motherboard in a Dell Laptop. With extensive pictures and detailed directions, along with notes on common design variations, we make it possible for anyone to replace the motherboard in their Dell Laptop


