Some of the most common accidental damage that happens to a laptop is screen cracking. This can happen from mishandling the laptop, occur during drops, or even accidental gentle bumps. You can replace the screen yourself if you laptop is not under warranty.
Keyboard Area
**
In this section of our laptop disassembly guide we discuss how to remove the laptop screen component from the base, as well as how to remove just the LCD screen for replacement (or for any other reason you can think of). Please heed the safety precautions and other warnings in part one of this series.
Keyboard Bezel
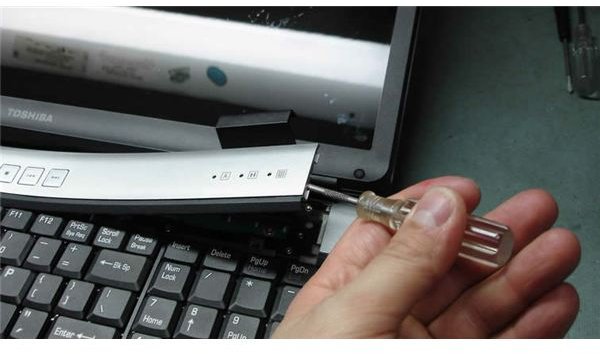
The first thing that needs to come off is the plastic bezel above the keyboard. In every laptop I’ve ever seen, this is a removable piece, and the gateway into the rest of the machine. On Dell laptops, you can simply pry it up and off from the side (there is almost always a convenient indent in the bezel for this purpose). On some HP and Gateway models, there are very small screws in the bottom of the laptop that are holding this bezel on, often inside the battery cavity. As a rule of thumb, you should never have to “force” anything. If it isn’t coming up from reasonably gentle prying, then look for screws.
The Keyboard
The next thing we need to remove is the keyboard. In some machines, once the bezel is up the keyboard will slide or tilt up and out. In others (like most Dell laptops) the keyboard itself is screwed in. If it is screwed in, the location of the screws should be pretty clear, at the top of the keyboard. Make sure you keep your keyboard screws with the keyboard, or in some way note them to ensure they don’t get mixed up with the rest.
The Screen
The next part we’re going to be removing is the screen. Most screens have this design: inside the screen bezel is an LCD sandwiched between two heavy metal brackets. These brackets connect via 2-6 screws to the base of the laptop. The screen receives its image through a heavy wide cable that plugs into the motherboard underneath the keyboard, and almost always has a grounding screw nearby. To remove the screen, first unplug the cable to the screen, and unscrew the grounding wire (if applicable). Since most wireless card antennas are located in the screen, you will likely have to disconnect the wires to the card (if you haven’t already done so) and/or feed them through from the bottom.
For the next step, lay the screen all the way back. Unscrew all the screws that are attaching the screen brackets to the laptop base. The screws may be in the top near the hinge, in the back, and on bottom. It just depends on the laptop. Once everything is unscrewed, the screen should simply lift apart. Make sure you keep track of what screws go where.
Continue reading about screens only if, for some reason, you need to remove the LCD from the frame.
To remove the LCD from the screen section of the laptop, you’ll first need to remove the front plastic bezel. Oftentimes, this is held on by screws hidden underneath adhesive rubber pads. You can remove these pads with your pry tool. Once you’ve removed the front bezel screws, you will need to again use your pry tool to separate the front bezel from the backpanel. Sometimes, this is no easy task, as some laptop manufacturers (Gateway is one example) like to use glue or other adhesive to hold it on. Avoid bending the bezel too much while prying around the edges, as it is usually not very flexible and can crack.
After you’ve removed the front bezel you should be able to see where the metal brackets attack to the backpanel, and also to the LCD. Be very careful with the LCD - they can easily crack or become damaged if mishandled. Unscrew the the brackets from the backpanel and lift out the LCD and brackets. Do not wrap your fingers around the back of the LCD. If you carefully flip it over, you will see a large strip of the LCD is very boldly marked DO NOT TOUCH. I highly recommend that you avoid touching it at all costs. Now all that is left is to unscrew the brackets from the LCD, and you’re done disassembling the laptop screen.
This post is part of the series: Do It Yourself: Disassemble a Laptop
You may have many reasons for wanting to take apart your laptop - perhaps its just for fun, perhaps you want to replace a part yourself, or maybe you’re just piecing it out to sell on ebay. Whatever it is, this multi-part series on how to properly disassemble a laptop will help you be successful.


