Computer upgrades require knowledge of what is inside your computer so that you can make purchasing decisions. This first article of the series discusses how to determine exactly what is in your current system so you can address it’s weaknesses.
You Need A Plan
This article is the first in a series about upgrading your computer. There are quite a few articles available concerning how to upgrade your computer, but the majority of those articles have to do with how to install hardware upgrades. This is important knowledge to have, but equally important is knowing the best parts that are available, the compatibility hazards which can unexpectedly appear, and when it is best to simply start from scratch.
The importance of having this sort of information available before upgrading your computer can’t be overly stressed. The modularity of the the PC as a platform means that no matter what your current configuration, there are thousands of upgrade paths that are available. Unfortunately, it is not always clear which paths will work with your current configuration, and which won’t. Take Intel’s new 45nm Core 2 Duos as an example. These processors use the same basic architecture as the old 65nm processors, and they fit into the same socket. However, not all motherboards that supported the old 65nm processors support the 45nm models. Some simply are not compatible, while others will only work if you update your motherboard’s BIOS.
Knowing what paths will work prevents you from having to return hardware. It will also result in a better overall system once your computer is upgraded.
Decode Your PC Using PC Wizard
Discovering what is in your current PC is the first step of any upgrade. Even if you built your PC yourself, you probably don’t remember every part you used, and if you purchased your computer from a major manufacturer, information about your computer’s hardware is probably not readily available. Most manufacturers don’t provide documentation with details regarding the motherboard used, the speed of the RAM, or the brand and speed of the hard disk.
Luckily, there is free software available, known as PC Wizard , which will tell you exactly what can be found in your current computer. There are several particularly important questions that you’ll need to know the answer to. Write the answers to these questions down.
What is my motherboard’s chipset? You can answer this question by going to the mainboard section of PC Wizard, and then looking at the information listed under Chipset.
What CPU do I have? You may know the answer already, but it is best to double check. If you have an older PC, it can be easy to mistakenly believe you have a Athlon X2 when you in fact only have an Athlon, or vice-versa.
What video card do I have? If you didn’t build your computer, this can be difficult to answer. You can find this information in the Video Card section under the Video tab.
What kind of hard drive do I have? You’ll find this information under the Drives tab. Each hard disk you have will be listed. Unfortunately, PC Wizard doesn’t provide much information about cache sizes or disk speeds, so you’ll have to retrieve your model information from PC Wizard and then Google it.
Performing A Visual Inspection
After you’ve ran PC wizard and poked around your computer’s internals via the software, you’ll need to shut down your computer and open the case . PC Wizard can tell you a great deal of information about your PC, but there are some things you’ll need to know that you simply won’t be able to discover without cracking open the cover. Again, write down the answers to these question as you discover them.
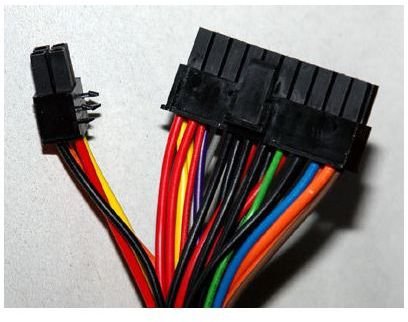
How powerful is my Power Supply? The Power Supply provides the juice which allows your computer to operate, and if you try to draw more power than the power supply can provide, your computer will shut down. Luckily, power supplies readily list their vital statistics on their exteriors. There is one main stat that you’ll need to know about, which is the maximum wattage that your power supply can handle. This will be expressed as “250W” or “500 watts” and so on. You’ll also want to note the power connectors available. Your motherboard requires a 20 or 24-pin connector, pictured to the left, and a 4-pin connector. You’ll need to write down if you have the 20-pin or 24-pin connector. Also write down the number of Molex connections you have, the number of SATA connections you have, the number of PCIe connections you have, and whether the last ones are 6 ot 8-pin.
How much cooling do I have? Many pre-built PCs that aren’t geared towards performance have terrible cooling. Take a count of the internal fans that you can find, and their locations.
What expansion slots are open? Inspect your motherboard to determine how much expansion it allows. You’ll mainly want to take down the number of PCI slots, PCIe slots, the SATA ports, and any empty RAM slots. If you have an older PC, you might also encounter AGP slots and IDE connections. Take note of those, as well.
How much room do I have in my case? Inspect the 3.5" hard drive bays and the 5.25" media bays and take note of how many open spaces are available. Also, take casual note of how cramped your case appears to be. Is it easy to move your hand between parts, or do you often have to maneuver between components that are extremely close to each other?
The Next Step
Now that you have information down about the vitals of your computer, your next step will be to decide if upgrading is even an option, or if you’d be better served by simply buying or building a new computer. Despite the modularity of the modern PC, there are some situations where an upgrade simply isn’t possible, and many when it isn’t worth it. Look for this information to be covered in the next article.
This post is part of the series: The Best Possible Upgrade
Upgrading your PC means more than rooting around in the guts of your digital companion. It also means deciding which upgrades are worthwhile, what hardware to keep, and if upgrading is even possible. This series focuses on the mental work that is required before diving into the bowels of your PC.


