Removing and replacing the keyboard in a Dell Inspiron is a fairly easy process, but proper care must be taken in order to make sure that the removal and replacement goes smoothly. This article will detail the steps you need to take in order to safely remove the keyboard from your Dell Inspiron.
Before You Start: Turning Off Your Computer
If you are experiencing problems with your Dell Inspiron keyboard , you may have to replace the actual keyboard itself. Before you can start the process of replacing the keyboard in your Dell Inspiron, you must first make sure that the computer is shut down and that all peripherals and attached devices are turned off as well. Save and close any programs and files that are open on the computer, and then shut down the operating system (Start > Shut Down). If the computer doesn’t turn off, hold down the power button until it is manually powered down.
Preparing Your Computer
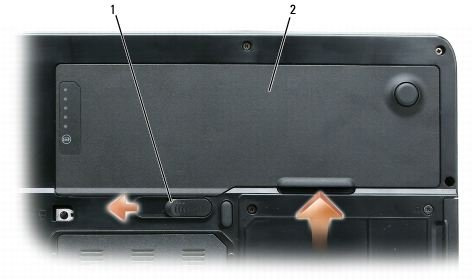
Once your Dell Inspiron is shut off, disconnect any networking wires from the computer. This includes ethernet cords, phone cords, or any cable that connects an external device to the computer. Remove the computer’s plug from the electrical outlet, close the Inspiron, and place it upside down on a flat work surface. Remove the battery cover by releasing the battery cover lock, and take out the battery from the battery bay. Then, flip the computer right side up.
Image Source: Dell.com
Removing and Replacing the Keyboard
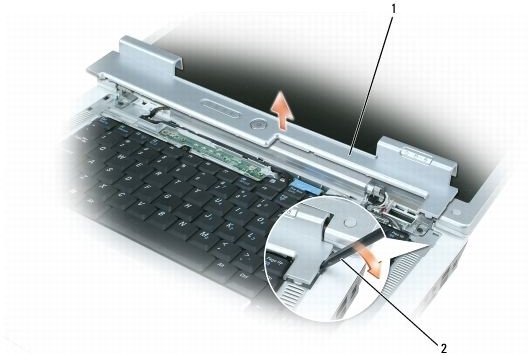
First, we have to remove the hinge cover on the display. In order to do this, we will open the Dell Inspiron’s display all the way, so that the computer should lie nearly flat. Then, we will use a small scribe, or flat edge, to lift the right side of the hinge cover. Gently work the hinge cover out and remove it from the Inspiron. Be sure to be gentle with the hinge cover, as it’s pretty fragile and using too much force could break it.
Using a small flat head screwdriver, remove the two screws at the top of the keyboard. Be sure to set these aside carefully, because they are rather small and are needed for installing the replacement keyboard. Then, gently lift the
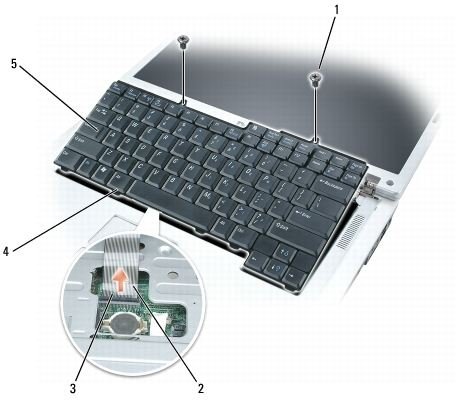
keyboard forward so that you can see the keyboard connector behind it. In order to remove the keyboard connector, you need to lift the connector latch and slide the keyboard cable out of the connector. After that, all you have to do is simply remove the keyboard from the Dell Inspiron.
In order to replace the keyboard, we just need to follow the above steps in reverse order. We take our new keyboard, and slide the keyboard cables into the keyboard connector, and close the connector latch. Then, we take the tabs of the new keyboard and slide them underneath the palm rest, and press gently on the top parts of the keyborad to snap them into place. After that, all we have to do is replace the two screws at the top of the keyboard that we removed earlier. Congratulations! The new keyboard will now work with your Dell Inspiron laptop computer.
If you are looking for more information on repairing and installing hardware in a Dell Inspiron Keyboard, please check out this article: Dell Laptop Motherboard Installation - Removing the Keyboard, Screen, and More
Image Sources: Dell.com
References
Dell Support, https://support.dell.com/support/edocs/systems/ins1501/en/sm _en/index.htm


