Anyone with a home office knows that budgeting time is critical to the success of the business and in maintaining a balanced healthy personal life. You can use MS Excel time tracking to keep an employee time card, calculate billable hours, create invoices, and analyze how you spend your time.
MS Excel Time Tracking - Weekly Time Card
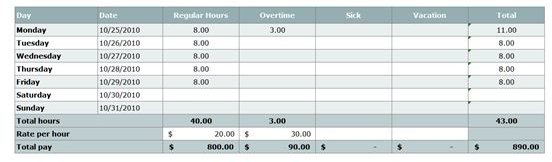
If you need a basic electronic time card, MS Excel already has a built in template to track weekly time. The time card is useful if you have another employee or if you are working on just one project and don’t need to separate your work into billable hours.
To access the time card, start by creating a new workbook and select the time card from the sample templates. For this article, Excel 2010 was used, but the template is also available in earlier versions. The time card is setup to record weekly time from Monday to Sunday and is designed to handle different pay types (regular, overtime , sick and vacation). The card also provides for the automatic calculation of total pay based on the rate of pay you input into the spreadsheet. With a few modifications to the time card you can also subtract standard payroll deductions to derive the net total pay.
MS Excel Time Tracking - Calculating Billable Hours
In Excel you can set up a spreadsheet that will track the time you spend on multiple projects or on work for multiple clients to calculate billable hours. The trick is to convert Excel time tracking into a stopwatch.
Steps for Creating the Excel Time Tracking Spreadsheet
1. Begin by naming the column headers: Project/Client Name, Description, Start Time, Finish Time, Billable Hours and Total.
2. Fill in the project or name of the client in Column A and the description of the type of work done in Column B.
3. Use Start Time and Finish Time (Columns C and D) as your personal stopwatch with these shortcuts.
-
When you are ready to begin working on the project, insert the current date and time into the cell for the Start Time by pressing CTRL+; (semi-colon), then press SPACE, and then press CTRL+SHIFT+; (semi-colon). When you are finish or want to take a break, repeat these steps for the finish time.
Advertisement -
Make sure that the columns for the Start Time and Finish Time are set on the date format Day, Month, Year 00:00 AM/FM.
4. Set up a formula to calculate billable hours in Column E.
-
In Column E, you will subtract the Finish Time from the Start Time by referencing the previous cells, e.g., D2-C2.
-
Make sure Column E is set on the time format 00:00.
Advertisement
5. Enter your hourly rate of pay in column F.
6. Set up a formula to calculate your total pay for each work activity in Column G.
-
For each cell in Column G, you will insert the formula Billable Hours x Pay Rate x 24. For example, the formula for G2 would be “=E2*F2*24”.
-
Set the accounting format for Column G and extend it to two decimal places and then add a currency symbol by clicking the symbol located on the Ribbon.
Advertisement
7. To calculate your final total for each client or project, designate cells at the end of the spreadsheet and use a SUMIF formula with the condition being the name of the client. For example, for Client 1 the total pay is calculated with the formula “=SUMIF(A2:A8, “Client 1”, G2:G8)”.
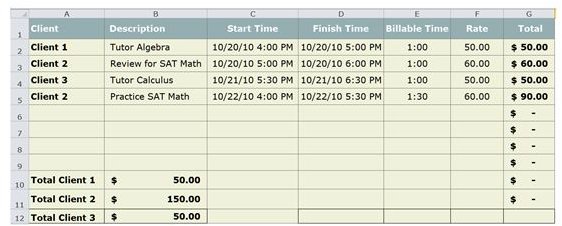
Here is an example of the completed spreadsheet which shows the billable hours for a high school math tutor with three different clients.
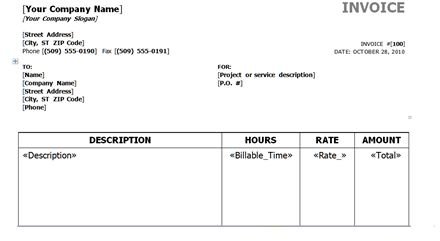
You can create a separate invoice for each lesson by using Word’s mail merge feature, an MS invoice template, and data from your Excel spreadsheet. Here is what the MS invoice template with the merged fields would look like.
Analyzing Your Time with MS Excel Time Tracking

At the end of the day, do you ask yourself where has my time gone or why can’t I get anything done? MS Excel time tracking can help you visually see where you spend your time.
How to Record Your Daily Activities
-
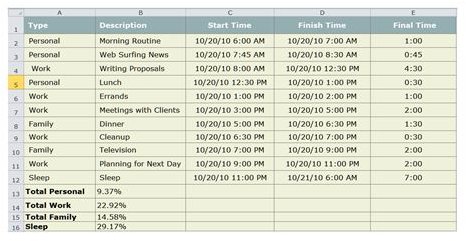
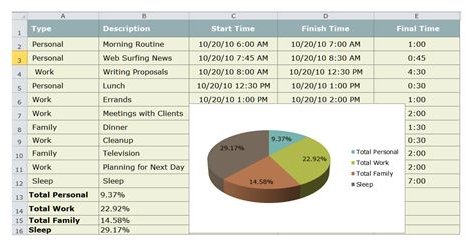
Open a new spreadsheet and label your header columns: Type, Description, Start Time, Finish Time and Final Time.
-
Select categories to represent the different types of time, such as personal, family, work, and sleep, for entry into Column A.
Advertisement -
List specific activities associated with each time category in Column B.
-
Enter your start and finish times in Columns C and D as explained in the previous section.
-
At the end of the spreadsheet, designate cells to hold the total time for each time category. Set the format of these cells to percentages in order to get comparatives for where you spend your time.
This example captures some of the daily routine of mom who is busy keeping up with a home business and a growing family.
Creating the Pie Chart
To create the pie chart , highlight the cells with the category names and the total time (Cells A13:B16 in the example). Choose the Insert tab on the ribbon and then select Pie Chart. Choose the color scheme and pie chart form according to your preference. For this example, I chose the 3D form with a full range of colors to vividly display my categories. To add data labels, click anywhere in the chart and select Add Data Labels. This will set the percentages of your data to give you the following pie chart.
You can enter other categories to track where you spend or “waste” your time. For fun and, of course, if you have the time, try to record how much time you spend on these infamous time wasters.
- Web Surfing
- Nonproductive meetings
- Telephone calls
With a little of bit of knowledge of where you spend your time, you can begin to set these goals to improve your time management.
Image Credits:
- Clock: graur razvan ionut / FreeDigitalPhotos.net:
- MS screenshots taken by Ginny Edwards


