Online Selling: 2 Essential Tips for Taking Better Photos

Do you need to hire a professional?
If you have rudimentary skills with a camera and photo software, the answer is no. Keeping your business costs low keeps profits high.
Maybe one day you’ll be selling so many selfie sticks or Mickey Mantle gloves you can farm out your photo, but until then let’s learn how to keep things in-house.
The difference between success and stagnation is the quality of your images. Whatever you’re selling, you’ll need two basic elements.
#1 Camera
You’ll need a camera on a tripod. Inventory your equipment. What cameras do you have? Do you need a new one? A decade and half into the 21st century, you certainly have a decent camera that makes phone calls. But is it good enough for business?
I have a three-year-old digital camera and a fairly new smartphone. The first device takes 16 megapixel images and is a dedicated camera. The second takes 8 megapixel images and does a million other things. So which takes better pictures?
No way to know other than to test it. I set each up on my tripod in front of a lava-rock statue on a curved sheet of paper. I took some shots with each machine with identical lighting setups and compared them.
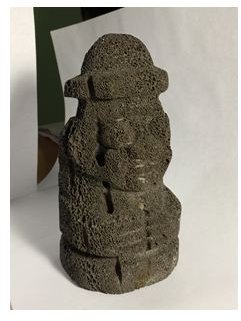
It looks like the phone is the winner despite a lower megapixel rating. The details are crisper and better defined. Maybe my kids have put their sticky fingers on the lens of the camera too many times or maybe it’s a processor thing poets don’t understand.
Regardless, the pictures don’t lie.
Now we need to mount the device solidly. When taking close-up shots, it’s imperative the camera holds still. Not only do I like to mount it on a tripod, but I also like to set the shutter for a short delay. Then the camera won’t fire until a few seconds after I push the button. That way if I jostled the machine a little it will stabilize again before taking a picture.
I have an old tripod, but the screw-on mount hasn’t changed for decades. It still fits a modern camera, but not my phone. I had to get a clamp mount for the tripod, but it’s a $15 piece of equipment I’ll use often.
#2 Light
The quality of your lighting is as critical as the quality of your camera. Natural is best, but light bulbs are easier to control and predict than the sun.
Again, take inventory of what you have. You surely have some form of artificial light.
If you live somewhere with predictably blue skies, work outside. Work next to a big window if you can but not if the sunlight is too direct.
You can take quality pictures in a cave without fancy artificial light. Desk lamps or work lights with clamps or flexible necks are very handy. You might have something in your garage, office or living room you can repurpose at no cost.
If you do need to buy some lights, get ones you can use for other stuff. Gooseneck floor lamps are great because you can move them around and aim them wherever. Lamps for use in a garage are durable, powerful and designed to mount in awkward spots like under the hood of a car. They’re good too.
Now you need a light box. It’s simple to build one. You need a smooth white curving background so you’ll see nothing at all behind your product. All you need is a big piece of white poster board.
Then you need a big box. Cut the top and two sides off it and you’re in business. Cover the inside with plain white paper to reflect light. No need to be fancy because only the poster board will be in the shot.
Mine looks like this:
Images
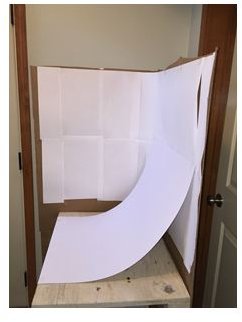
Again, I used what I had. I took an old wood TV stand I was no longer using. I stapled two sides of a box two it and lined them with sheets of 11x14. All I bought was the poster board.
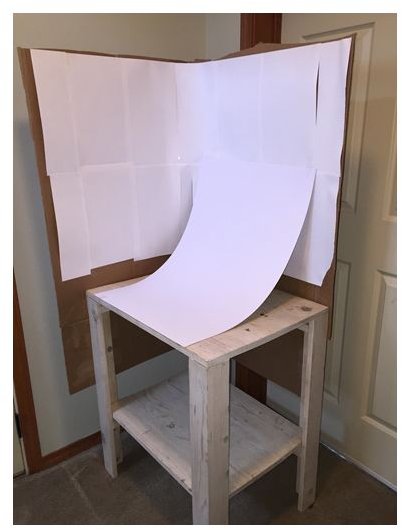
Take your light box and put it with the open side facing your window or light source. Use another lamp to fill in the shadows. Utilize the 3-Point Lighting technique used by videographers and you’re in business.
Practice
Get to know your device. Take a bunch of pictures with the same light and camera setup, but experiment with the settings. Download the photos and see what works for you.
What software do you have? You can spend a bunch of dough of Photoshop and it might be worth it when you’re a big business. However, until then the free stuff that came with your camera or phone should be plenty. Again, play around with the different settings and get to know it.
You’re not trying to be fancy, just accurate. Your job is to make your product look clear, bright and high quality. No need to manipulate the image into something it isn’t.
With a little patience, ingenuity and technique you’ll make people think your images were created by an expensive professional in a studio with top-flight equipment.
Will you tell them it was just you in the basement with your phone, some cardboard and a little tape? You can keep the secret.