Don’t like the color of an object in your video? This Adobe After Effects tutorial will teach you how to change the color of a moving object without affecting other moving objects using the Roto Brush tool.
Using the Roto Brush Tool
Adobe After Effects allows you to edit your movies, add effects and even change the color of certain objects. But, how do you change the color of a moving object without affecting other moving objects? You can use the Roto Brush tool. This tool also allows you to isolate and change the color of a single object, but it takes a lot of practice to learn this skill. This tutorial will teach you how to do this. You might also be interested in reading this Adobe After Effects tutorial to learn how to brighten a dark video.
Tracing Over the Image
The Roto Brush tool is a new tool within Adobe CS5 , which is a rotoscoping tool. Rotoscoping is the process of tracing over objects within a live action video, and changing those objects frame by frame. Once you draw over your object, you can then manipulate the color or matte of the object.
To start using this tool, press Alt + W in Windows or Option + W on a Mac, and then select the layer that you want to change in the Layers panel.
Now, find a frame where the object is most exposed by looking at your video in slow motion. You should look for a clip where the entire object is displayed if possible. If not, then just get as much of it as possible. Also, make sure that the object stands out from the rest of background images. If not, the tool may become confused by the other images.
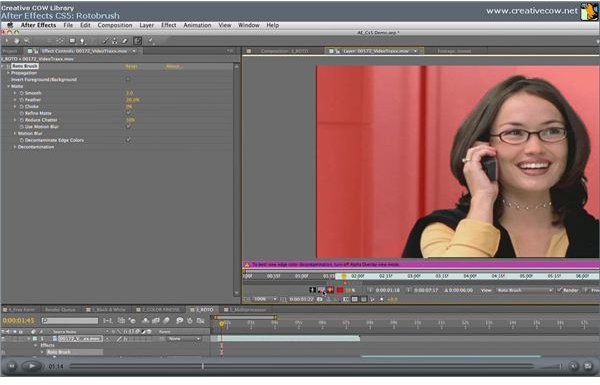
Creating Your Frame
Next, start drawing your stroke, this will create your base frame. Then, drag your mouse around the Layer panel to start creating your foreground stroke. This will convert this object into the foreground object, and your mouse pointer should look like a green circle with a plus sign.
Once you finish drawing around the object, you will see a magenta outline around your object. You are now seeing your object in the Alpha Boundary mode. You will also see the segmentation boundary, which delineates the foreground and background objects.
Create Your Background
Click on either Alt (Windows) or Option (Mac) on your keyboard while dragging the mouse around the background to start creating a background stroke with the Roto Brush tool.
This will now define this area as the background. The pointer will be red with a minus.
Continue drawing foreground and background strokes until the two segments are clearly delineated.
Move to the Next Frame
Once you’ve done this for one frame, press page down to go to the next one. After Effects will use the motion tracking tool to follow the changed object, but this usually does not fully work. So, you will have to correct the segmentation boundary in the next frame. This will help After Effects figure out exactly where the boundary should be. Do this for all the frames of your video.
Change the Matte
Now, you can change the color of the object by selecting the Refine Matte option - this option is in the Effect Controls panel. Change the properties as much as you need to. After you make your matte changes, select the Freeze button in the Layers panel. This will save the Roto Brush changes. Then, review your video to see if the changes worked.
This tool takes a lot of patience and practice to get right. So, don’t get discouraged if it takes you a few times to get it right.


