
This article will provide tips for editing video from Flip camcorders, what the video editing software does, the specific functions provided by FlipShare, and what software to use when you are ready to move beyond FlipShare. Learn some tips on editing Flip video here.
Introduction
Thirty-six percent of all camcorders sold on Amazon during the last holiday season were Flip camcorders. Why? Because Flip camcorders – particularly the HD models – produce very good quality video and audio at a very low price. Just as importantly, Flip has made the entire process of shooting video, transferring it to your computer (Windows or Mac), editing it, and sharing it online via services like YouTube and Facebook a very simple process. With that many camcorders sold, it’s a pretty good bet that many, if not most, purchasers of a Flip have never edited a video before. This article is for those people.
For a review and comparison of the Flip with other pocket camcorders, check out Finding the Best Pocket Video Camera .
Why Edit Flip Video?
Why should you edit your video? Because at best only about 10% of the video you shoot will be of interest to you, let alone to anyone else. The most important function a video editing program provides is to allow you to trim away the boring or useless parts. It does so non-destructively, which means that your original files are never changed, so if you don’t like the results, you can start over without penalty. This process of isolating and using only the most interesting parts very often makes the difference in determining whether or not anyone enjoys watching your video. You might also find that video editing is very creative and fun.
The Basics
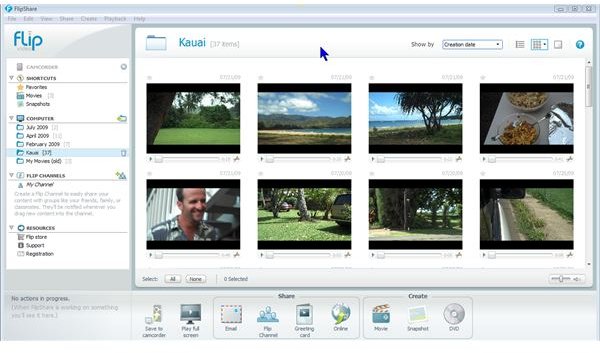
From the time you push the big red button to start filming to the time you push it again to stop, you create a file on your camcorder called a clip. When you plug your Flip into your computer, Flip’s built-in, self-installing editor pops us and allows you to transfer the clips from your camcorder to your computer. That editing program (also referred to as a video editor, or simply an editor) is called FlipShare.
If you have never used a video editor, the FlipShare software is a great place to start. FlipShare introduces you to all the fundamental concepts of video editing in a way that is easy to understand. The basic steps of editing Flip video are:
- Transfer the video from your camcorder to the computer, creating a series of clips.
- Select the clips you want to use to create a single movie.
- Trim each clip, to remove the parts that don’t contribute to your story. Sometimes you want to snip a single clip into pieces, and then trim each piece.
- Arrange the clips in the sequence you want them to appear – most often to create a storyline that makes sense to the viewer.
- Produce a new video file which incorporates all the trimming and sequencing decisions you have made. This process is called rendering, and can often be time-consuming.
Going just a little beyond the basics, there are a few other things that FlipShare allows you to do when editing Flip video, before the final render:
- You can add still images to your movie. You can use images created in FlipShare, using its “Snapshot” feature, images created with another camera, or graphic images you have created yourself with a program like Photoshop Elements . Images from an outside source need to be jpeg (.jpg) files that are imported into FlipShare, using the Import selection from the File menu.
- You can add a sound track to your movie, and decide whether it should be louder or softer than the original video sound, or replace the video sound altogether.
- You can add a title and/or credits to your movie.
You may surprise yourself at how easy all these steps are to accomplish, and how quickly you can arrive at a watchable movie that beats the heck out of all of those old home movies you have had to sit through in the past.
Beyond FlipShare
There are a number of things you can do to achieve a more professional looking result when editing Flip video:
- Shoot a lot of video so you can cut ruthlessly.
- In FlipShare, create a folder for a particular movie, and move all the clips into that folder you want to use in that movie, to visually isolate them from the others.
- Trim and sequence your clips to tell a story, or convey a mood.
The functions provided by FlipShare, and the steps I have provided here, are the most basic parts of video editing. Once you have grown familiar with the basics, you may find that you want to go beyond FlipShare’s capabilities to create better titles, to choose from a variety of different transitions between clips, and perhaps to add special effects to the video itself, such as sepia tone, black in white, or posterizing.
The next best step beyond FlipShare is to familiarize yourself with the video editor that probably came with your operating system, which is iMovie on the Mac, and Windows Movie Maker (or Windows Live Movie Maker) on Windows. Bright Hub provides a series of excellent tutorials on Windows Live Movie Maker , which is the only editor Microsoft offers for Windows 7, and this article teaches you How To Use iMovie . With the basic knowledge of what video editing is all about, you should be able to effectively build on that knowledge as you graduate to another video editor for editing Flip video.
Other articles you may like to read are:
- Converting Flip Video for Windows Movie Maker
- Here Comes Flip… again
- Creating YouTube Videos with the Flip UltraHD


