Are you tossing around some ideas for an Adobe Premiere Elements slideshow project but aren’t quite sure what to do? Well, there are dozens of ways to use a slideshow for both business and personal presentations.
The following Adobe Premiere Elements tutorial will be used to create a slideshow, showcasing an idea for a new nature television show. This tutorial can also be used for creating family, friends and other personal slideshow presentations. I’ve used this tutorial on several occasions for my own professional projects and the outcome is superb.
Making the Slide Show
1. Begin by creating a folder on the desktop and dragging all of the images you would like in the slideshow into it. Open Adobe Premiere Elements and go to import. A dialogue box will open and allow you to click on Browse. Select all of the images you would like in your slideshow from your desktop folder.
2. Once the images are selected, click on the Create tab above on the Task panel.
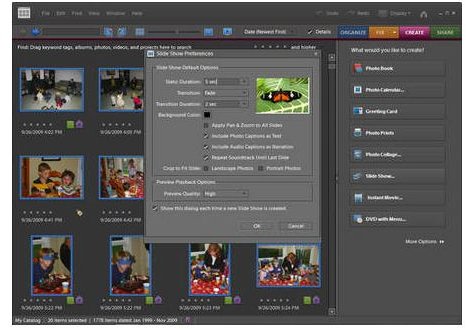
3. Choose Slideshow. The Slideshow Preference dialog box will open.
You can always change these settings, they are fully customizable.
Creating a Slideshow
4. Now you want to reorder your slides. Click Quick Reorder to quickly rearrange the individual slides in your Slideshow. Drag and drop your images in the order you would like them to appear in the final slideshow. If you would like to incorporate transition effects, such as Fade in and Fade Out, this can be done in this window as well.

Figure 1: The Slideshow Preferences dialog box.
5. On the Dialogue box click OK. This opens the Slideshow Editor window. This is where you can add images, text, and other elements. The Slideshow Editor entails the Preview Window, the Properties area where you can customize select object settings, and the Timeline. If you want to preview your Slideshow, hit the spacebar or press the Play button beneath the Preview window.
6. Point your cursor between two of the slides or images you have just dragged and dropped. These icons are the transitions. Select the triangle next to the transitions box to expand the options for Transition effects .
7. To return to the Slideshow Editor, select the Back button. Note how all the slide order and transition effects have changed and now are in Slideshow format. Proceed to click on the first slide in the Storyboard.
8. You will see the properties setting for the selected image. Select Enable Pan and Zoom.
9. The Start bounding box has a green outline. Notice that the Properties area shows the settings for the selected item. For example, you can add a Pan & Zoom animation.
.
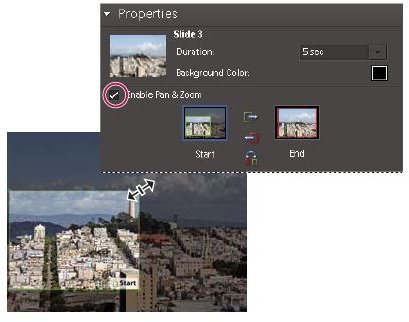
10. There will be a bounding box that has a green outline. In the preview window, resize a bounding box by dragging one of the corners. Drag the Start box to the portion of the image, where you want the pan and zoom to start. Cover the area of the image by resizing the box.
11. Select on the end of the image by clicking End in the Properties area. This box will have a red outline.
12. Repeat this procedure with each image of your slideshow.
13. It’s time to add audio. Select the Add Audio in the Slideshow command.
14. Select an audio file and click Open.
15. Make Audio track 1 visible in the Time line or use the timeline’s More button to Add a Track, then proceed to find the audio clips in the media Window. Repeat the dragging and dropping step, to place the clips in the right spot in the Timeline. You see? It’s a cinch to add audio in the Timeline.
16. Select the Play button and Preview the window to begin the Slideshow.
Congratulations, you have successfully created your first Adobe Premiere Elements slide show presentation! Adapt this tutorial to any slideshow presentation you plan to create for the web, multimedia CD or slide projection.


