Screen Recording With VideoStudio Pro X5: Tips for Producing a Great Screencast
Producing Your First Screencast?
The screen recording tool is one of my favorite features in VideoStudio Pro X5. Since the tool is brand spanking new to this version of VSP, I thought it might be a good idea to go over the basics of how to use it and give a few tips that will help you produce great screencasts with it.
Accessing the Screen Capture Tool
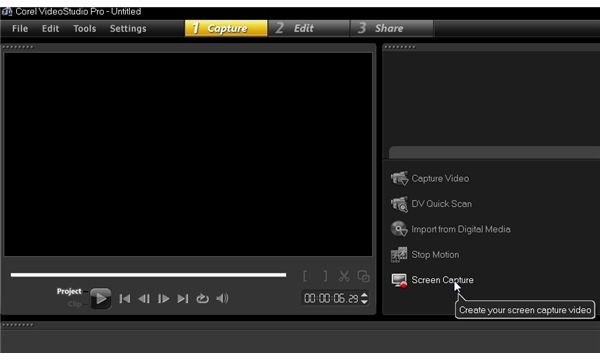
There are a couple of different ways to start a screen recording in VSP X5. If you’ve just started a new project and haven’t added anything to your timeline yet, you may want to begin on the Capture tab. Here, you just have to click on the Screen Capture option (see image to the left) to get the ball rolling.
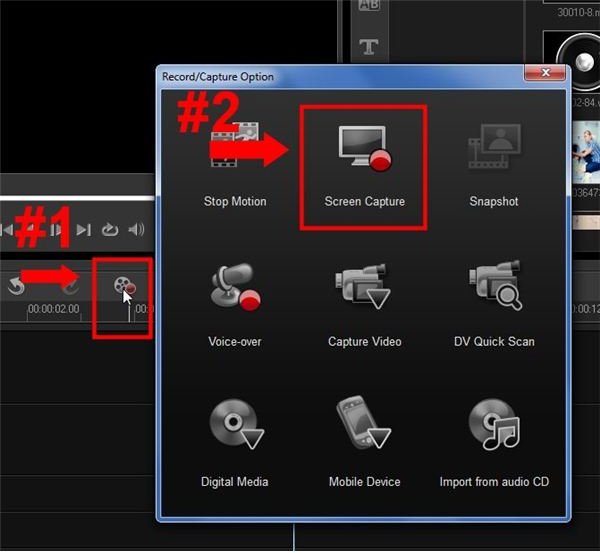
Alternatively, if you prefer to work on the Edit tab like I do, just click on the Record/Capture Option icon above the timeline and then select Screen Capture. (See screenshot to the right.)
Choosing Your Settings
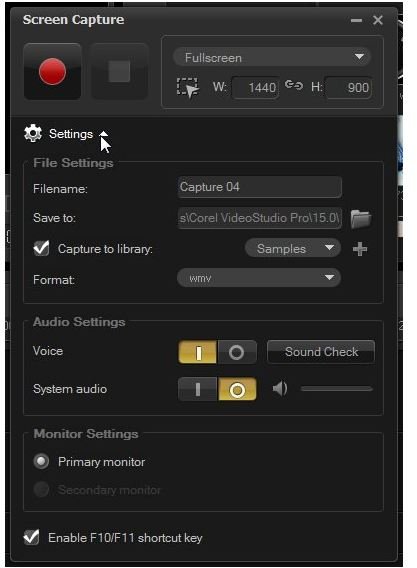
No matter how you access the tool, the next think you should see is the Screen Capture dialog box, pictured to the right. If the box isn’t completely expanded, click on the arrow next to Settings to open up more options. There are several items you can modify here:
Screen Capture Region – Although set to Fullscreen by default, you can change this setting so that you’re only recording a specific application or a certain area of your screen.
File Settings – Specify a name for the recording you’ll be creating and where you want that file to be saved on your computer.
Capture to Library – If you check the box next to this option, VideoStudio Pro will automatically import the video file to the Organizer when you’re finished recording. By default, it will be added to the Samples library, but you can change this by picking a new library from the drop-down list. I recommend creating a new library each time you start a project to help organize your files better. You can always remove libraries from the Organizer when you’re done with the project so they won’t clutter up your space.
Audio Settings – Choose whether you want to include voiceover and/or system audio as part of the recording.
Monitor Settings – If you’re using a dual monitor setup, specify which monitor you want to record.
Enable F10/F11 Shortcut Key – With this option checked, the F11 key can be used as a shortcut to start, pause or resume a recording and the F10 key will stop the capture and save the file.
Once you’re happy with all of your settings, just hit the Start button to begin your recording. After hitting the button, you’ll be shown a 3-2-1 countdown screen and then the capture will begin.
Tips for Enhancing Screencast Quality
1. Clean up your screen. I don’t mean you should break out the spray bottle and wipe down your monitor – although, in some cases, that might not be a bad idea. Instead, before you start your screen capture, make sure to close any programs you won’t need during the recording and get rid of all the icon clutter on your desktop. Not only will this make your screencast look more professional, but it will also free up resources and lessen the chance of lag or slow application responses.
Many times, you may not want to simply delete icons for shortcuts and files on your desktop because you probably put them there for a reason. If this is the case, you can create a new folder on your desktop and drag all of your icons into that folder. Then, when you’re finished with your recording, you can drag everything from the folder back to the desktop again.
2. Prepare an outline in advance. A lot of people fall back to the wing-it principle when creating screencasts and just say whatever pops out while making the recording. While there’s nothing really wrong with this – especially if you plan on redoing the voiceover after the recording – the whole production process will go a lot smoother if you take a few minutes and jot down an outline of what you want to say first. This doesn’t have to be anything fancy; a bulleted list will work just fine in most cases.
On the other hand, if you’re producing something that’s a bit more formal – like a product demonstration or a training video – it’s a good idea to create a full script in advance. This extra work up front will save you tons of time later, and prevent you from having to record the same portion of the screencast over and over because you kept leaving something out.
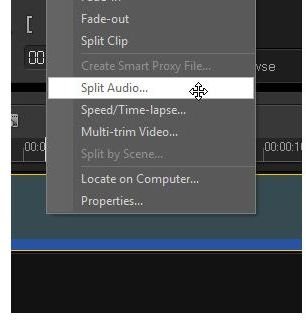
3. Learn to love the Split Audio option. After you record your footage and drag your video clip to the timeline in VSP, right click on the clip and select Split Audio. This will pull out the audio portion of the video and put it on a different track, so you can edit each piece separately.
4. Talk your way through the recording even if you plan to use a different voiceover for your final production. A lot of people make the mistake of just recording the screen movements with the intention of going back and adding voice or music later. While I do recommend fine-tuning or even completely replacing the audio before rendering your final video, it’s still a good idea to talk during the initial recording to help set the pace.
Since we tend to think and read faster than we talk, it’s very easy for the video portion to move too fast if we don’t use some method to gauge the speed. Plus, you can always split out the audio portion later and delete it.
5. Do include some type of audio component in the screencast. You don’t necessarily have to use voiceover, but at least include some type of light background music for every video. Not only will this help keep people engaged, but good audio makes it easier for viewers to overlook minor video flaws, like skips and pauses that result from splicing multiple clips together.
6. Add a short introduction or titling sequence to your screencast. Many screencasts just jump right into the recorded footage, and that can be a bit jarring to viewers. Again, this doesn’t have to be anything too fancy – a few seconds of footage is fine. You can even use one of the built-in titling effects from VideoStudio Pro on top of a plain, single-color background.
7. Don’t go crazy with transitions. Sure, transitions are cool. Plus, there are so many options for transitions and effects in VSP, it can be tempting to want to use as many as you can. The trouble is that these actions can easily overshadow the actual content of your screencast and even look gaudy at times. It’s best to only use transitions when you need to make moving from one clip to another look smoother. Even then, be consistent and use only one or two types of transition throughout the entire video instead of a different one between every two clips.
8. Add a short closing sequence. This may be even more important than adding an introduction, since the last frame of this sequence will often still appear in the viewing area even after the video is over. Like with the opening sequence, this doesn’t have to be too long and may simply be a listing of credits, information on how to contact you or the URL for your website.
9. Preview the video in full-screen mode before creating the actual video file. It’s a lot easier to catch little issues and minor problems when you’re watching a full-screen preview. Depending on the length of your video and your computer’s specs, creating the final video file can take anywhere from a few seconds up to half an hour or more. So, if you can catch and fix problems before creating the video file, you’ll save yourself a lot of time.
10. Preview the final video in Windows Media Player or some other viewer before uploading to the Web. Don’t just assume that everything went picture-perfect when the final video file was being created. Occasionally, weird things do happen and this is another opportunity to catch and fix them before pushing the video live. Even if you’re not worried about someone potentially seeing the problems, you’ll save yourself the time it takes to upload and process the video again.
In addition to these 10 tips, there are lots of others. If you have one or more that you’d like to share, please leave us a note in the Comments section below. And, happy screencasting!
References
- All information is derived from the author’s personal experience. Screenshots provided by author.