Adobe Premiere CS5 Tips for Video Editing
Adobe Premiere CS5 remains a popular software tool, and when combined with the Adobe Production Bundle, the CS5 offers one of the most powerful tools for video editing. Premiere, itself, is the non-linear editing portion of the Adobe family of software, and is a hands on product that remains an intuitive option that costs less than comparable products by the studio friendly software company AVID.
While Adobe Premiere is an easy-to-use editing product, it does have some areas where users run into some problems. These Adobe Premier CS5 tips will help lead you through a few of these troubling areas while using the Adobe Premiere software.
Separating the Audio Track from the Video Track
When beginning to edit video, you import the original clips into the software to begin working. The audio and video remain linked, and you can move, cut and edit all the clips without losing the synching of the original audio and video tracks. However, there are times that you want to separate the audio track from the video track. Examples of this are when you want to add ADR work, replace the audio clips with separately recorded audio work, or add music without wanting the original audio track to play over the scene. This is actually an easy task to accomplish in Adobe Premiere.
When the tracks are in your timeline, the software already splits them up and you can have numerous audio tracks lined up under any video track. If you want to completely remove the audio track, here are the instructions.
-
Make sure you cut the video clip where you want to remove the audio apart from the rest of the footage using the RAZOR tool, found in the TOOLS dialogue box. This makes certain that you keep all the other audio and video synched up while only removing the portion of the audio you want to remove. If you don’t do this, you un-synch all the footage and it makes it more difficult to move scenes around when editing after the fact.
-
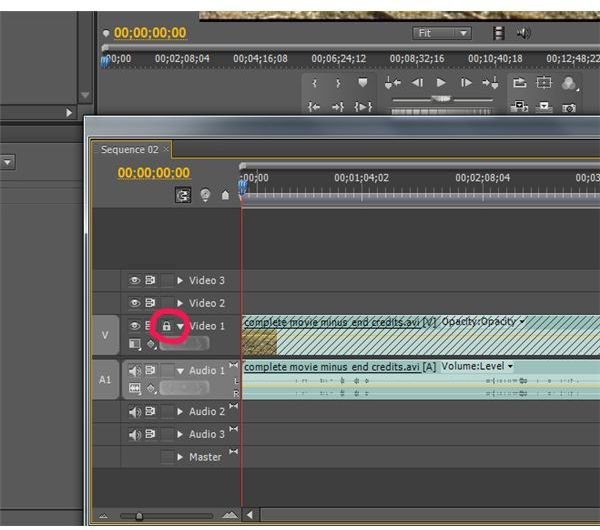
Next, you should lock the video track by clicking in the “TOGGLE TRACK LOCK” box on the timeline. This allows you to manipulate any other audio tracks without making any changes to the video track. There is a box in the timeline for “TOGGLE SYNCH LOCK” but that only lets you move your timeline tracks individually but you can’t remove any individual portion using this method without also removing both tracks.
-
With the lock enabled, you can use the RAZOR to cut your audio track without it affecting your video track. You can then manipulate the audio track, either by deleting portions or moving portions while adding new audio in its place without ever-changing the video track it is associated with.
-
When you are finished, and all the new audio is added, you can unlock the video track and move on to work on other areas of the timeline. Make sure to be careful if going back to the separated footage because you need to select the altered audio and video tracks in the section you already worked with if you need to move them together.
Exporting Still Shots
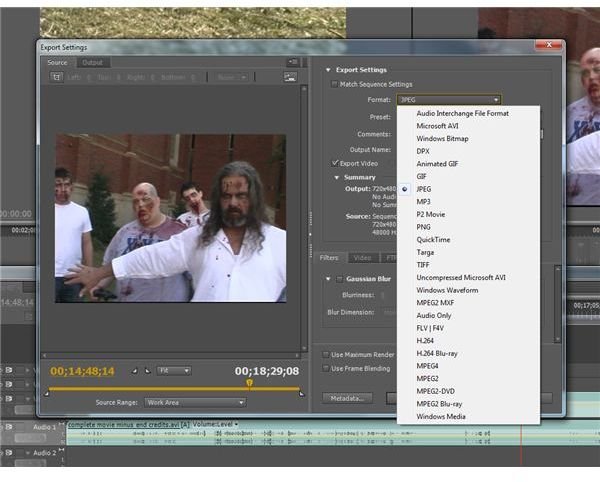
Many video editors need to export stills from their production for their product reel, promo art work, movie posters and more. The first thing you need to figure out is what format you want to export your still shot as. Adobe Premiere CS5 offers the option of exporting stills with some of the more popular options, such as a JPG, GIF, PNG or TIFF.
To accomplish this, find the still image you want to save. Next, go to File > Export > Media. This is the same method to export a project into a video format. While in this dialogue box, choose the format you want to export the still photograph into under the FORMAT pull-down menu. Beside OUTPUT NAME, click on the name of the file and you have the opportunity to specify where you want the still photo to save to your hard drive as well as what you want to name it. When you have all the information entered, click EXPORT and the still shot will save to your computer.
Batch Capturing
When batch capturing in Adobe Premiere, you log the in and out point of a group of clips, and allow the program to automatically transfer them all to the computer. This is done for a number of reasons - the most important ones include saving time by not capturing everything you shot on the tape, and saving hard drive space by not including shots you will never use. The first thing you need to do is find all the clips you want to keep, the best shots that you will use in your project.
One of the important things to remember is that you need to be able to quickly scan your clips and know which are which. This makes naming them important. After you figure this out, here is how to use batch capture with Adobe Premiere CS5.
-
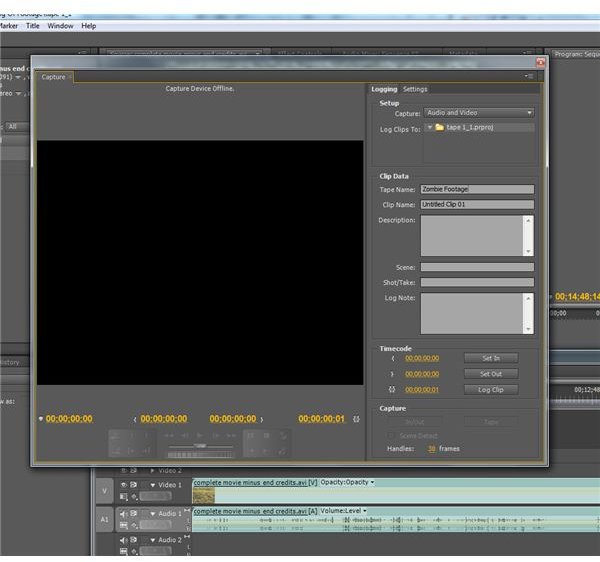
In the Capture panel, make sure you are under the Logging tab.
-
Change the Handles setting to 30 frames to ensure there is a second before and after each clip for editing ease when it comes to transitions.
-
Name the tape, to make finding clips easier.
-
Rewind the tape to the beginning and start playing it. When you find a clip you want to keep, rewind to the start of the clip and click the SET IN button in the capture window. When the clips ends, click the SET OUT button. You can then click the LOG CLIP dialogue box and give this clip a unique name to help find it when editing. You can also add notes here.
-
Find the next clip on the tape you want to use and repeat Step 4 for it. Do this until the tape is completed.
-
When you are done, close the Capture box. All the clips will appear in the Projects panel now, with OFFLINE next to them. Select all the ones you want to capture. Click File > Batch Capture. In this new dialogue box, there are a few options. Ignore them and just click OK and Adobe Premiere opens and captures all the clips you chose to your computer.
Adobe Premiere CS5 remains one of the most powerful and affordable non-linear editing tools on the market. Luckily, it is also one of the most intuitive to learn and master. There are still some areas that give users various problems but once you master those tricky steps, Premiere delivers everything you could want from your editing software and more.
Do you have Adove Premiere CS5 tips we forgot to cover? If so, be sure to visit the comments seciton below.
References
- Box art from Amazon.com
- Adobe Premiere Pro CS5: Classroom in a Book (2011)
- Images of software used are from screen captures.