Here is an easy tutorial on how to set a basic mask in Adobe After Effects.
Visual Effects
After Effects is Adobe’s tool to do the visual effects, image control, compositing, and other post-production features that can’t be handled by other programs on their own. With After Effects, you use a system of layers to work out different effects, generating and altering footage that will work in your project. Masks are some of the central functions of Adobe After Effects and they essentially allow for certain objects to go in the front or back of other objects while staying in the same visual space. It is a relatively simple concept, and learning how to create a mask in After Effects is also not too difficult. Here is an easy tutorial on how to create a mask in After Effects in a basic way.
Still Mask
The principles of how to create a mask in After Effects is really based on its layer system, and similar on how to do effects in Adobe Photoshop . First, what you have to do is to take one layer and make a duplicate of it. You can do this by hitting Control and D on your keyboard, and then make sure the layers are right on top of one another for now.
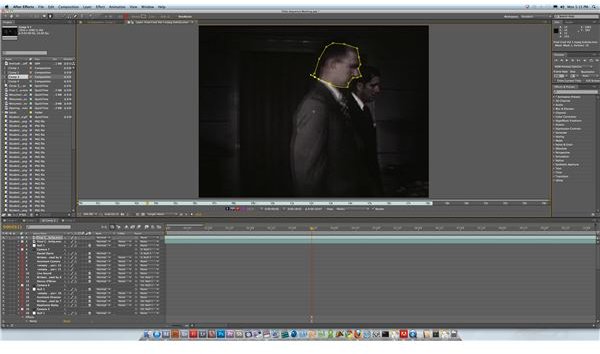
In the top layer go to the Pen tool in the upper tool task bar. Go down to the image and find the area you want to mask out and begin to make a line around it with the Pen tool, making sure that each segment of the line links to the next one and that it is a complete shape at the end. Once you have a closed pen built object you will be essentially telling After Effects that this is the single area of that layer to be shown, and the area of the space that you are still seeing is from the bottom layer that is either the original or the duplicate. Here you have created a still mask.
Moving Mask
Since you will want the mask to move with your video in After Effects , you are going to have to make it do so in the same way that you deal with
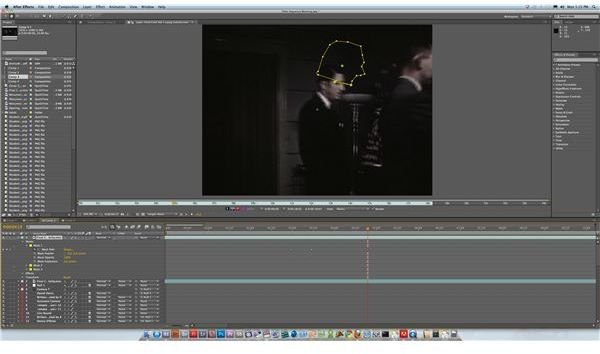
other types of movement or progression: with keyframes. Go to the layer that you created the mask in the Timeline and go over to its sub options. Select Masks, and then choose your mask from the list. In Mask Path you will hit the stop watch to begin setting keyframes on each frame as it moves, that way you can readjust the mask on these keyframes so that it continues to mask out the object that you want. From here you can then adjust the movement of objects on other layers so that they interact with the After Effects mask that you set in a way that you intended.
References
Source: Author’s own experience.
This post is part of the series: Adobe After Effects Tutorials
Here are tutorials with common tools in Adobe After Effects.


