Ever wanted to create something cute, but lack of ideas or artistic ability held you back? Sure, we’ve all been there! But what if I told you that I could show you how to make a cute cartoon that’s sure to win over friends and family? My Photoshop kitsch owl tutorial is just what you need.
Now, I’m the first person to admit that I’m not a huge fan of the retro kitschy artwork found in houses of the 50s-70s. However, I do think that some of it can be rather charming, especially when it is applied to a quick cartoon for a greeting card or invitation. If you’re looking to learn how to create something simple and cute, this Photoshop kitsch owl tutorial is just thing thing for you.
I’ll walk you through the basics of creating an adorable retro-style owl sleeping in a tree. This tutorial assumes that you’re fairly comfortable with Adobe Photoshop and its basic and intermediate features. If you’re not, the learning curve might be a little steep, but there are a few tutorials that can help you be a little better prepared.
Photoshop Basics: The Pen Tool
Photoshop Basics: Changing the Colors of Objects
Photoshop Basics: Layers
Creating the Tree
First, we’re going to create the top, leafy part of the tree. Using your ellipse tool set on Paths only, create a large oval like so.

Now, using your pen tool, alter the paths enough to make an interesting tree shape. It can really be as round or oval as you want, and it can be a bit asymmetrical, but remember, kitsch is relatively simple, so don’t go too crazy.

Fill your path with whatever color you want. Keep in mind that kitschy artwork is generally muted colors in mustard browns, mint greens, brick reds, terracotta orange, and olive drabs. This doesn’t mean that you have to stick to these colors, but it does reflect the time period relatively well. Delete the path after you’re done.

Now, we’ll create the trunk. The easiest way to do this is to first create a triangle with the pen tool that starts well below your tree, but then extends about 3/4ths of the way up into it.

After you get it positioned to where you would like it, use the pen tool to round the top and widen it a bit like the example below.

Fill the path as you did before with a color of your choosing.

Now, create some branches from the trunk that extend into the tree. You can use the same method you did to create the tree trunk. Feel free to add any embellishments to your tree that you like. These can be leaves or knotholes or bark textures. Just remember to keep it simple!

Creating the Owl
Now, create a new layer (to make things easier) for your owl. Using the pen tool, draw a squarish-oval like in the example below.

Fill the path with whatever color you would like your owl to be. I’ll go with a blue-grey so he’ll stand out against the oranges and browns of the tree, but feel free to get creative.

Create two triangles with the pen tool on the top of the oval for the owl’s horn feathers. Fill them in with the same color as before.

Give your owl two wings on either side of his body that are a darker color than the base color of his body.

Now take a color lighter than the body color, and make two circles for the circles around the owls eyes. I prefer to make them a little asymmetrical, as it keeps it truly kitsch!

Using the pen tool, make two shallow U’s for his sleepy eyes, and fill them in using the same color you used for his wings.

Now you can feel free to add little feathers down his belly with the pen tool. I like to use the same light color I used for the outside of his eyes, making shallow (and small) U’s.
Lastly, give him a little beak by creating a triangle that is the same color as the wings and eyes.

Last Minute Touch Ups and Embellishments
Now that your owl is sitting nice and cozy in his little autumn tree, feel free to add last minute touch ups (such as changing the colors if you’re not fully satisfied) and embellishments like backgrounds and shadows. Keep in mind that this is kitschy, so the simpler the better! Here’s my finished product:
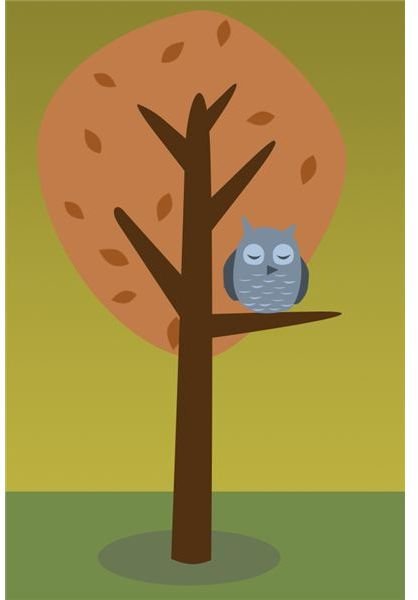
Image Credits
All images were created by Amber Neely and are intended for educational purposes only.


