If you’ve ever wanted to learn how to change brush settings in Photoshop, look no further. This guide will explore the basic brush settings in Photoshop as well as how to create a simple, yet effective scatter brush that can be used for creating snowflakes, confetti, or even fall leaves.
How to Change Brush Settings in Photoshop - Understanding the Basics
Have you ever tried to explore the the brush settings panel (found by pressing F5) in Photoshop only to be confused? Don’t worry, a lot of people are! This article will define the most common brush settings that the average home desktop publisher would use, as well as how to change the brush settings in Photoshop to create a quick and simple scatter/confetti brush.
This tutorial uses Photoshop CS4 , but should work perfectly fine for anyone using Photoshop 7.0 and up. It’s also incredibly useful if you have learned how to create your own brushes, so here’s an article on how to create your own heart brush in Photoshop.
Brush Tip Shape
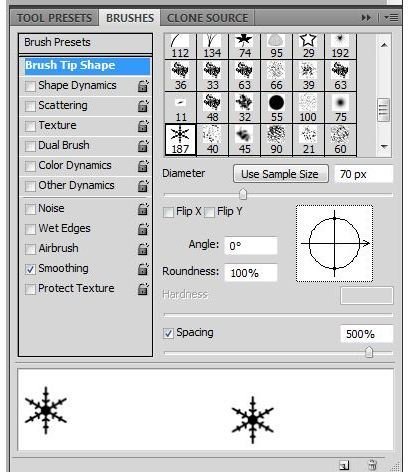
Diameter: This defines the size of your brush. The sizes are as small as 1 pixel, all the way up to 2500 pixels.
Angle: This allows you to change the angle of your brush - particularly useful for achieving a calligraphy style stroke.
Roundness: This allows you to flatten a brush to suit your needs - when mixed with a custom angle setting, you can achieve great calligraphy-style brushes.
Hardness: This defines how “soft” or “hard” the edges of a brush are - particularly the default round brushes. Hard brushes are good for blocky chunks of color, soft brushes are good for achieving a soft painted look.
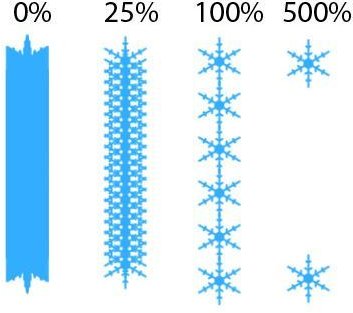
Spacing: Each brush is actually a single image that is repeated several times, and the spacing setting is the one that tells Photoshop how often to repeat the image. The default is 25% - but the scale goes from 0% to 1000%. Here’s a quick example of different settings of the spacing tool with various spacing settings:
Shape Dynamics
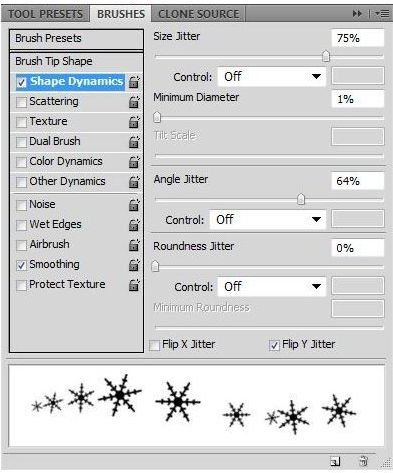
Size Jitter: This allows Photoshop to vary the sizes of the brush - like all of the control settings, if you leave this to “off” it will be a random effect. If you have a pressure-sensitive graphics tablet such as a Wacom tablet, feel free to experiment with the pen-related settings!
Minimum Diameter: This sets how small you want your brush to get when coupled with the size jitter.
Tilt Scale: This is only applicable if you’re using a graphics tablet combination that enables tilt sensitivity. This will change the size of your brush depending on the angle you tilt your pen.
Angle Jitter: This will change the angle of your brush. This is a great effect for random-scatter (or “confetti” style brushes.
Roundness Jitter: This will change how round your brushes are, based either on a random effect or on the tilt or pressure of your graphics tablet pen.
Minimum Roundness: This will set how round you want your brush to be, which is useful if you’re trying to add a little depth perception without making the brushes look overly flat and strange.
Scattering

Scatter: This tells Photoshop how far it can scatter your brushes from where you draw your line. The higher you increase this number, the more scattered it will appear. Checking “both axes” will enable Photoshop to scatter on both the Y and X axis.
Count: This tells Photoshop how many brushes can be in a certain area. Increasing this number increases the amount of brushes that will be included in the area.
Count Jitter: This enables Photoshop to either add a random amount of jittering to your count, or allows you to change it based on your graphics tablet’s settings.
Other Dynamics
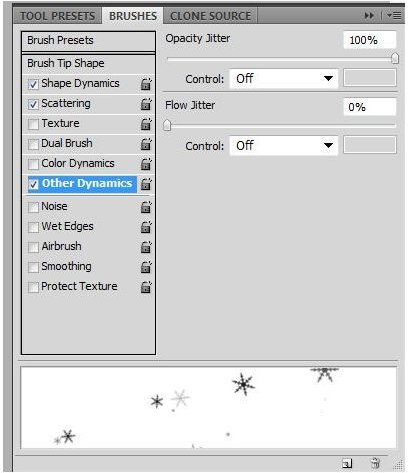
Opacity Jitter: This defines how transparent or opaque your brush will be depending on either a random photoshop setting, or on the settings of your graphics tablet.
Flow Jitter: This defines the rate and density of your brush - similar to the spacing effect mentioned before. A low flow has more spacing, a high flow has much less.
Scatter Brush Application
Using these following settings we’ll create a quick Snowflake brush! I changed only the following settings from the defaults to get the effect in the image below.
Brush Tip Shape:
Diameter: 30px
Spacing: 150%
Shape dynamics:
Size Jitter: 97%
Angle Jitter: 75%
Scattering:
Scatter: 1000%
Other Dynamics:
Opacity Jitter: 100%