Have you ever wished there was an easy way to align elements in Photoshop? Turns out there is! By creating a Photoshop grid, you will have lines that can quickly help you make sense of both simple and complex projects. This article will walk you through the process.
Why Use a Photoshop Grid?
Sometimes when you create a project in Photoshop , that big white canvas can be pretty disorienting. Is that bit of text aligned where you need it? What about that one element, is it spaced evenly from your other? How can you tell? Sure, you can try to use the ruler tool, but that only works so well. So what are you going to do?
Fortunately, there’s a nifty tool built right in, but you might not know about it. The tool? The Photoshop grid! This grid allows you to effortlessly align things up and space them evenly, allowing for a better-looking end project in much less time.
To set up your Photoshop grid, you need to make sure you have your Photoshop document open. Once again, I’ll be using the sunny day graphic I created before!

Now, navigate to Guides, Grid & Slices by going to Edit in your top menu, scrolling down to Properties and accessing the panel. This is the location of your Grid setup.
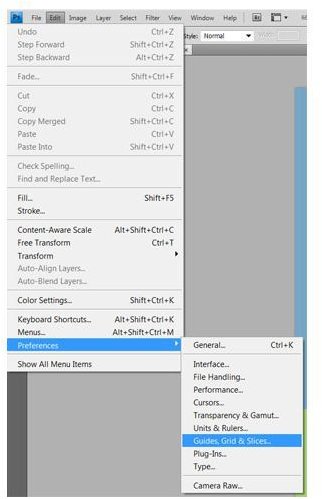
Now that you’ve found where to set up the grid, lets begin, shall we? Looking at the options here, we see a bunch of different settings we can mess with. Right now all we need to be concerned about is the grid section, so feel free to ignore guides and slices right now.
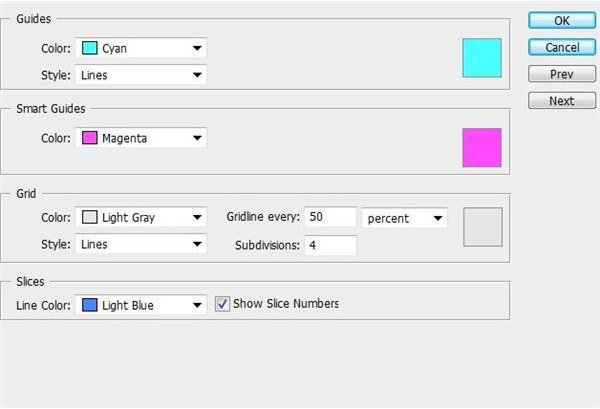
For most projects, two large grid lines and a subdivision of four minor gridlines between works pretty well. What you might need is a little different. For now, just enter these settings:
Style: Lines
Gridline every: 50 percent
Subdivisons: 4

For the color, feel free to change it to whatever you would like. Keeping it high-contrast to the background of your document is recommended. By default, it is set on light gray, but I don’t think that’s going to cut it for me, so I’m going to set it to black. Click OK when you have selected the color you want.

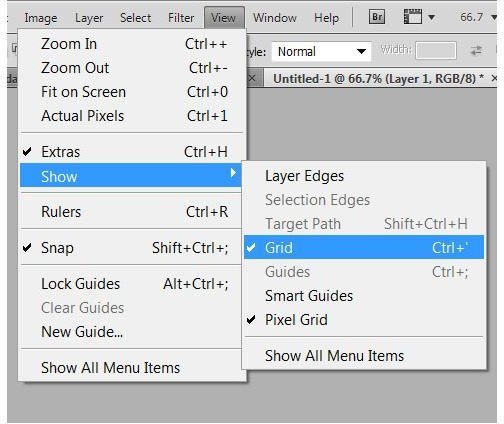
By default, the grids are off, so now we’re going to have to turn them on. This is the super easy part! Navigate to the top menu and click on View. Scroll down to Show and make sure Grid is checked - or if you’re a shortcut junky like I am, just press CTRL+` (Mac users: Press CMD+`)
Now you should have a grid similar to this laid out over your picture:

To use it, simply use the Move Tool to move objects around and align them to the grid spaces you would like. Each grid is evenly spaced, which will help you align your objects, text, and elements much easier than without them. You may notice that your elements seem to “snap” to the grid, which is another very useful function. Here is an example of a well balanced picture using the Gridlines:
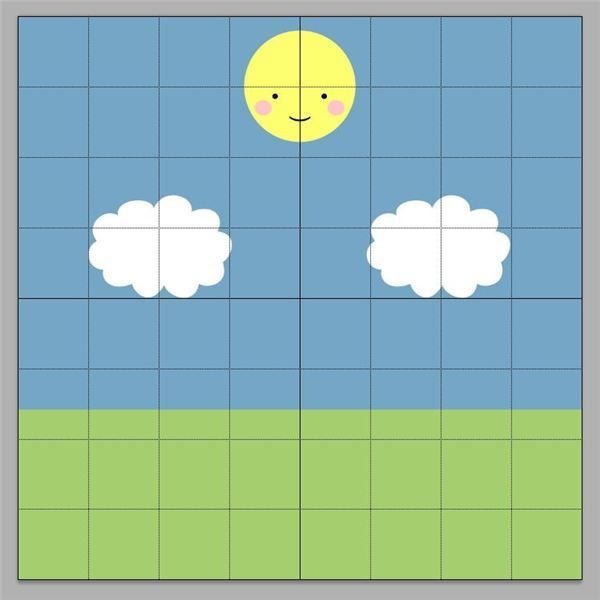
Image Credits
All screenshots and graphics were taken by Amber Neely and are for educational purposes only.


