While something like moving objects in Photoshop might seem incredibly easy, you might be surprised to know that there are a few little tips and tricks to using the Photoshop Move Tool. This article will help you move things more effectively.
Yes, This Really is a Tutorial on the Move Tool!
Okay, so this is a super basic Photoshop tutorial. Chances are, you’ve already learned how to move objects around the screen with the Photoshop move tool . It’s not rocket science, right? Well, while clicking and dragging is an important feature, you can do quite a bit more with this little tool than that. In this article, you’ll learn some tips and tricks that you can use to help you move things more accurately, effectively, and efficiently.
Location, Function, Modifiers
The move tool is located in the toolbar on the side of your screen and looks like a small black arrow with a cross-hair next to it. It’s used to move things from place to place around the canvas, and is generally a pretty useful tool. After all, isn’t it pretty awesome when you can move text around your design to see where it provides the most impact? Of course it is!
The move tool, like most other tools in Photoshop, can even change functions by adding modifier keys. And what are the modifier keys? ALT and SHIFT!* Here, we’ll be working with a quick example I made of a sunny day picture:

*It should be noted that CTRL (CMD for Mac users) is also a modifier key for a lot of tools, but it does not affect Photoshop’s move tool.
SHIFT Modifier
Pressing SHIFT while using the move tool will allow you to do one of two things. While dragging on your screen with your mouse and holding shift, you can pull the layer or selected object 45 degrees in any direction.
Here’s an example:

As you can see, you can drag your images along 45 degree angles pretty much anywhere you need to. This can help move things more accurately and create a neat and orderly look to whatever you’re doing.
Pressing SHIFT while hitting any of the four directional arrow keys on your keyboard, however, does something different. Every time you press an arrow key, say the right arrow key for this example, it will move your selection (or layer) 10 pixels to the right. In this example, you can see that the moon is peeking out just a little bit behind the sun.

ALT Modifier
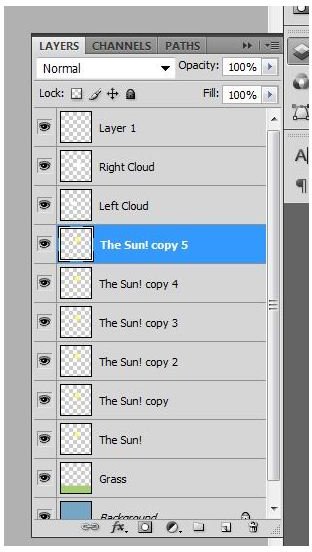
Pressing ALT while clicking and dragging your selected layer allows you to copy it to a new layer while leaving your original layer in the same position. Here’s an example of copying the sun to the left:

As you can see, the original layer is still in its position, while there is a duplicate sun to the left.
Pressing ALT while pressing any of the four directional arrows – Up, Down, Left, or Right – will simply copy the layer or object selected onto a new layer. This is absolutely wonderful for quickly duplicating layers on the fly.