If you’re tired of racking your brain for a creative pattern for a graphics design project, or if you just want to learn a new trick in Photoshop, look no further! This quick tutorial will teach you how to make a swirl patterns in Photoshop in just a few minutes.
Photoshop Swirls
Adobe Photoshop has set the bar for graphics design for years, allowing people to create wonderful images and patterns in addition to editing and improving photographs and existing images. In this tutorial, you’ll learn how to make swirl patterns in Photoshop. After creating this pattern, you can use it as a background for websites, blogs, and social network pages, or maybe you’ll just want to use it as a banner background on your website. This little trick has lots of potential creative ideas!
Note About Photoshop CS4 vs. Other Versions
I’m using Adobe Photoshop CS4 for this tutorial, but it should work perfectly fine for any version from Photoshop 7 and upwards. All the filters have remained very similar, so you should not have any problems following along.
Getting Started
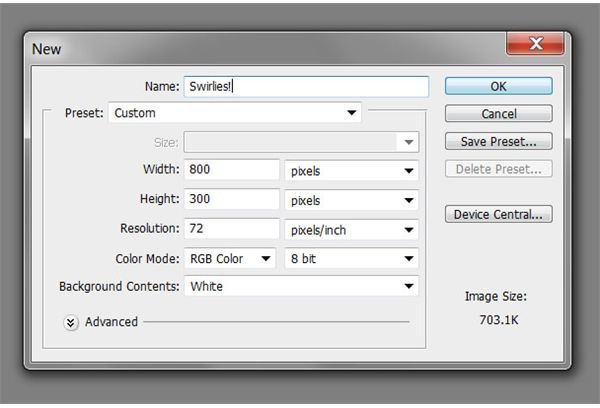
Open up Photoshop and create a new document. Here we’ll be using an 800px by 300px document with default photoshop settings. Make sure to leave it set on RBG 8-bit. (Click any image for a larger view.)
Finding the Gradient Tool
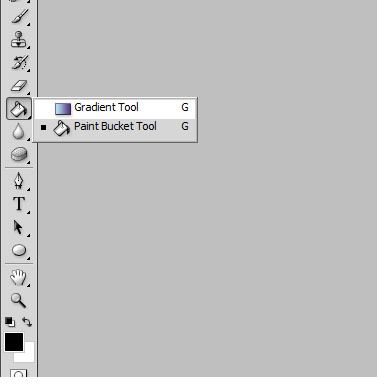
Now click on your gradient tool (the keyboard shortcut is G). The gradient tool might be hidden under your paint bucket tool in your toolbar, so just click and hold until the fly out gives you the option of selecting the gradient tool.
Setting up Your Gradients Colors
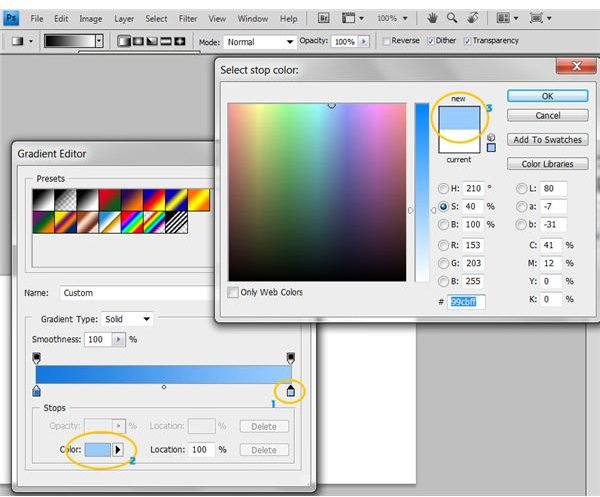
At the top of the screen, double click the gradient shown above, and set it to two colors you like. This effect works very well if you use two similar colors, such as two different shades of blue like we’re using here. To set your colors, simply click on the lower boxes on the gradient bar. This will bring up another box at the bottom showing the color on that half of the gradient. Click this box and choose your color in the color picker that pops up.
Creating Your Gradient

While you have your gradient tool selected, draw a gradient on the screen as I have done, starting at the very top of the image and going to the very bottom. To make your gradient perfectly straight, hold down shift as you click and drag your line. If your gradient has the light at the bottom and the dark at the top, simply press CTRL+Z (Mac users: CMD+Z) and draw your line in the opposite direction, such as bottom to top.
Using the Wave Filter
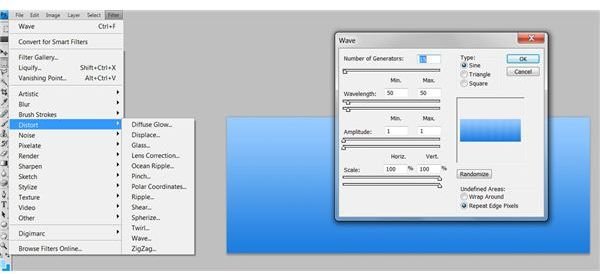
Here’s the fun part! In your menu bar, go to the Filter section, and then into the sub-menu where it says Distort. In the Distort menu, click on Wave. In the box that appears, enter these settings:
Type: Sine
Number of Generators: 15
Wavelength Min: 50
Wavelength Max: 50
Amplitude Min: 1
Amplitude Max: 1
Scale Horiz: 100%
Scale Vert: 100%
Undefined Areas: Repeat Edge Pixels
And then click OK.
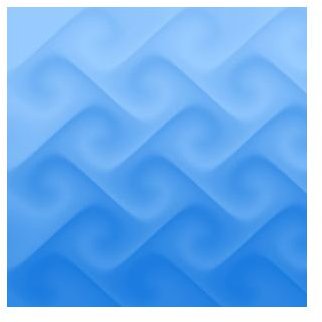
Creating Wave Definition
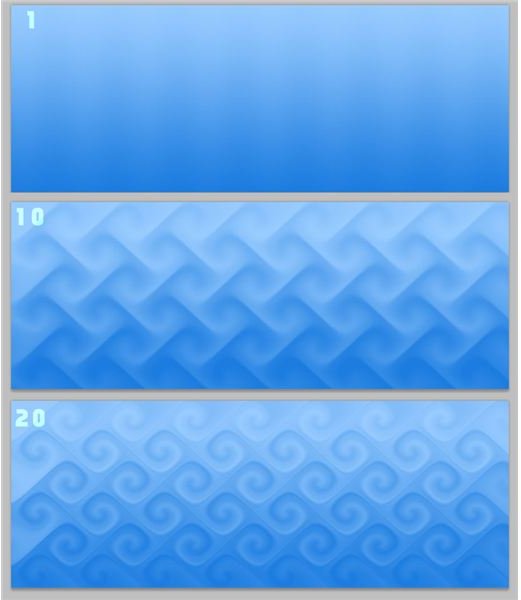
Now, it doesn’t look like much has happened. However, if you press CTRL + F (Mac users press Apple + F) repeatedly, you can achieve either a subtle or a very defined swirl. Here I’ve show you what it looks like after once, followed by repeating the process ten times, and then the wave definition after the process is repeated twenty times. Feel free to use this tutorial as a jumping off point, and then get creative as you would like!


