Microsoft Publisher is a great tool to create posters for personal or professional events. Learn how to make a poster in Microsoft Publisher, including adding text, graphics and backgrounds.
Getting Started
There are two ways to begin your poster project in Microsoft Publisher. The first is to use templates provided in Publisher in the Flyers section. You can edit the poster template to customize it, but templates are a great way for beginners to start a new poster. The second method is to start with a blank publication. To make a poster in Microsoft Publisher using a blank publication, you must add each individual element, such as text and image blocks.
Template
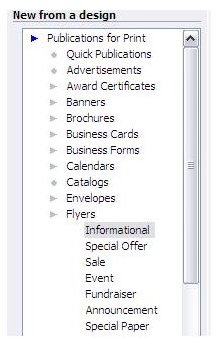
Start Microsoft Publisher, which is located in the Microsoft Office application suite. To start with a template, select Publications for Print and choose Flyers. Select a type of flyer from the list, which includes Informational, Special Offer, Sale, Event, Fundraiser, Announcement and Special Paper. Select the template you wish to use to continue. Once you select a flyer template, you will be asked what personal information to include. If you want to include personal information, fill out the provided form. If not, press Cancel.
Blank
To start your Microsoft Publisher poster from scratch, start Microsoft Publisher, choose Blank Publications and select Poster. You will be presented with a blank rectangle as your starting point.
Adding Text and Graphics
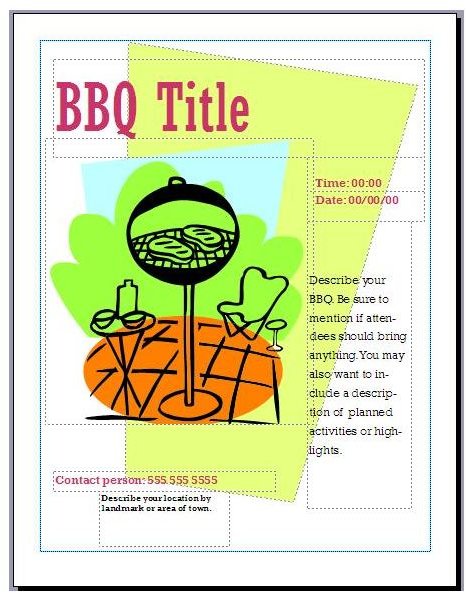
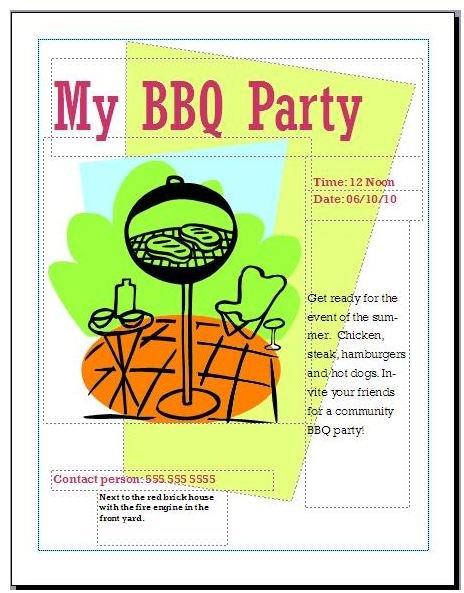
Double-click any outlined block to change the image or text in the block. For instance, in the BBQ Flyer template, double-click BBQ Title to change the text in that block. All blocks are outlined in dotted lines. Highlight any text you want to change and type in new text. Use the formatting toolbar to change the font type, color and size.
Add or change graphics in a Microsoft Publisher poster by double-clicking the existing images. Type a keyword in the clip art search box on the left side of the screen and select a new clip art image. If you want to add a custom image, see the steps in the next paragraph, which talks about adding graphics to a poster created from a blank template.
When you create a blank poster in Microsoft Publisher, options appear on the left side of the screen, including color schemes, font schemes and a list of objects you can add to your poster. To add a new text or graphics block , click the appropriate button on the objects toolbar and draw a small rectangle or square on your poster. You can resize or move the block as needed. If you are adding graphics, choose the type of graphic you want to add, such as clip art or a file from your computer. Double click the clip art image to add it.
Backgrounds and Borders
To customize your Microsoft Publisher poster further, add backgrounds and borders. Graphics and images can be used as a background. When you insert a graphic image, resize it to fit the entire poster. If you want a solid color background, draw a rectangle on your poster and use the formatting toolbar to select a fill color. Right-click the shape and choose Format AutoShape to view a list of options to change the transparency, shading or to add multiple colors.
Though there is not set menu or option for adding borders, you can select borders from the clip art section when you choose to add an image. Type Border or Borders as your keyword search term. Click on the border images you choose and turn or stretch them to fit he sides of your poster. You can also add border art. You must add a background image first, such as a blank rectangle or other auto shape. Right-click the image and choose Format AutoShape. Under the Colors and Lines tab, select Border Art and choose a border style. You can choose the size of the border and on which sides the border is displayed.

Further Considerations
Any time you want to edit an object block, single click it the block itself to move it, resize it or delete it. In addition to editing blocks, use the formatting toolbar to completely customize the text in your text blocks. You can also use Word Art, which is on the object toolbar, to create custom text shapes and colors for a more artsy feel to your poster. If you have objects that overlap each other, you can change the layering on your poster. Right-click any object and choose Order to change which layer is in front or back.


