With DrawPlus, you can take any object from a photograph and create a silhouette. In this tutorial, we’ll show how to cut out a tree from a photo, turn it into a silhouette, and then export the results as an SVG file so that it can be used in other software applications.
“Drawing” with DrawPlus X4
One of the great things about DrawPlus X4 is that you can use the application’s wide array of tools to design creative and original artwork even if you aren’t blessed with an abundance of drawing skills. As a testament to that fact, this tutorial will explain how to create a silhouette of a tree by cutting that tree out of an existing photograph and then performing an automatic black-and-white trace. When done, we’ll export the result as an SVG (Scalable Vector Graphics) file so that it can be used with other applications that support vector graphics for your desktop publishing projects.
Steps for Creating a Silhouette
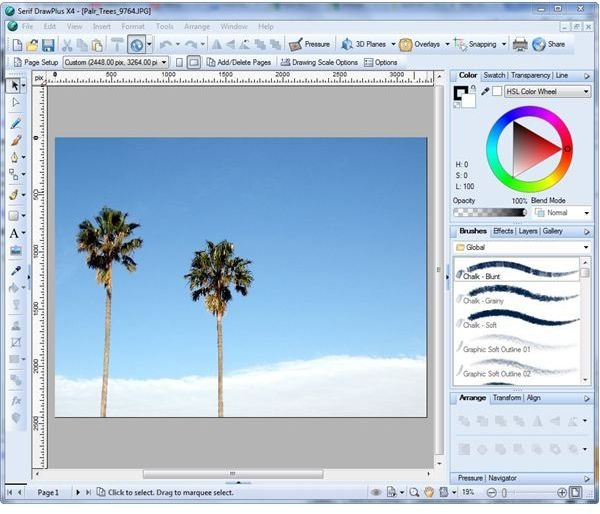
Step 1: Start out by opening the photograph that contains the object that you want to transform into a silhouette. For our example, we’ll use a photo that contains a tree against a fairly simple “blue sky” background.
Click any image for a larger view.
Photo Credit: morgueFile/alvimann
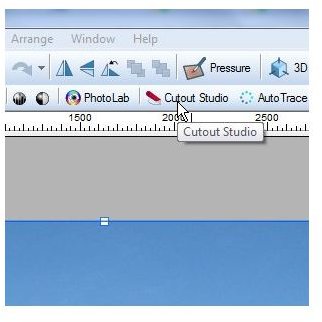
Step 2: The first thing we want to do is to get rid of everything in the photo except one tree. To do this, make sure the photograph is selected (if it isn’t, just click once anywhere on the photo) and click the Cutout Studio button as shown in the screenshot below.
A few seconds may pass while DrawPlus analyzes the image. When the processing is complete, a new window will open for the Cutout Studio.
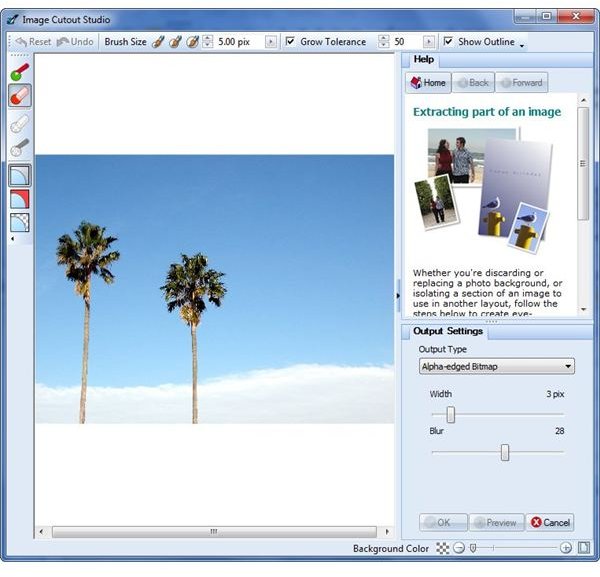
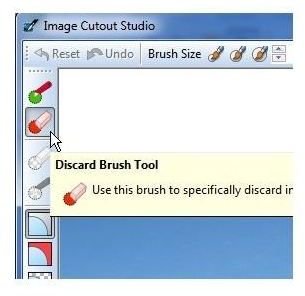
Step 3: Select the Discard Brush Tool as shown to the right.
You may also want to adjust the brush size and tolerance, depending on the size of your photograph and the complexity of the image background.
Begin painting the background with the Discard Brush Tool. The tool recognizes edges and color changes, so it will automatically grow to select the entire background as you paint around the object that you want to keep – which, in this case, is the tree. Be careful that no portion of the object you want to keep is included in the Discard Brush’s selection. If it is, you may want to start over and use a smaller brush size and/or a smaller tolerance.

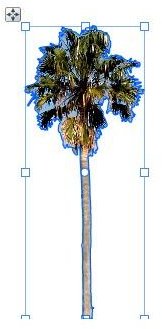
When done, only the object you want to keep (the tree) should be selected – like in the image to the left.
If you were going to use this object as a color cutout, you would probably want to do some more detailed work to get rid of the bits of sky showing between the leaves of the trees. However, since our goal is to create a silhouette from the tree, we won’t worry about that too much. All we need is to get the basic outline of the tree, so the cutout process should only take a few seconds.
At any time, you can click the Preview button to see the results of your cutout up to that point. When satisfied, click the OK button to continue.
After clicking OK, you’ll be returned to the main DrawPlus window and the only part of the photo that will remain is the tree, as shown below.
Step 4: Now, we want to create the silhouette. To do that, we’ll use the AutoTrace tool in DrawPlus. With the tree still selected, click on the down arrow next to AutoTrace and select B/W Image Trace.
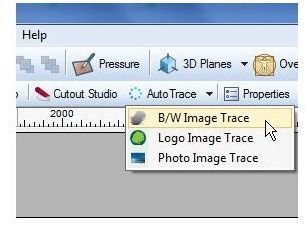
This will open the AutoTrace Studio in a new window.
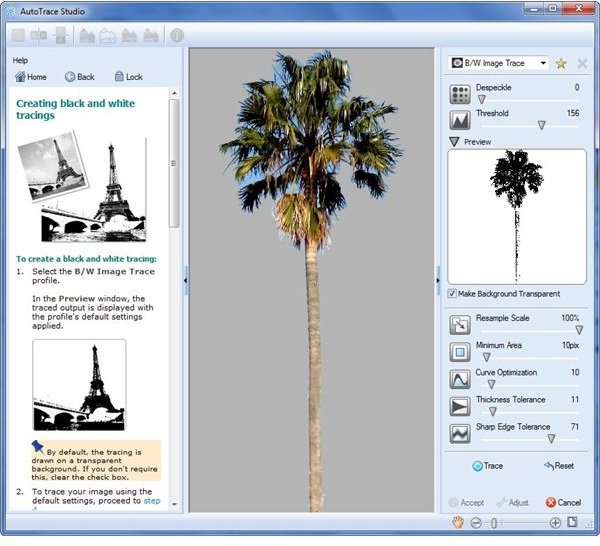
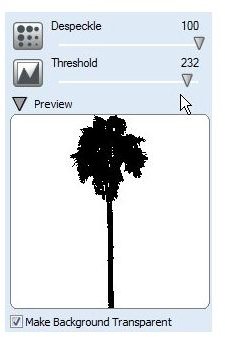
Step 5: A preview of what the tracing will look like appears in a small window in the right panel. Use any of the tools in the right panel to adjust the image and you’ll be able to see a live preview of how that adjustment will appear. In this example, we’ll modify both the Despeckle and Threshold to give the silhouette a much darker appearance. Specifically, we’ll change the Despeckle to 100 and the Threshold to 232.
When done, click the Trace button. If you don’t like the results of the Trace, you can make adjustments to it. However, if you’re happy with the result, you can click Accept and be returned to the main window of DrawPlus with the changes applied.
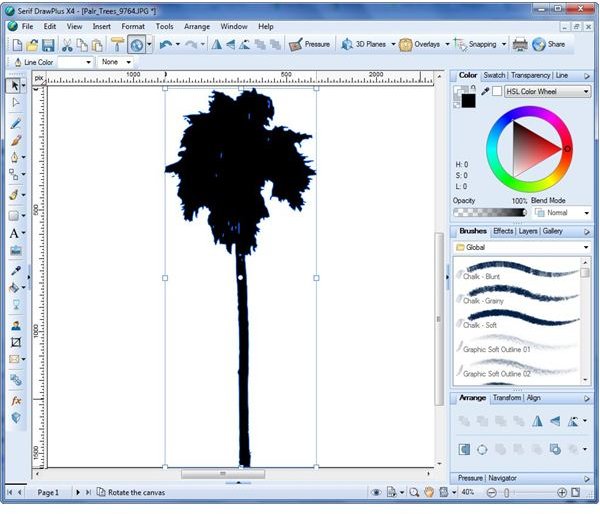
At this point, the silhouette is done! You can save it in any format you like for use with other projects. Since SVG is a common vector file format that is recognized by almost all applications that support vector graphics, we’ll show how to export this drawing to an SVG file in the next section.
Exporting to an SVG File in DrawPlus
Another nice capability of DrawPlus X4 is the ability to export a file to SVG format so that it can be used in other programs for either desktop publishing or web design purposes.
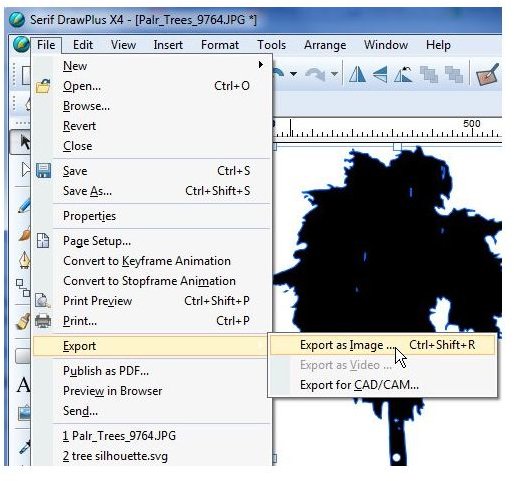
Step 1: To begin, from the File menu on the main toolbar, select Export and then Export as Image as shown below.
Step 2: In the Image Export window that appears, make sure to choose Scalable Vector Graphics from the Format drop down list.
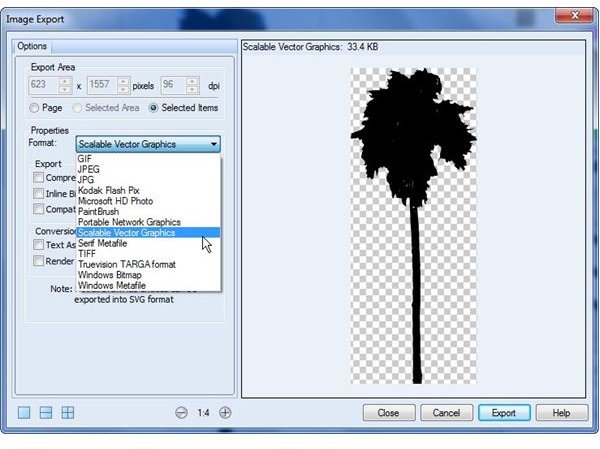
If needed, you can select any of the other items as well. For example, if you want to use the file in Illustrator or Inkscape, check the box next to Compatibility and select either Adobe Illustrator or Inkscape from the drop down list.
When done, click the Export button, give the file a name, and specify a location for the file to be saved.


