Ever wondered how you could make the flame effect in photoshop? This article will help you know which tools you can use. Now you can make a flame ball in only 13 steps!
Creating the Flame Effect
Of the many effects that can be made using Photoshop , the flame effect is one of the most popular. Many people use it for emphasizing text, embellishing pictures, or for producing an image of a burning item without actually having to burn it (like setting up a car in fire—in Photoshop—because you wouldn’t want to a decent car set up in flames, would you?) Here are the step by step procedures on how to make flame effects in Photoshop.
There are many ways to do the flame effect in Photoshop. For this tutorial, we will be creating a flaming ball. Of course, you can use any other base image. You can search for stock photos online or choose an image from your digital camera. For the flame, there are many sites offering vector shapes and templates. This way, you can just merge images, thereby saving you around one hour of extra work.
Steps 1 to 7: How to create the flame effect
Step 1: To create the flame effect in Photoshop, you must first have an image of a flame. Open the image as the first layer. Make sure the image is clear enough before any editing takes place. You can adjust how the flame’s color looks like or how strong the lines are. Here, we have a stock file of a flame so we will use this one instead. Here’s a previous article explaining how you can enhance your image by adjusting levels in Photoshop . Also, you can manipulate the image by blurring some sections.

Step 2: Afterwards, create a new layer in your PS project. It is best to create separate layers for the flame, the base image, and background so you can easily manipulate each layer. To create a new layer, go to the menu bar, click on Layer and choose New>Layer
.
Step 3: A new popup will appear. Indicate how big your canvass should be and what background you would like to have for your image. In this case, I chose a white background for the new layer.

Step 4: Open your base image to the new layer. In my case, I will use the 3-D tool to create the ball. To do this, I chose 3-D in the menu bar, and clicked on New shaper from layer.

Step 5: Resize your base image (in my case, the 3-D ball) to the size you desire. Depending on the format of the base image (3-D objects, .png, .gif), you might need to convert it to a smart object layer.

Step 6: Next, adjust the contrast levels of the base image through the historgram. In my case, I had to rasterize the layer first. I right-clicked on the layer and clicked r__asterize layer. If you are already using a .jpg file, you can skip this step. Then, select Image on the menu bar, hover your mouse over to Adjustments and click Levels. In the layers panel on the right side of the Photoshop window, choose the layer for the object and adjust the opacity level.

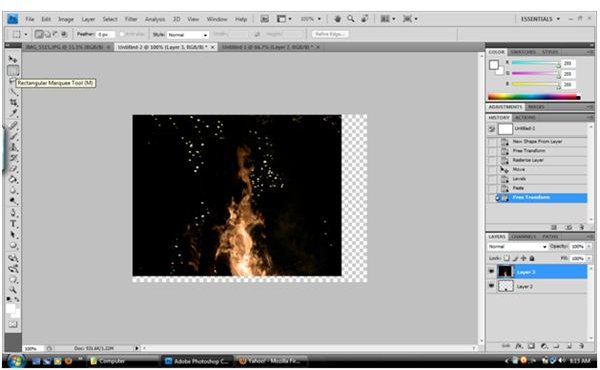
Step 7: Now let’s go back to our stock photo of the flame. Press Ctrl+A to select the entire image, then Ctrl+C to copy the image.

Steps 8 to 13: Creating the Flame Ball
We have already prepared the image of the flame we will use to create the flame effect in photoshop. Now let’s create the flame ball.
Step 8: Press Ctrl+V to paste the stock photo onto your black ball. Doing this will create a new layer on top of the black ball. Resize and position the photo right on top of the ball so that it looks like the ball is on fire.
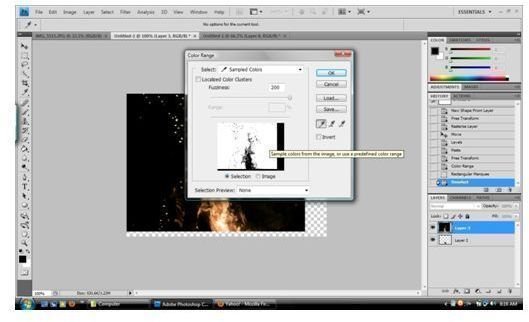
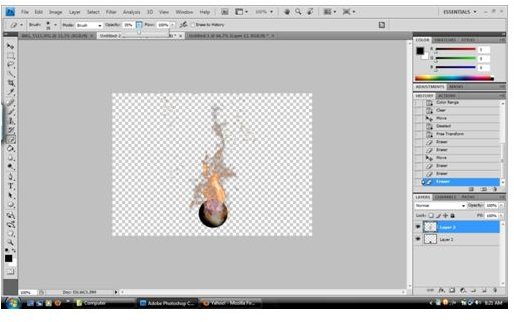
Step 9: Right-click on the stock photo using the select tool and click “Color Range …” Click on the black area of the flame photo. Click “OK”. Then press “Del”. It should then look like this.
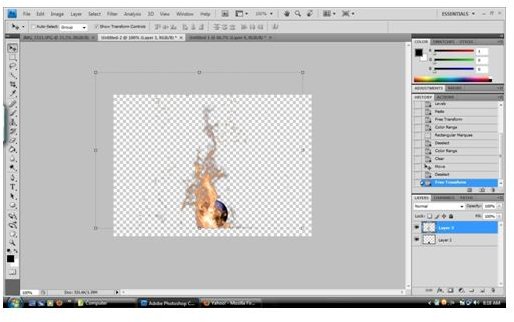
Step 10: Reposition the stock photo of the fire right on top of the black ball and using the eraser tool, erase the excess fire around the black ball.
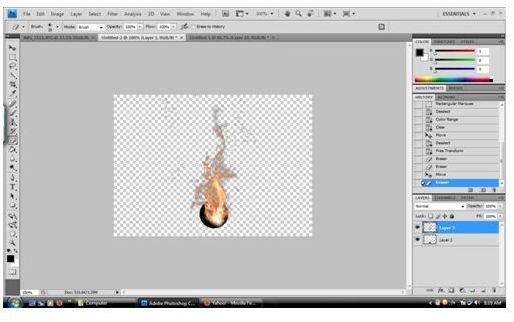
Step 11: Click on the eraser tool. Adjust the opacity of the erasure to 35% then erase the area inside the ball. It should not be erased completely. This will create a starting point for the fire and will help create a more realistic effect.
Step 12: Press Shift+Ctrl+N to create a new layer.
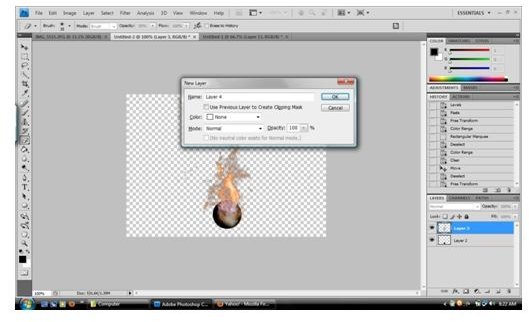
Step 13: Using the Fill tool , fill the layer with the desired background color.

You could make it black or white like this.
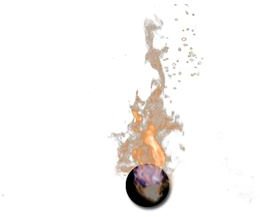
There you have it, a flame ball made in Photoshop using stock photos. Using stock photos will be great for your Photoshop projects since it looks more realistic. Here’s an article explaining where you can find the best stock photos on the web . But a word of caution in copyrighted photos: you might get sued for using ones which are copyrighted. It is better to use your own photos instead of getting one from the internet or at least, get permission from the website. Also, you can use image from sites offering royalty free images.


