Adobe Photoshop has an easy way to convert image photos and other image graphics into poster images. Learn how to create your own in black and white here.
Creating a Poster Effect in Photoshop
Adobe Photoshop is a great tool for desktop publishing. With so many effects and options, you can design and create everything from business cards to web sites. One creative way to usePhotoshop for desktop publishing is by turning photos and other images into a black and white poster. Creating a poster effect is simple and it is also an easy way to create a design silhouette for any desktop publishing project.
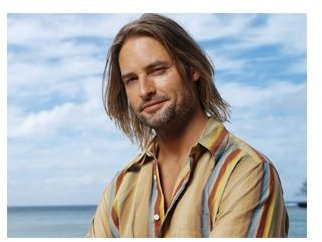
The first step in this process is to open a photo image in Photoshop. This image can be any photo or other graphic that you are looking to streamline. For practice purposes here we will start off with a photo image of American actor Josh Holloway. Here we see Josh on the set of the TV series Lost. Nice stripped shirt, blue sky and ocean in the background which we will be getting rid of in this process to turn this photo image into a black and white poster.
The next step is use the Crtl+Shift+U keyboard shortcut. Using this shortcut will turn the current image into a black and white photo. Josh’s photo image will basically stay the same, except that now it will look like an older style picture from the nineteen-fifties.
Once we’ve turned Josh into an old photo, we start working with layers. Duplicate the layer that you have open by using the Crtl+J keyboard shortcut and then choose the image photo. Once you have chosen click on Adjustments > Threshold. The Threshold window will appear and you will need to adjust the Threshold Level box to 79, then click the OK button.
When the Threshold window closes you will then be able to set your blending mode to Color Dodge.The Color Dodge option in the
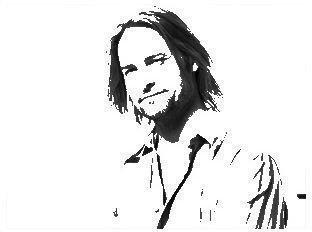
blending mode drop down helps make our image of Josh more of a poster by decreasing the contrast that is used to brighten the base color of the image. Color Dodge also reflects the blending color and has the best affect in images that are on the lighter color spectrum. If you are using an image that has a darker color spectrum back ground, the omit the Color Dodge step and instead use the Color Burn option. It will help to remember the following: light background - color dodge, dark background - color burn.


