
This article shows you how to create matching envelopes for the kid’s Valentine’s cards you made in part one. All you need is MS Word and a printer to create these envelopes. And remember, you can follow the steps in these tutorials to create your own cards and envelopes for any holiday or event.
Creating Valentine’s Day Envelopes with Word
This tutorial complements my do-it-yourself project on How to Create Kid’s Valentines Cards for Classmates using Microsoft Word . In that tutorial, I offered a basic example of how to create the cards. In this tutorial, I will show you how to create the matching envelopes to go along with
those Valentine’s cards.
Open your Microsoft Word program and click Tools > Letters and Mailing > Envelopes and Labels. The Envelopes and Labels properties box will open and you will need to select the options to create the envelopes. Let’s take a look at the options.
Envelope Options
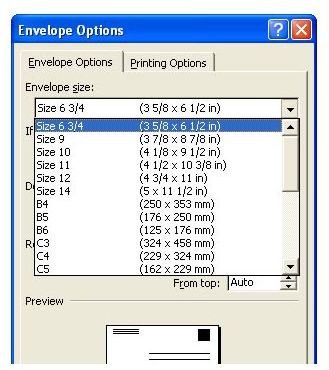
First, we will need to set up the envelope options. So, the box you are looking at will have an Options button on the right side. Click that button and the envelope options box will pop up. In this box, you will need to select the size of envelope you will be using. Assuming you created small cards, you will probably be using a small envelope. Find out what size envelope you are using and drop the box down and make your selection.
Printing Options
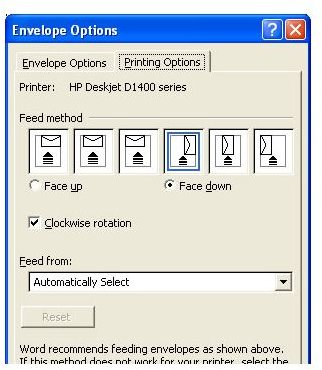
While we have this box open, let’s go ahead and set up the printing options. Click the Printing tab in the box you have opened. In this section, you will see the different options for printing your envelope. Click the option of your choice in this section. Once you have made your choice, click the OK button to close this box.
Adding Your Text to the Envelope
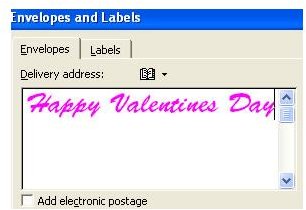
Next, you will need to add the text to your Valentines envelope. The text will need to be entered in the top field of the box you have opened. That would be the Delivery Address section. Type what you want in this field. You can type something like Happy Valentines Day. Once you have added the text, click the Add to Document button.
Adding Your Graphic to the Envelope
Now you are ready to add your graphic. To create matching envelopes, it’s probably best to use the same graphic you used on the Valentines card . Click your mouse on the envelope and click Insert > Picture > From File. Locate the graphic you used and open it by double clicking it. You may need to shrink it down if it is really large because it will throw your envelope out of whack. To shrink it, click the graphic and drag the bottom corner inward.
Adjusting the Text and Graphic

Your matching Valentines envelope is almost finished. The last thing you will need to do is adjust the text and graphic. You can align the graphic and text to the left, right, or center. You can highlight the text and change the font size, style , and color. Once you are finished, save it and start printing.
Image Credits
Images and screenshot were taken by the author.


