
Creating a book by hand doesn’t have to be complicated. Learn more about how to hand bookbinding techniques and get started on making your own books at home.
Bookbinding at Home
Bookbinding at home has become more popular in the past ten years, enhancing the services of desktop publishers and hobbyists alike. Printing up your own comic books, journals, memory books, and e-books for binding, can save time and money in comparison to sitting at the computer for long periods of time, reading through text or buying expensive e-book readers.
There are various bookbinding techniques used by people who bind by hand. Some people prefer to use glues or staples in their binding process, while others use the hand sewing method for binding. Here we are going to focus on the hand sewn method for binding any pages you wish to commit to book form.
Tools for Hand Sewn Bookbinding
This book binding process uses thread to hold the pages together, creating the spine of the book. A good method of hand sewn binding is called Japanese binding, where the pages are bound using a simple stitch. In order to bind by this method, you first need to have the right materials, which are as follows:
- 2 Pieces of Millboard (binder’s board) or Cardboard
- Waxed Linen Thread or Thick Quilting Thread
- Heavyweight Paper or Card stock
- Large Eye Paper Needle
- Sturdy Hole Punch or Dremel Tool
- Measuring Tape
The type of materials needed, can vary from type of book, or just by personal choice. For creating a sketch book or memory book, you may want to go with the binder’s board, waxed linen thread and card stock for the main pages. When creating a book from printed pages such as an e-book, you can chose lighter weight materials such as cardboard, quilting thread and heavyweight paper. You can even try out alternative items such has hemp cord or ribbon and using old hardback book covers for binding at home. Other materials could include anything you wish to use as book decoration like paint, gold foil or fabric.
These materials can often be found in your local craft shop, if not in stock there you can contact your local book binding supplier or visit an online shop such as Hollander’s . Another option to replace the cost of using millboard, is to recycle old hardcover books that you already have around the house.
Creating the Holes
These are basic instructions for completing a book by hand sewing. The dimensions of the book that you create are up to you. The board, paper and hole punch location, all depends on the type of book you make and all are based on measurement. The first step is to decide what type of book to make, and what size book you want to end up with.
Once you have chosen the type and size of the book, start by measuring and cutting your board. Next you will need to create a hole guideline, referred to as a jib. The jib will be the marker for the holes after you decide where you what them placed in the book. Take a piece of card board and measure 1 inch in from the edges of the top and bottom of the book. Next you will want to measure in another 2 inches in from the first holes to mark as the next hole spot. The holes in the center of the book should be no longer than one inch apart. In the image to the left is an example of what this measuring will look like. The holes in the image are exaggerated to give you a better view of the hole line up when making the guideline.
When you have created the guideline, the next step is to mark on your board where the holes will be, and either hole punch them or use a small drilling tool like a Dremel to create the holes.
After the board is done, take your paper and measure to double the size of your board. Fold each piece of paper in half, then line up the holes using the guideline. Score the paper where the holes will be, using your paper needle. This means that you will puncture the paper to line up with the holes made in the board, without using the same hole punch or drill as you did for the board. If the holes are too large in the paper, the inside of the book will slide around and not be tightly bound.
Sewing the Book Together
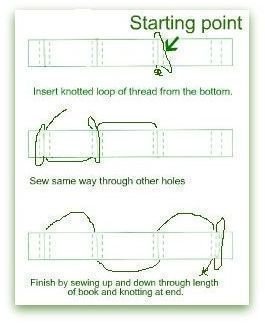
After the holes are made for your hand bookbinding, and your paper is scored, place the paper between the the board material. Place the paper between the the board material. Take your needle, thread it, and create a loop with the thread. Tie the two ends of thread together to complete your loop. It is a good idea to create a large loop to ensure that you will have enough thread to finish sewing the book.
Next, follow each step below:
-
Push the threaded needle up through the 3rd hole position. Start at the bottom on the outside of the back cover.
-
Wrap the thread back down the outside of the spine and sew back up through the 3rd hole.
Advertisement -
Sew over the top of the book cover to the 2nd hole position.
-
Sew down through the book, out the 2nd hole in the bottom cover.
Advertisement -
Wrap the thread over the spine and sew back down the 2nd hole.
-
Sew across the bottom cover from the 2nd hole to the 1st hole position.
Advertisement -
Sew straight up through the 1st hole position.
-
Wrap the thread over the spine and sew back up through the 1st hole.
Advertisement -
Sew across the top of the book cover to the 2nd hole and sew through to the bottom cover.
-
Sew across the bottom cover of the 2nd hole to the 3rd hole and sew up through to the top cover.
Advertisement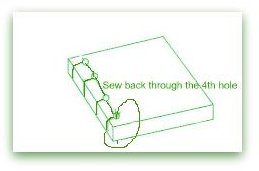
-
Sew across the top cover to the 4th hole and sew straight down.
Advertisement -
Wrap the thread on the outside of the spine at the 4th hole.
-
Sew back down through the 4th hole to the bottom cover. Pull thread securely and knot.
Advertisement
It is important to note that this is just one way to hand sew a book. Some people use one length of thread through all holes and some will use a separate piece of thread for each hole, the method that ends up working best for you is the one in which you are most comfortable with.
Many people create their own comfort level when hand bookbinding. The area of the holes, spacing and material types used are all up to you. Since you are creating the book, even the way the sewing is done can be modified to fit your book use needs.
References
Ikegami, Kojiro. Japanese Bookbinding. Weatherhill, 1986.
Greenfield, Jane. Books, Their Care and Repair. H.W. Wilson, 1983.
Images used are author provided


