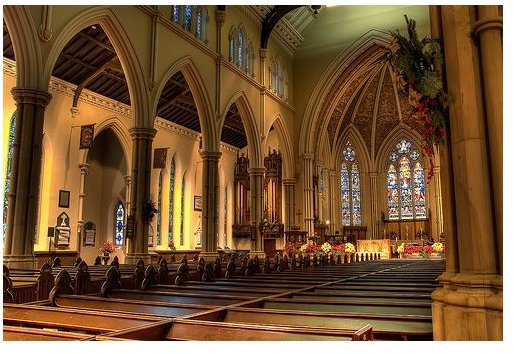
Find out what the fuss is about HDR photography and how to use it well in a church setting!
Introduction to HDR
The basic idea of HDR photography is taking multiple photos at different exposures of the same scene with the intent of merging them together. By merging different exposures, you can take the best pieces of each photo and combine them into something closer to what the eye can see (a large dynamic range). This alleviates the issue of a single exposure in which the foreground may be vastly underexposed as compared with the background or vice versa (like a sunset).
HDR photography at one point was really popular. Everyone was doing it and it became overdone and it has settled down a bit. But when the HDR technique is used carefully and appropriately, you can create some realistic, stunning, and beautiful results!
Photo by .dr4gon
What You Will Need for HDR Church Photography
The first thing you must have is a solid tripod. This can be substituted with a firm place to put your camera, but a tripod is a must for easy HDR merging. The second and last is obviously a camera that can be manually adjusted (digital SLR).
Camera Settings
Make sure you are shooting in manual mode! Set everything manually including your shutter speed, aperture , ISO , white balance, and focus! If you rely on your camera’s automatic functions, your photos may not be consistent.
First meter for your base exposure:
This will be a middle exposure appropriately balanced for the highlights and shadows. If you were only taking one picture of the church, this would be the one photo.
Once you have found your base exposure, you simply need to overexpose and underexpose the photo by a certain value (+/- 2-3 EV). You can use your exposure compensation and light meter to figure this out.
Merging the Photos and Tone Mapping on the Computer
Once you have downloaded all of the corresponding RAW image files to your PC or Mac , import them into an HDR merging program like Adobe’s Photoshop or Photomatix. In Photoshop, you can use the automated merge to HDR function to stack, align, and blend the images into a 32-bit TIFF file which can be then be tonemapped with the Photomatix plugin. If you do not have Photoshop, the standalone version of Photomatix can merge and tone map your image.
An alternative way of merging your HDR images is to import each exposure into a different layer of Photoshop and using image masks, selectively apply it to different exposure layers by hand. This method is much slower, but you have full control over your final image.
These are not the only pieces of software that can create HDR photos. Others like HDR Expose do a good job.
HDR Church Photography Quick Tips
- Always shoot in RAW to capture the most dynamic range, information, and resolution.
- Shoot in Manual mode with a low ISO and a small enough aperture (large f/ stop) to have a large depth of field.
- Don’t push the HDR processing too much. You want a realistic, yet powerful image. Nothing over the top.
- Take your time adjusting your settings and composing your shot.
- Try different compositions and move around the church.
- Have fun with it!


