A baby is a scrapbooking panacea. Unlike everyday events that you wonder whether to include, virtually everything your baby does is worthy of a scrapbook page. However, getting more than just “the big stuff” is what make a baby scrapbook a real treasure.
Baby Scrapbook Page Layouts for Milestones
Just because every baby scrapbook has a milestone page design for baby’s first steps, doesn’t mean yours has to be the same. Ordering kits and downloading baby scrapbook templates is one option for finding something special. Another option is to make your baby scrapbook page layouts yourself. Don’t worry; there is no artistic ability required. I have to copy simple cartoon animals over and over in order to be able to draw anything at all for my kids, so if I can put together a scrapbook page for baby’s first steps, so can you.
I use Microsoft Publisher to construct my baby page templates for scrapbooks. You can do the same thing in Microsoft Word, but there is a lot more hassle with things like the margins and other formatting because Word thinks that eventually you are going to want to print whatever you are making on a piece of 8 ½ by 11 paper and stick it in a three ring binder or something. Publisher, on the other hands, is designed for free form creations.
Scrapbook for Baby Page Borders, Pictures, and Designs
Remember that the star of every page in your baby scrapbook is a picture, or pictures, of your baby . That means that cutesy graphics and baby style borders should be sweet and simple. Most important, they should not distract from your pictures. Finding free graphics and backgrounds for your baby scrapbook pages is easier than you think from your Windows PC with Microsoft Office installed.
Click the start button and choose your Office start menu folder. Inside you’ll find Microsoft Office Tools, and under that, you will find Clip Art Organizer. Don’t worry, it’s not what you think. Start the Clip Art Organizer and make sure that the option to use Office Online is checked. Then, you can uncheck all the file type options that are pictures. Now, type in “baby” and click search. You just found a bunch of baby style graphics for your baby scrapbook page templates. Now search for borders and you have your borders too.
The trick to the Microsoft Clip Art Organizer is to click the image you want and choose COPY. Then, open your File Explorer, or My Computer and go to the folder you want your graphics files in. Right click in the open space inside of the folder and choose PASTE. That puts the file right where you want it, instead of buried inside the Clip Art Manager somewhere.
If you actually have some artistic talent, you can, of course make your own scrapbook backgrounds or clip art.
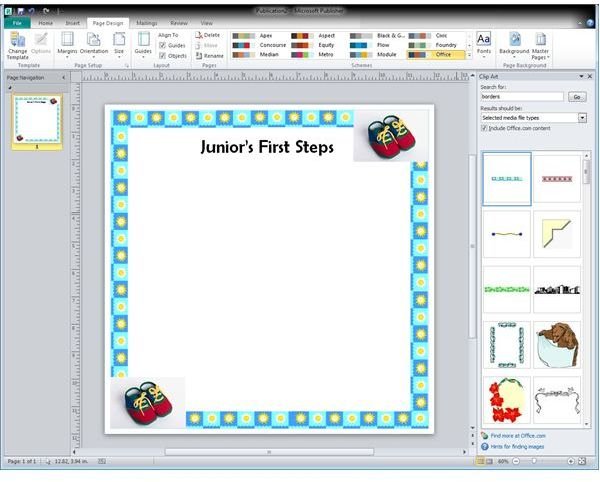
With graphics in hand, you can make your own baby scrapbook page template layouts. Open Publisher and set the paper size to 12 x 12, or whatever size paper you use. Now start inserting your graphics. Start with the borders and work your way in. Remember, these graphics are NOT the main attraction, so less is more and keep the center open. You don’t want to be trying to figure out how to cut Junior’s picture so it will fit around that cute little kitty cat icon you put center left.
If you don’t want to put the text of your page on your scrapbook page later you can type it here, but it is best to already have an idea of where you will be putting the pictures. Otherwise, stick with centered along the top or centered along the bottom to be safe. Just be aware of how to choose scrapbooking fonts .
With just a few minutes of effort you have created your own baby scrapbook page layout template. You can use this same technique for as many pages as you need, which is a very good thing. After all, how many baby scrapbooking kits do you think are going to come with a “First Time Junior Slobbered on the Dog,” page?


