In this tutorial you will learn how to crop a picture to improve your digital images. Mediocre shots can be made much more interesting with the right cropping, so see what creative cropping can do for your photography when you follow these great tips.
Why Crop?
The purpose of cropping a picture is to focus the viewer’s attention on the subject(s) within your frame. Almost every photographer you meet will freely admit to have taken photos that would have been so much better if only the composition could have been improved. However, the truth is, we do not always have the time, position, or correct lens to achieve perfect framing every time. This is why it is important to know how to crop correctly. Image editors make it easy to do, but what should you be thinking about when you do it? Consider the following.
Top Tips for Photo Cropping
1.Shoot in Fine Quality JPEG or RAW - If you make sure that you always take pictures at the highest image quality settings that your camera allows, your chances of getting a good quality cropped photo are greatly increased. This is because when you crop an image, you are making the file smaller and less detailed. The more detail you have to start with, the less detail you will lose when you crop.
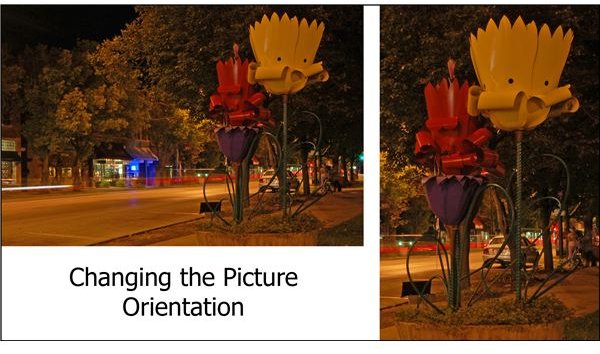
2. Change the Picture Orientation - Just because you shot your picture in a horizontal, landscape format, doesn’t mean it has to stay that way, (see photo left). All the popular image editors like Adobe Photoshop and Corel Paint Shop Pro, will allow you to crop an upright, portrait selection from your original photo. The same trick works for photos shot in a portrait format.
3. Use the Rule of Thirds - Make your photos look their best by cropping to the rule of thirds . This classic photography staple is a key skill for photo cropping, and is a method that can be seen in many of the great photographic captures. Isn’t it time it was used in yours?
4. Lose Distracting Elements - Sometimes photographers are so focussed on their subject that they forget about distracting elements in the foreground or background. Details like this ultimately draw the viewer’s eyes away from what you want them to focus on. So, cropping to remove a tree branch, power lines, or even additional people, will ensure that the focus of the viewer stays exactly where you want it to be.
5. Crop to Get Up Close - Did you forget to bring your zoom lens on that last photo shoot? Pick out far off subjects, or zoom closer than your camera let you at the time of exposure, by cropping the image to get as close as you really wanted to.

6. Change the Aspect Ratio - When you crop a photo, you also get the chance to change the aspect ratio. Some pictures are more suited to a square crop, (see photo right). Others can be cropped to mimic a panoramic picture. You could even crop for a 16:9 aspect ratio to make a photo slideshow for your widescreen HDTV.
7. Copy First, Crop Second - Photo cropping could alter your original photo beyond what is recoverable. So, before you start cropping, make a copy of your original file. This way, you can always go back to your original if you are unhappy with the final saved product, and you will have the chance to crop it again and again.
8. Crop In-camera - Do you know how to crop a picture using your camera’s built in editing tools? Your camera’s live view LCD screen can be used for many different things , so check your manual to see if your camera can crop your photos in-camera.
Final Tip
Once you know how to crop a picture correctly, you will quickly find that your images begin to look a whole lot better than they used to. However, one of the best tips I can give you for digital cropping is to save your cropped image with a different file name. This way you can always go back to the original if you decide you want a different crop in the future.
References
Images in this article were taken by, and are the property of, the author.


