This tutorial will guide through the process step-by-step to turn any ordinary photo into an artistic oil-on-canvas type painting. This is a great gift idea for pretty much anyone, and requires no artistic talent!
Using Corel Painter’s Auto-Painting Feature
Corel Painter has made artistic expression easy even for those without much artistic skill. I have grown to love the auto-paint feature within the program, and use it for many personalized art pieces in my home, or for inexpensive artistic gifts. Here is a tutorial for one of my favorite uses of this feature: turning a photo into an oil painting quickly and easily.
This tutorial works for both Corel Painter X and Corel Painter XI, but I have never used the older versions to know whether it will work for them as well.
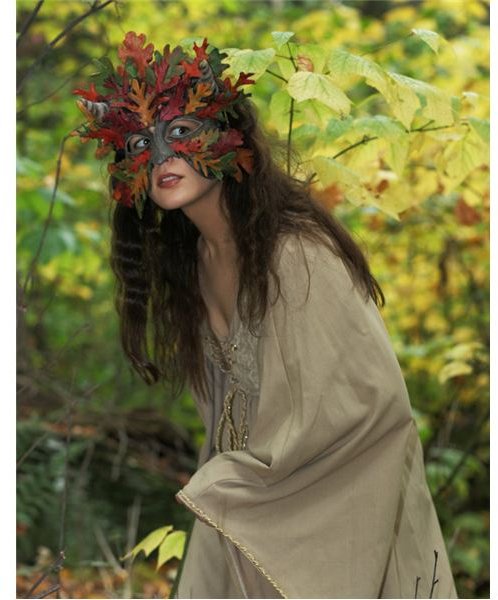
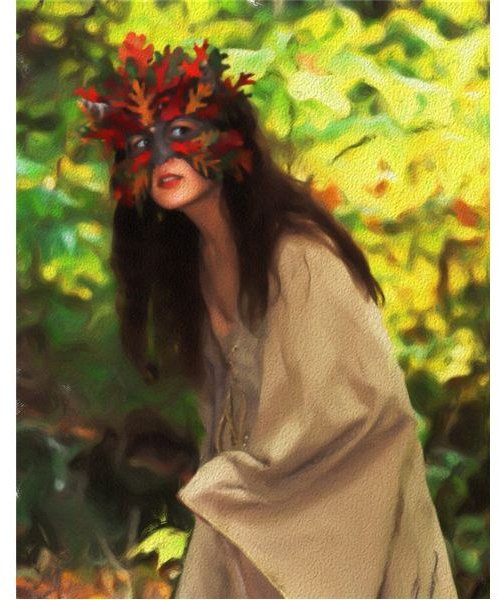
First, you’ll need to Open Corel Painter and open your picture. I am choosing to use the photo below, which you can get here if you’d like.
My Stock Image
Now go to Window–> Show Underpainting to display a new tool bar in the workspace.
You may choose a color scheme from the top drop-down menu just below Underpainting. I’ve chosen Chalk Drawing for this particular photo.
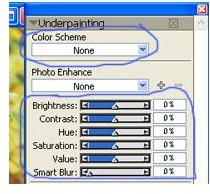
Now change the values below to whatever appeals to you by using the slider bars or by manually typing in values. For example, I changed the values into this:
Brightness: -6
Contrast: 25%
Hue: 3%
Saturation: 10%
Value:-20%
Smart Blur: 50%
Tip: You will almost always want a Smart Blur of at least 30% to get an authentic “painterly” look to the photo. Here’s my picture ready for painting.

Making the Painting
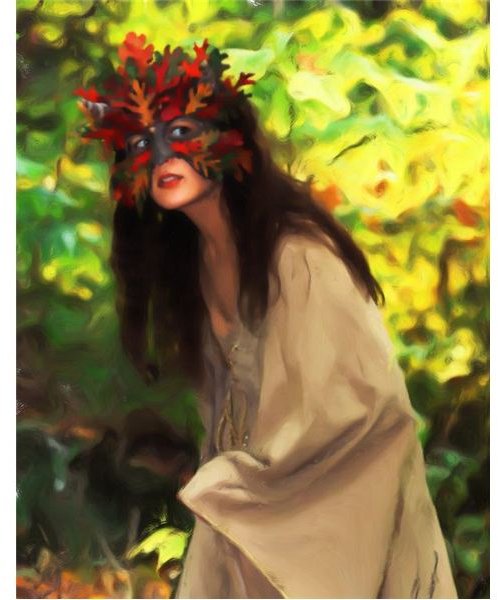
When you are satisfied with your new colors and the blur, click on the Apply Button. Then click on the Quick Clone Button just below the Apply button. Now it’s time to get painting!
Under the Auto-Painting section, be sure to check the Smart Stroke and Smart Settings options if they are not already checked. This will ensure that the strokes the computer makes will follow the actual lines in your photo, and not be randomized.

Up in the

, select the Oils category (not Artist Oils), and use the Flat Oils 20 brush. Click

on the color palette as well. This will make the program pick up colors from your painting automatically when it is painting.
Now turn the tracing paper off either by selecting the icon in the upper right corner, or by pressing Ctrl+T on your keyboard. You should be left with just a blank page. Click the Play button under Auto-Painting. You may stop this process at any time by just clicking on the photo or hitting the stop button, so you can go for a very detailed look, or a more soft and abstract look to your painting. On this photo, I let the auto-paint stop itself.
If you are satisfied with the finished result, you can stop here. If you’d like to add some detail and texture to the photo, then the following two steps will walk you through doing that.

If there are areas you’d like to touch up after auto painting, you can close the underpainting window, chose the

, and paint in details by hand. Be sure the Clone Colors button is still chosen, and you won’t have to manually select colors to paint with. You can also change to a round oils brush such as Bristles 20 or Fine Camel if you’d like. I used the Bristles 20 for touching up.
Remember during this step that a smaller brush will bring out more detail, and a large one will blur out detail and smudge colors, this will give you lots of room for your own personal style and taste.
I chose to sharpen the details of her face and the mask she is wearing. Then I lowered the opacity of my brush to 40% to slightly sharpen the details of her hair and dress. This keeps the focus of the painting on her face without making the face look out of place. I like the blurry abstract look of the background, so I left it alone.
To apply some canvas-like texture to your painting,
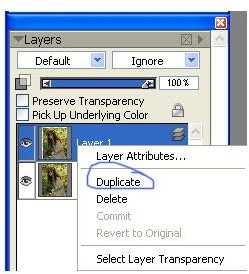
by left clicking on the layer and selecting Duplicate, and then go to Effects–>Apply Surface Texture. Use these settings:
Use the Paper option
Softness: 0%
Amount: 115%
Picture: 100%
Shine: 0%
Reflection: 20%
Leave all other options at their default and select OK.
Finally, lower the opacity of this top layer to somewhere between 25% and 50% to make the texture more realistic and less dramatic. I’ve chosen 30%
Congratulations! You now have an oil painting which can be admired and envied by all of your friends and family. You may also print this photo on cards, photo paper, or even canvas to make gifts. You can also experiment with different color schemes and brush types to find the perfect art style for you!


