If photography is your passion then the gear should never be the limiting factor. Learn how to push the limits of your compact digital camera. Learn how to make your own macro lens to take wonderful pictures of the world close up with this DIY photography tutorial.
Can Your Point & Shoot do Macro Photography?
There is a prevalent opinion that to take great photographs, one needs good gear. But that isn’t completely true, it all depends on the pair of hands and eyes behind the view finder or the camera. That said, decent camera gear does help a lot towards making a great photograph by complementing the skill of the photographer. Point in case, macro photography with a simple point-and-shoot digital camera. Did you know that by spending a little time, and very little money, you can turn your point-and-shoot camera into a decent enough tool to create really good macro images ? We’ll see how you can make your own macro lens for your point-and-shoot and come out with some breathtaking macro shots.
Materials You’ll Need to Make Your Own Macro Lens
Okay, let’s first look at how macro photography is done. Ideally, macro photography makes use of a dedicated macro lens which is capable of focussing at a very close distance and capable of magnifying the object that is being focussed. Also required is plenty of light or a flash that lights up objects that are focussed closely. Since we’ll be going the DIY way, we need the following:
1. A point-and-shoot digital camera
2. Masking tape/cello tape
3. An old pair of binoculars or telescope (Tip: You can pick up new binoculars at local toy store for just a few dollars!)
4. A well lighted environment (since your on-camera flash isn’t going to be of much help here)
5. A bottle cap with a diameter that can be inserted on your lens (Note: This is required only if the binocular optics do not fit your lens!)
6. A hobby knife - Only required if you’re making the adaptor (As mentioned in the previous point)
(Click on any image for a larger view)
Making the adaptor ring

Assembling Your Macro Lens
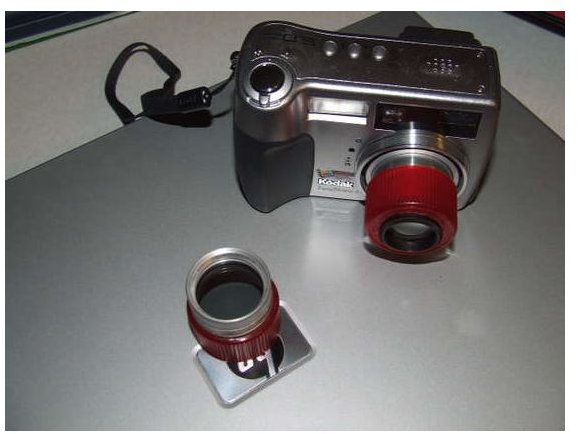
Step 1: Remove the front lens (not the eye piece) from the binoculars which will essentially be our macro lens. Take care that this part is not scratched or damaged which can affect image quality.
Step 2: Switch your camera on and zoom out to the maximum. Now see if the eye piece from the binocular is of equal diameter to your lens. Most lenses are, so go ahead and affix the eyepiece to the lens with the masking/cello tape.
If your lens and eye piece don’t match, you’ll need to put on an adaptor, so follow the next step. For the lucky ones who managed to tape the eyepiece on, skip the next step and start shooting macro photos!
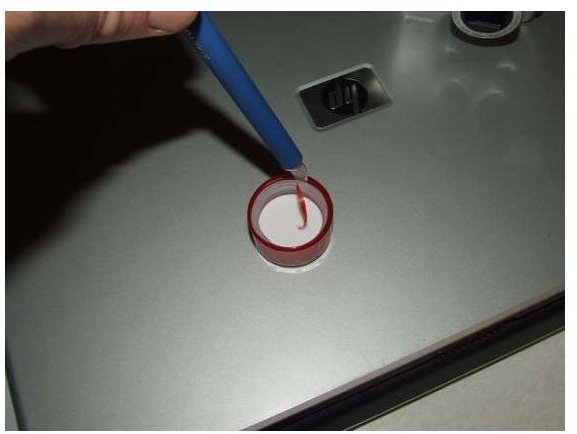
Step 3: To make an adaptor, use an old film container cap or any bottle cap. Carve out the central part of the cap to make space for the lens. Once the lens has been fit in tightly, slightly attach the cap to your lens and use masking tape if it is too loose.
Images: https://www.instructables.com/id/Macro-Atachment-for-pocket-digital-camera/


