Old photographs connect you with past loved ones or memories. They, however, fade very quickly. You can use programs like Adobe Photoshop Elements to fix minor blemishes in your images, including correcting color problems.
Fixing Old Photos
Adobe Photoshop Elements is a less expensive, but still very functional version of Adobe Photoshop. This program is designed for quick edits, photo tweaks and adding effects.
If you have older photographs, you may want to fix some issues with them, including sections of the photograph that are fading or that is torn off. You are probably now asking yourself a question: can I edit old photos with Adobe Photoshop Elements?
Scanning Your Images
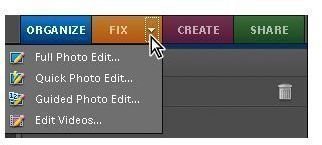
The quick answer is yes and fairly easily. Adobe Photoshop has a number of different options for editing your photographs, including Quick
Photo Edit, Full Photo Edit and Guided Photo Edit. You can access these options by going into the Organize tab.
Before you can begin tweaking your image, however, you need to scan it into your computer if it’s not already saved on your hard drive. A standard scanner should work fine for this process, but you can purchase specialized photo scanners if you want higher quality images.
Once you finish scanning the image, save it to a folder or to your desktop. Open it up in Adobe Photoshop Elements by going to File and then Open. Double-click on your image to open it in the editor.
Quick Fixes
Now, you can start really editing your image. One of the most common issues with older photographs is that they begin to fade, causing the image to lose its vibrancy. You can use the Quick Photo Edit tab to fix the color in the image.
The available color fixes include the following:
- Lighten Shadows.
- Amount – This tweaks the overall effect of the adjustment.
- Lighting – This adjusts levels and contrast.
- Darken Highlights.
- Smart Fix – This is a quick fix tool, which fixes shadows, highlights and color balance.
- Color – This effect tries to make your image look more natural.
- Midtone Contrast.
To fix the photograph, follow the below steps:
- Select your photo from the Elements Organizer.
- Click on the arrow located next to Fix, and then select Edit Photos.
- If you want to preview your image before the changes take effect, change the preview options in the View menu. This will show you how the photograph looked before and your changes affect the image.
- Select from one of the different fixing options, which you can see on the right-side of your screen.
- Keep tweaking the image until it looks correct. If you don’t like a certain change, simply hit the Reset button to revert back to how the image previously looked.
You can also crop out problem areas in the Quick Fix section. This is especially helpful if the photograph is torn or worn near the edges. Zoom into the photograph, and select the crop tool. Try to keep as much of the image as possible while still removing the damaged areas. Hit enter to crop the image.
If the image was scanned improperly, and it’s slightly crooked, you can fix this problem with the Rotate Left or Rotate Right button.
Tools and Adjustment Layers
Oftentimes with older photographs, only certain parts of the image are corrupted or faded so you may not want to change the entire image. Photoshop Elements has a number of Touch Up buttons that allow you to focus on the problem areas of your image.
To use these tools, go into the Quick Fix Tools panel, and select the tool that you want to use. Available tools include:
- Make Dull Skies Blue, which improves the look of the sky.
- Whiten Teeth, which brightens subjects’ teeth.
- Red Eye Removal.
- Black and White-High Contrast.
The last option adds a red filter effect over your image, and it creates a very high-contrast black and white image.
If you want to make more advanced changes to your image, use the Full Edit option. You can add adjustment layers to your image. An adjustment layer allows you to add color, highlights or contrasts without actually changing the image itself.
This way if you are unhappy with the change, simply delete the adjustment layer.
Full Editor
Another tool in the Full Editor is the Spot Healing Brush. This tool removes minor imperfections from your image. To use this tool, follow these steps:
- Select the Spot Healing Brush from the Editor panel.
- Select a brush size.
- Select a brush type. A proximity match brush will use surrounding pixels to fix the spot, and the create textures option uses every pixel in the photograph.
- Click on the area that you want to change.
You now know the answer to the question can I edit old photos with Adobe Photoshop Elements . Yes, you can easily repair faded or torn images so that you can save them posterity. Share your finished photographs with friends and family so that everyone has a good copy of them.
References
Image Source: Adobe


