Despite the shortcomings of the original release of Windows Phone, the Mango update brings several enhancements, not least the ability to import custom ringtones for contacts.
One of the most common complaints about the original release of Windows Phone 7 was that it was missing various useful customization options. Such an omission was the ability to set custom ringtones, with users limited only to the included selection.
While Microsoft had provided quite a large choice, they were naturally pretty standard, in-house tunes. Omitting to include either an MP3 editor or a means of saving an MP3 or WMA file as a ringtone wasn’t a popular move, and while it was countered by the homebrew activities of some users, on the whole most Windows Phone owners weren’t able to use this tool.
Fortunately Windows Phone 7.5 (“Mango”) sees this particular oversight resolved, with the result that there are now ways in which you can set a custom ringtone on your Windows Phone device. In fact, any existing tune on your phone can be added as a ringtone, simply by altering a single aspect of its ID3 tag.
Configuring Your Ringtone
In order to set a ringtone on your Windows Phone, the file must have the following properties:
- It must be in MP3 or WMA format.
- It must have playback duration of less than 40 seconds.
- The file should be under 1 MB.
- Your intended ringtone file must not be protected with digital rights management (DRM).
Most of these specifications exclude standard MP3 and WMA files, which of course means that you will have to create your ringtone using a cropping tool.
There are several available that are free to download. One popular option is Audacity, the open source audio editor (you might also use the Windows XP version of Windows Movie Maker, which has some audio editing capabilities) and this is available from https://audacity.sourceforge.net/download/beta_windows
Once you have downloaded the latest version (a modest 14.8 MB) run the installer to add it to Windows and follow the on-screen instructions. Upon installation, Audacity should run, and you will be able to begin editing your intended ringtone.
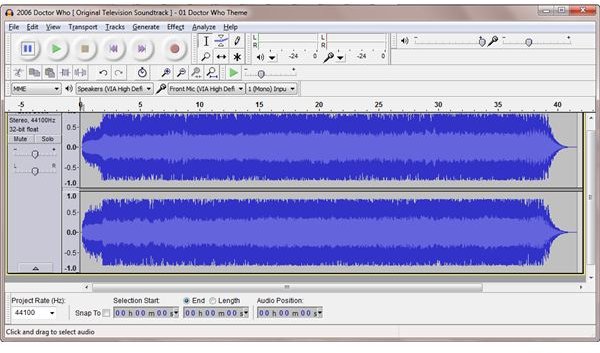
Use File > Open to browse for the original MP3 file that you want to use – when open, you will see the audio of the file represented in blue, and a timeline across the top of the window. Remember that the maximum duration of your ringtone is 40 seconds, so if your file is longer than this you will need to use the trim tool, available via the Edit menu or by pressing CTRL+T.
To use trim, left click and drag the cursor across the selection of the music that you want to keep, and then trim the file down. You can click play to get an idea of how it will sound, and if you’re unhappy simply go to Edit > Undo or tap CTRL+Z to reverse the trim and try again.
Saving and Configuring Your Ringtone
Before proceeding, you will need to make sure that you have the right codecs for creating WMA and MP3 files on your computer. In Edit > Preferences > Libraries use the Download buttons to find and save the LAME 3.98.4 and FFmpeg Library to your computer, then use the Locate buttons to add these files to Audacity.
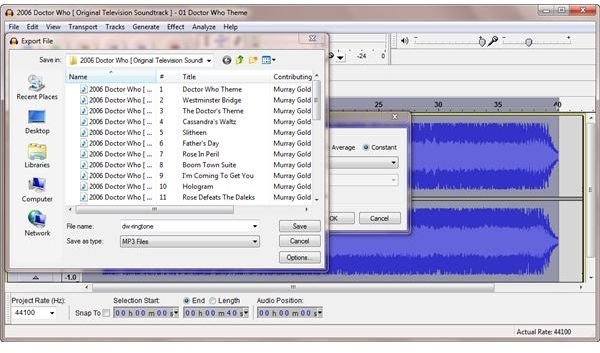
When you’re done, click File > Export to save the trimmed file as an MP3 or WMA file. Use the drop down menu in the dialogue box to select your preferred file type, and then in the Edit Metadata box that appears, ensure that the trackname matches the name that you assigned when you saved the file – this will prove useful when finding the ringtone in Zune. Click OK to continue and the file will save at the default 128 kbps rate (this can be altered in the save dialogue box via the Options button).
Adding a Ringtone to Your Windows Phone
With your file saved, you will be ready to add it to your Windows Phone. Your device should be connected and synced to the Zune desktop software before proceeding – with the connection established, use the search box in the top-right corner to find the file. If you haven’t saved it in a location that Zune is monitoring, simply open a Windows Explorer window and drag the file into Zune.
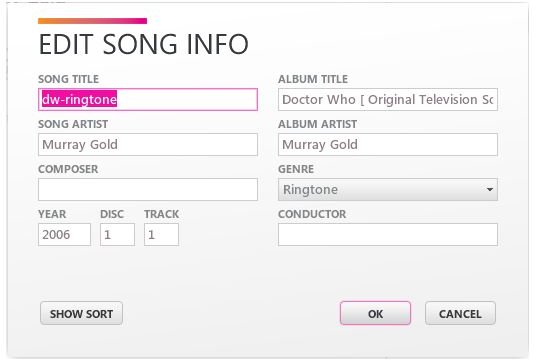
If you’re unable to find the file this way, select Genre and look for ringtone – the file should be listed here – if not, you may need to go back and check that you followed all of the steps. Once you have found the file, right-click and select Edit -- you will then need to set the Genre to “Ringtone” without quotes). Click OK when you’re done.
Right-click the file and select Sync with [PHONENAME], and wait a moment while this happens. Next, disconnect your phone from the USB connection, press Start and then open Settings (or swipe left to open the apps menu and find Settings) > Ringtones+sounds > Ringtone, where you should find your edited file listed in the Custom section at the top of the list.
All you have to do next is select the ringtone and you’re ready to rock! Note that you can also assign ringtones on an individual basis via the People Hub – simply find a contact, tap Edit and then +ringtone to add your preferred audio alert to that individual.
Could Microsoft Improve the Process?
Undoubtedly the steps required for creating and adding ringtones on Windows Phone are not ideal. For a start off, a ringtone store in the Windows Phone Marketplace would be a definite time saver, but the restrictions on tunes already stored on your phone are particularly frustrating.
Alternatives to this method exist in the form of apps such as Ringtone Recorder and Ringtone Maker Pro, but it would be great if Microsoft could add an MP3/WMA trimming utility into Zune to make the process a little easier…
References
- Screenshots provided by author.


