Stitch together photos with Ztitch to create an impressive 360 degree panorama that you can share with friends on Facebook!
Windows Phone 7 Image Editing Options
Windows Phone 7 cameras are equipped with a range of options, from high definition resolutions to zooms, sepia and grey filters and a widescreen mode to the ability to record video or upload photos direct to a Windows Live SkyDrive account or Facebook.
In fact, given how quickly the last task can be performed it should come as no surprise to learn that many Windows Phone 7 users are regularly snapping photos with their phones, safe in the knowledge that the image will be safely stored in the cloud.
This is one of the reasons why so many image editing apps are available for the platform. Among them is Ztitch, a useful app that will create a 360 degree panorama out of photos stored on your Windows Phone!
Snapping Your Photos
With the Ztitch app you can create a massive 360 degree panorama – but you need the best selection of photos first of all!
While you don’t have to create a full 360 degree shot (you can choose just 180 degrees, for instance) you need to make sure that the images you use are sequential otherwise the results will end up a bit scrappy.
As such, try to avoid close-up objects and stick to landscapes and scenery, or at least larger environments like concert halls and corporate offices. This way you have every chance of achieving the best results for your panorama!
Creating a Windows Phone Panorama
In order to create your panorama image, download and install Ztitch from the Zune Marketplace . Available for just 79p (UK price) the app provides a means to place and arrange your photos to create a sort of 3D effect.
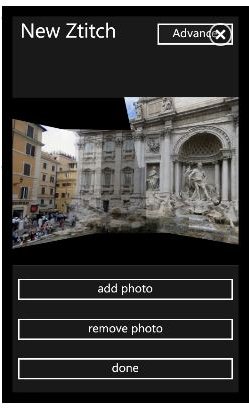
To use the app, you can begin by selecting New Ztitch to use images from your phone or Flickr Access to use an image stored on Flickr. The principle is the same for each method – you need to click Add photo to browse for and select an image from your library, and then arrange it as a panorama on your phone’s display using your finger. Each time you want to add a new image, tap Add photo and repeat the process.
The control method here is to keep an eye on the newly added image and then drag it into position. Any previously added images will be visible through this so that you can see how to line them up.
You will need to spend some time at this process – once you’re happy with it, however, tap Done!
Saving and Sharing Your Panorama

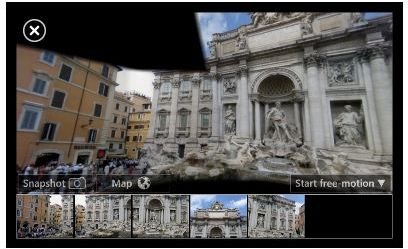
Once you have saved the image (the result of tapping Done) you will see the panorama in its completed form. From here you can use the Enable free-motion to view the 360 degrees with your phone’s accelerometer or use the Take snapshot tool to save a copy of the panorama to your phone.
Browsing to the Pictures Hub and selecting All will reveal the snapshot of your panorama, and using the standard sharing tools you will be able to upload the image to Facebook, send by e-mail or share via SMS!
References
References and screenshots from Ztitch for Windows Phone 7.


