
Don’t feel down because Apple decided not to give Game Center to you and the rest of the iPhone 3G users. Learn how to add Game Center to your jailbroken iPhone and enjoy all the same features that iPhone 4 and iPhone 3GS users enjoy.
Reasons to Add Game Center
Game Center is one of the best features of the iOS 4 upgrade. Allowing access to many great multiplayer gaming features such as
matchmaking, leaderboards, scoreboards and gamer chat. Other features are enabled on a game to game basis such as voice chat. These features are crucial to the enjoyability and functionality of multiplayer games and enable the iPhone to jump to the next level of online multiplayer gaming.
Adding Game Center on the iPhone 3G is a necessary step for 3G users. Apple chose to leave Game Center off this model of the iPhone due to the limited hardware. This esentially leads to the lack of multiplayer support or very limited multiplayer support for iPhone 3G owners. Users of jailbroken iPhone 3G’s can enable the Game Center with just a few easy steps.
Requirements For Game Center
Enabling missing features on the iPhone 3G can only be accomplished if you have a jailbroken iPhone 3G. Jailbreaking your iPhone is a fairly simple process. Users that already have a jailbroken iPhone 3G can follow the guide below to add Game Center on the iPhone 3G.
In addition to jailbreaking your iPhone 3G, you will also need to have Open SHSH installed. Open SHSH can be obtained from the Cydia or Rock app by searching for it and installing it. Once Open SHSH is installed, you will be required to reboot your iPhone before installing Game Center on the iPhone 3G.
Installing Game Center
Installing Game Center on the iPhone 3G is a fairly simple process.
Tools Needed:
- WinSCP (Win) or CyberDuck (Mac)
- Game Center App (Download here )
- Home Wi-Fi Network
-
Connect to the iPhone. Using WinSCP or Cyberduck, connect to your iPhone. The IP Address can be found under Settings > WiFi and then by clicking on the blue arrow next to your network name. The default SHSH login for the iPhone is “root” and password, “alpine”.
Advertisement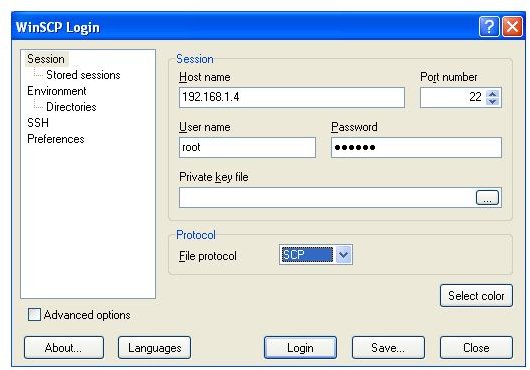
-
Copy the Game Center App. Navigate to the “/private/var/stash/Applications” folder on your iPhone. Open the Game Center Zip file and drag and drop the GameCenter.app file onto the iPhone.
Advertisement -
Set Permissions. Right click on GameCenter.app and set the permissions to 755. This is an important step to ensure the Game Center runs on your iPhone 3G properly.
-
Copy additional files. Navigate to this folder using WinSCP or Cyberduck, “/system/library/CoreServices/SpringBoard.app/ “. Open the folder “Game Center” on your computer which you should have downloaded earlier. Copy the file “N82AP.plist” from the Gamer Center folder onto the iPhone 3G.
Advertisement -
Copy daemon files. Navigate to this directory with WinSCP or Cyberduck, “System/library/LaunchDeamons/”. Copy the file “com.apple.gamed.plist” from your desktop to the iPhone 3G.
-
Copy the remaining file. Navigate to the following folder in WinSCP or Cyberduck, “usr/libexec/”. Copy the file “gamed” to the iPhone and set the permissions to 755 by right clicking it in WinSCP or Cyberduck.
Advertisement -
Restart your iPhone 3G. Restart your iPhone 3G by holding down the sleep/wake button and the home button at the same time. Once the iPhone reboots you should have Game Center on your iPhone 3G.
Considerations & Resources
This method works to add Game Center to the iPhone 3G. It will add the exact Game Center that is found on the newer iPhone models. Apple decided not to include Game Center for the iPhone 3G due to potential performance issues. It is worth noting that you may experience slower performance when using Game Center although it does work flawlessly for the most part.
Read Jailbreaking Your iPhone for more information about the process. Read Exploring Game Center to learn about all the features and abilities of Game Center.


