
With features that rival some digital cameras, the iPhone 4 gives you the opportunity to use your phone for your photography needs on the go. Continue reading for instructions to help you take pictures from your phone and learn about the photo editing options that are available.
The camera app on iPhone 4 was designed to be user-friendly and take high quality photos. However, if you’ve never taken a picture on an iPhone before it can seem confusing at first. Before you can start snapping shots from your phone you’ll need to understand the options available. Start by opening your camera app (the photo lens icon).
When you open the camera, your screen will look similar to the photo to the left (except it will show the view of what your camera is facing). To snap a picture press the camera button at the bottom center of the screen. The rest of the buttons are:
Flash - Button at top left side of screen with lightning symbol - Tap for flash options.
Forward Facing Camera - Button at top right side of screen with picture of camera and arrows - Tap to switch to forward facing view.
Video Camera - Slide button at bottom right side of screen - Slide to the right to switch to video.
Last Photo Preview - Small thumbnail photo at bottom left side of screen - Tap to open last photo taken.
How to Use iPhone 4 Camera Zoom
The iPhone 4 camera zoom helps you get better, more focused photos from your iPhone. Using the zoom on your iPhone is actually pretty simple. While open to the camera screen, tap the screen once. A slide bar will appear above the bar at the bottom of your screen. Slide the bar from left to right to zoom in (as shown in the progression of photos below). Slide the bar back to the left to zoom out.


How to Focus iPhone 4 Photos
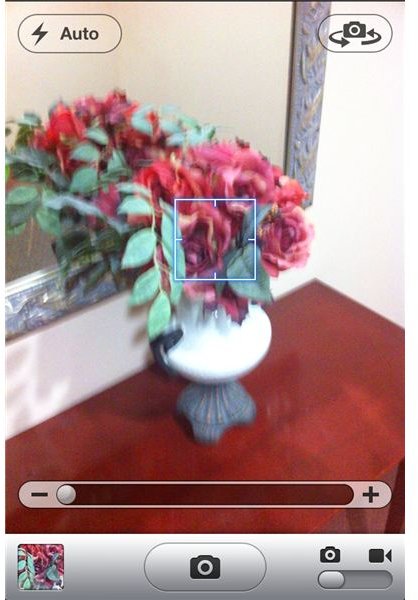
No one wants a blurry picture, and the iPhone 4 camera makes it easier to avoid them. With simple “tap to focus” technology, iPhone makes it easy to get your photo ready to be taken. Simply tap the screen on the area of the photo that you would like to be the focal point of the picture. The phone will then automatically adjust its settings to focus on that particular section. A small box will appear on the screen (as shown in the center of the photo to the left) to show you the area that was focused. To re-focus on a different area, just tap another spot on the screen. Wait a few moments while the phone finishes focusing before taking the picture.
Tips for Taking Better iPhone 4 Photos

The iPhone 4 camera has 5 mega-pixels, 5x digital zoom and LED flash, giving you breathtakingly clear photos from your phone. Apple has made it simple to take the best iPhone 4 photos possible. Following a few simple steps can give you beautiful, focused and colorful photos from your iPhone.
- Hold your phone as steady as possible.
- Aim your phone for the subject you wish to photograph.
- Turn the flash on for low-light areas.
- Use the zoom option to center your subject.
- Tap the screen to focus on your subject.
It’s that simple. Following those five simple steps will give digital camera quality iPhone 4 photos. A major benefit to using your iPhone 4 camera for photography is the ability to easily share the photo after you’ve taken it.
Image Courtesy of Apple
Editing iPhone 4 Images
Once you’ve taken a photo on your phone, there are ways to edit iPhone 4 images. There are numerous third-party apps that give you different photo editing capabilities. Some are silly, allowing you to draw over the photos you’ve taken, while others are more traditional photo editing software that allow you to enhance your pictures. Some of the top iPhone apps for editing photos are:
- CinemaFX
- Photo Wizard Fixer+Filter+Uploader Lite
- Cropulator
- SP Photo Fix Lite
- Fantasy Lens
- Polarize
- Colorsplash
- Light
- SepiaCamera
- PhotoHype
Use the link above for full descriptions and links to download each photo editing app.


