
Learn how to get an emulator on your computer that will enable you to play with the Android 2.0 Software, and even give it a skin to make it look like the Droid!
First Off, The Essentials
Now then, to install a Droid emulator you will need to download a few things, but it will be worth it. Not only will you be able to use Android 2.0(and other versions if you choose to) but you will also be able to install applications onto the emulator and see how they will run on the phone! I’m going to make life a little easier on you and combine lots of information onto this page.
Off to Download Land! We will need:
- Android SDK (Software Developers Kit)
- A Java IDE program(Google recommends the classic version Eclipse 3.4 or higher)
- A Java Developers Kit (Google says that version 5 or 6 is required)
- A skin for the emulator to make it look like the Droid. Courtesy of Tea Vui Huang
Once you have those downloaded, lets start installing!
Android SDK Installation
Download the SDK from the Google site and then go to your download folder to find it. (It should be either android-sdk-windows, android-sdk-linux or android-sdk-mac) It will be a zip file that needs to be extracted. It is best if you extract it to an easy to find location. I extracted mine to the root of my main hard drive, so it would be C:\Android-Sdk-windows\. Simply extracting it will not install it though, you have to add the folder to your system path, so that it can be found. To add the SDK tools to your system you must…
- On Linux, edit your ~/.bash_profile or ~/.bashrc file. Look for a line that sets the PATH environment variable and add the full path to the tools/ directory to it. If you don’t see a line setting the path, you can add one: export PATH=${PATH}:<your_sdk_dir>/tools
- On a Mac OS X, look in your home directory for .bash_profile and proceed as for Linux. You can create the .bash_profile if you haven’t already set one up on your machine.
- On Windows, right-click on My Computer, and select Properties. Under the Advanced tab, hit the Environment Variables button, and in the dialog that comes up, double-click on Path (under System Variables). Add the full path to the tools/ directory to the path.
That is straight from Google’s help on how to install the SDK. After that step is done, the SDK is effectively set up on your system.
Android SDK Update
There is an update that needs to be done on the SDK and this is what will allow you to use the emulator. Go to the folder that you extracted the SDK into and open it. Inside of it you will find an Exe file called SDK Setup. Run this application. When it first initializes it will take a little bit of time to load so don’t worry if you don’t see something right away. It will automatically try to fetch the list of updates available for the SDK. It might fail, it did when I tried, but I found a fix thanks to androidandme.com . So, if it pops up with the error “Failed to fetch URL…” then you will have to force it to use http instead of https.
- Close that first error box
- Close the package install window
- Click the settings tab
- Click the check box by the “Force https://… sources to be fetched using https://…” button. This will allow you to update it
- Click Save and Apply and then restart the program.
Once it works, you will see a list of different items that you may download for your SDK. You can be choosy, but it doesn’t take that long to just download everything, so click the radio button at the bottom that says “Accept All” and wait for everything to be done. Once it is done close the window because we are done with it for now.
Java Developers Kit
Follow the above link to go to Sun’s Developer page and download the Java JDK package. After it is downloaded, double click the file to begin installation. Make sure that you close any program that uses java before the installation begins. This is just a standard install so click ‘Next’ a lot until it is finished.
Total Eclipse of the Android
Once you have Eclipse downloaded, start the installation. That is to say the extraction. Eclipse is installed in much the same way that the Google SDK is installed. Pick a spot to extract it, once again an easy to find spot, so I would use C:\Eclipse. To make using it easier, right click on the Eclipse.exe icon and create a shortcut on the desktop.
Open Eclipse and allow it to load. To be able to use it with the Google SDK package, we will need to install the special ADT plug-in for it. To do this you need to:
- Click on the ‘Help’ button
- Click ‘Install New Software’ or ‘Software Update’ depending on the version that you downloaded
- Click ‘Add’ or ‘Add Site’
- In the location field type https://dl-ssl.google.com/android/eclipse/ and click OK
- In the ‘Available Software’ screen you should see ‘Developer Tools’ listed, click the box next to it and then ‘Install
- Make sure that in the next screen both ‘Android DDMS’ and ‘Android Development Tools’ are selected and click Next
- Read the License and click Finish. After that restart Eclipse
After Eclipse has been restarted, go to the Preferences section. Once there click on the Android tab. Where the SDK Location is, click browse and then direct it to the folder that you extracted your SDK to.
Skin-tastic
The last thing needed to do is to download the Motorola Droid skin for the emulator. So go to Tea Vui Huang’s page and click on the ‘Motorola Droid’ skin (or even other ones as well if you are feeling a bit froggy). Save the file to a convenient location and then:
- Open the file and and also open the directory where your SDK is installed.
- If you did download all of the platforms earlier, this will get a little repetetive, but inside each of the android-# folders there will be a folder called ‘Skins’. Extract the Droid skin into each of these other skin folders so that it may be used universally with any of the platforms that you downloaded.
The Fun Begins! Finally, Right?!
Open up Eclipse. If this is your first time using it, you can look around a bit and get a feel for how it works. If you just want to get right on down to the Emulator loving, then here goes.
-
Either click Window > Android SDK and AVD manager. Or Click the 4th icon from the left
Advertisement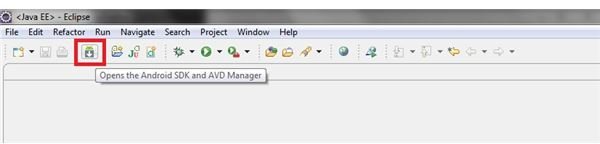
-
After that manager pops up, click New
Advertisement -
Make a name for your emulator, no spaces though, so maybe MotorolaDroid or Droid or even Motorola_Droid or really whatever suits your fancy.
-
Click the Target drop-down menu and scroll down to Android 2.0 - API Level 5
Advertisement -
You will also need to give it a virtual SD card, so put in a number, I normally go for 1024 MiB(equivalent to 1 Gig)
-
Under Skins, scroll down to WVGA854-Droid and click Create AVD
Advertisement -
Now click on the name of your newly created AVD and click the Start button on the right hand side of the box
Wait patiently for a few minutes. It takes a while for it to load the first time. After the first time it loads quite a bit quicker. You now have a working Motorola Droid Android Software 2.0 working emulator on your computer!
The Icing on the Cake
Well, now you have a working Motorola Droid emulator. You’re perfectly fine with just using the built-in software, right? No! A nice treat to be able to do with the emulator is to install Android Applications onto it, and see how they would run on the phone as well(minus the motion control). To do this, you need to have the .APK files that you want to install onto the phone (it is easiest if you store these .APK files in the Tools folder of the SDK) and then:
- Open up your command line( Start > Run > type in CMD for Windows computers)
- Change the directory to target your Tools folder in the SDK. For example, type ‘cd C:\android-sdk-windows\tools’
- Then all you have to do is type adb install “name of the app that you want to install.apk” Wait for the command box to say Success!, then go back to the emulator and enjoy!

This merged a lot of information from different sources into one article. Some of the information was found on https://developer.android.com and https://www.androidandme.com . The manual for the SDK has a lot of very useful information in it.
For Related articles, go to
https://www.brighthub.com/mobile/google-android/reviews/65955.aspx
https://www.brighthub.com/mobile/google-android/articles/65899.aspx


