
Are you an Android user who needs help managing your contacts? In this helpful guide, learn how to add or delete contacts on Android, as well as how to edit Android contacts.
Android Contacts
On your Android phone, the Contacts app is used to manage information for your friends, such as their phone numbers, e-mail address, and so on. Things can get a little more complicated when you tie it into your Gmail or Facebook account, like when you sync all of your contacts and wind up with hundreds of added entries from people you may not even know. In this Android contacts guide, we’ll discuss adding new entries and how to delete contacts on Android phones as well as how to edit Android contacts and sort through all that information.
Note: This guide was written using the Samsung Galaxy S , so there may be some minor differences in screen and menu layouts although the base functionality should remain the same.
Before Your Sync
It’s pretty common for Android users to sync their Facebook account with their contacts, and the main reason to do this is to automatically assign a friend’s Facebook photo to their contact listing. When you sync Facebook friends with Android contacts , you may wind up with duplicate information or a few oddball entries that you want to delete.
What you really have to watch out for is when you sync your Google contacts to Android because you might import information for every person that has ever e-mailed you. I made this mistake when I first configured my phone and had names, addresses, and phone numbers from people I didn’t recognize.
If either of these scenarios sounds familiar, the steps below and on the next page will show you how to clean up your Android contacts.
How to Add Contacts to Android
Adding a new contact to your Android phone is very easy and only takes a few seconds. Just follow these steps:
- Open the Contacts app.
- Press the + Create Contact button at the top of the screen.
- If prompted, choose whether to add the contact to just your phone or to make it part of your Google contacts , too.
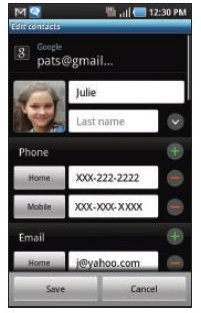
- At the ‘create contact’ screen, fill in all the appropriate information like the person’s name, phone number, and e-mail address, if you wish to save that into your phone.
- Press the Save button and you’re done.
How to Delete Contacts on Android
Removing a contact from your Android is easy. In fact, there are two main ways to remove a contact. Just follow these simple instructions for entries in your main Contacts listing:
- Open the Android Contacts app.
- Locate the contact you wish to delete.
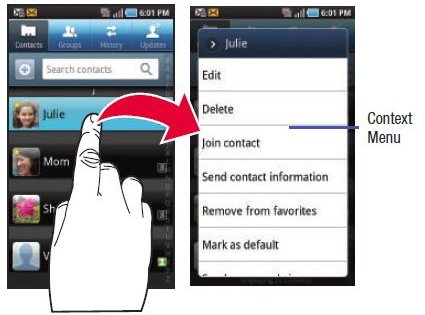
- Press and hold your finger or stylus over the selected contact until a pop-up menu appears.
- In the menu, select Delete.
If you need to delete a contact from under your Groups (Gmail, Facebook , Unknown, and so on) just follow these steps:
- Open the Android Contacts app and select the Groups heading.
- Locate the contact you wish to remove from the appropriate group.
- Press the menu button on the phone and select Delete from the menu that appears.
In both cases, a confirmation screen will appear with a warning and you can press OK to delete. If the contact has more than one number stored you can select which numbers to delete, then press the Delete button.
How to Edit Android Contacts
Editing contacts in your Android phone is just as easy as adding a new contact or deleting an old one. You can add extra phone numbers and other contact information to your existing entries, such as including office and cell phone numbers for friends and family. To edit an existing contact, follow these instructions:
- Open the Android Contacts app.
- Locate the contact you wish to edit.
- Press and hold your finger or stylus over the contact name, then select the Edit button from the pop-up menu.
- Note: If you wish to review what information is already in there, just tap the name of the contact, then hit the menu button on the phone and select Edit from the screen that appears.
- Make whatever edits you wish, then press the Save button and you’re done.
Note: One edit you may wish to consider is adding the area code for any contacts that don’t have it included in the number. This will help to ensure that your calls and texts get through whenever you are outside of your regular coverage area where the area code will be required to complete a call. I have found that the Android’s built-in SMS app sometimes doesn’t work properly when texting contacts that don’t have the area code included in the stored number.
Address Book Upgrades
If you find yourself regularly dealing with the Contacts app and want something better, there are several options available for Android users. Check out our list of the best contacts apps for Android and you might find a better address book to suit your needs.
For people that you regularly contact, you may also consider checking out of the great Contacts widgets that lets you make one-click direct contact with your favorites. This is great for those people you call or text the most and offers shortcuts to their contact information, plus you can customize the appearance of the button on the home screen.
References
- Author’s experience with his personal Samsung Galaxy S
- Samsung Galaxy S Screenshots courtesy of Samsung.com from user manual


