Many businesses can only survive because they can use SQL scripts within their websites. eBay and Amazon.com are two examples of websites which execute and run millions of lines of SQL scripts and queries behind the scene every minute to fulfill their online shopper’s needs.
Step 1: Create a Database
SQL (Structured Query Language) is a standard interactive and programming language for querying and modifying data and managing databases. Many might pronounce “SQL” as SEQUEL.
In this article I will cover how to create connection with your database and how to execute / run the SQL script from within your ASP.NET code.
Let’s create a simple Microsoft Access database.
Step 1. Open up Microsoft Access
Step 2. Select ‘New’ from ‘File’ menu
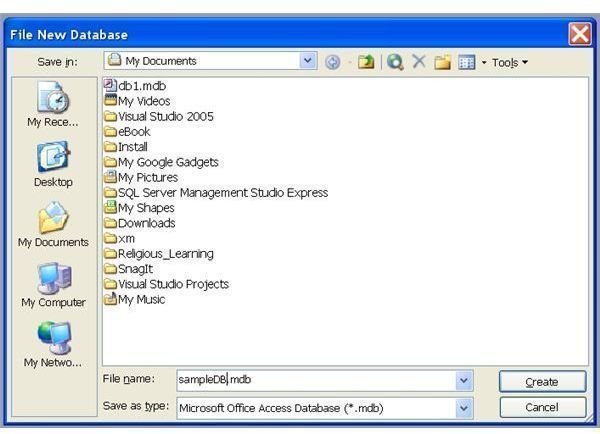
Step 3. Create a blank database and name it sampleDB.mdb (see ‘DB Screen Shot’)
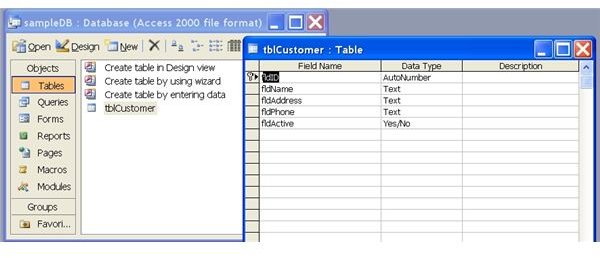
Step 4. Double click on ‘Create table in design view’ to create your sample “Customer” table.
Step 5. Create fldID, fldName, fldAddress, fldPhone, fldActive fields. (See ‘Table Columns’ screen shot)
Step 6. Save the table name name it tblCustomer
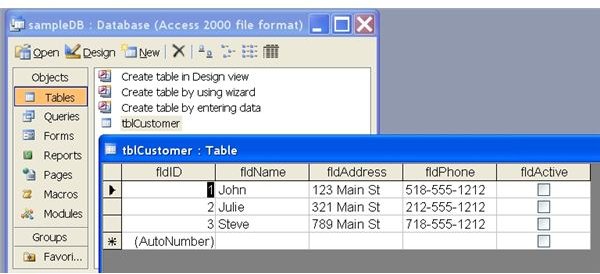
Step 7. Now let’s add few customers to our tblCustomer table. (See ‘Table Data’ screen shot)
Now you have your first Access database “sampleDB.mdb”. Move this database file to your “App_Data” folder in your ASP.NET website project. Moving a database file in App_Data folder is much better than keeping it in any other folders. ASP.NETrecognizes the App_Data folder without specifying any path. If you have your database file in any other folder, then you would have to specify the path which is not always the best option.
Step 2: Set a Connection String Variable
Let’s set a connection string variable for the Access database file you created and execute and run a SQL script against the table called ’tblCustomer'.
Open up your page, any page that needs to execute SQL script, and enter the below code (without line numbers) within a button click event or page_load event.
For this example, I’m using Default.aspx and Default.aspx.cs. Default.aspx is similar to an HTML page and Default.aspx.cs is its code behind page.
Open up Default.aspx (HTML) and add two labels, one to show status and another to show all of the customers.
<asp:Label ID=“lblStatus” runat=“server”></asp:Label>
<asp:Label ID=“lblCustomer” runat=“server”></asp:Label>
Please note I have used ID=”lblStatus” and ID=”lblCustomer”. This is how the code behind page (Default.aspx.cs) will be calling these controls. IDs are same as an object’s name.
Accessing the Database
Now switch to Default.aspx.cs
Before we go any further, let’s make sure our Default.aspx.cs has this line included on top:
using System.Data.OleDb;
//We explicitly include System.Data.OleDb because, by default, ASP.NET assume we are going to be using SQL Server connection. In this case we are using Microsoft Access so we have to including the proper classes and libraries.
We are going to write the below code in Default.aspx.cs page within the page_load event.
//First let’s create a Connection to the Microsoft Access Database
string sqlConnectionString = “Provider=Microsoft.Jet.OLEDB.4.0;data source=|DataDirectory|\\sampleDB.mdb”;
//Now let’s set a variable strSQL to what we want to select from the database table
string strSQL = “select * from tblCustomer”;
//Following line sets “conn” variable equal to OleDBConnection object by passing the connection string sqlConnectionString we created above
OleDbConnection conn = new OleDbConnection(sqlConnectionString);
//Create a command object for the query
OleDbCommand cmd = new OleDbCommand(strSQL,conn);
//Now open the Database Connection before populating your DataReader
cmd.Connection.Open();
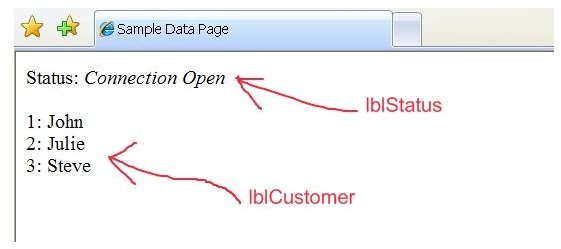
//Show connection status to the user. lblStatus is the label we created in Default.aspx page
lblStatus.Text = “Status: Connection Open”;
//Create and Populate the DataReader
OleDbDataReader reader = cmd.ExecuteReader();
//Read through the records in the database. We are using a “while” loop here.
while (reader.Read())
{
string strCust = reader[“fldName”].ToString();
//Please note, we are showing all of the customers in label lblCustomer
lblCustomer.Text += reader[“fldID”].ToString() +": “+strCust + “
”;
}
//Close the DataReader
reader.Close();
//Close the Connection to the database
cmd.Dispose();
conn.Close();
That is all. As you can see, it is very easy to run SQL script within your ASP.NET application. Please see the “Sample Output” screen shot.
Please click here to download the sample project for this article.
Screen Shots