Forms are powerful tools that allow you to collect information from your site’s visitors and enhance your site’s overall design. With these step-by-step directions on how to make forms in Dreamweaver, you can add these useful tools to your site without much muss or fuss.
What is a Form?
A form is a simple way for web servers to get information from their visitors. Technically a form is hidden, but chances are, you may have already seen one but didn’t know it was a form. With forms, you actually see elements like the text fields, radio buttons, check boxes, and even drop down list boxes. One example of this is the “SUBMIT” button, which you click in order to initiate the sending of the data collected from the form elements. In this basic tutorial on how to make forms in Dreamweaver, we will cover the creation of easy to learn Dreamweaver form elements like text fields, radio buttons, and submit/reset buttons.
This tutorial uses a simulation of the web server’s function using PHP. This will be employed for purposes of illustration. Proceed on to learn how to make forms in Dreamweaver.
Basic Tutorial on How to Make Forms in Dreamweaver
This 7-Step tutorial uses Adobe Dreamweaver 8 and the WAMP server to run the PHP files. You will need to have WAMP installed for the PHP parts of this tutorial to work.
Other versions of Dreamweaver will also work, since the method of creating a form is almost the same in higher versions. There may be some buttons located in different places.
As an example, we will be creating a Dreamweaver form that asks for the user’s first and last name through a text field, while the user’s gender will make use of the radio buttons. Although you can use the text field for both name and gender, using the radio button for the gender is considered a better practice. This is usually found in the comment box area, and is designed to provide additional information about your web visitor, in case you want to conduct a survey about visitor ratio.
All labels used here are for example purposes only. You can create your own labels of course. Please click on the image to get a larger view. The steps below will outline the general process of how to make forms in Dreamweaver.
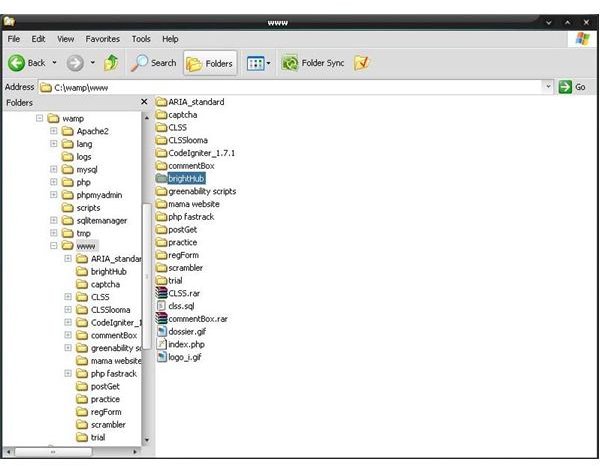
First Step: We will create a folder called brightHub in “C:\wamp\www” and it will look like this:
This is where we will be saving our form pages and it will go into the “www” folder in WAMP. WAMP will now be able to translate the PHP scripts in our files.
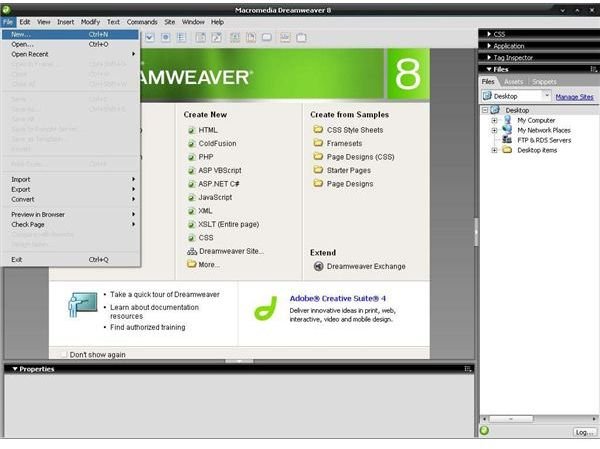
Second Step: Click the “Create New > HTML” button in Dreamweaver:
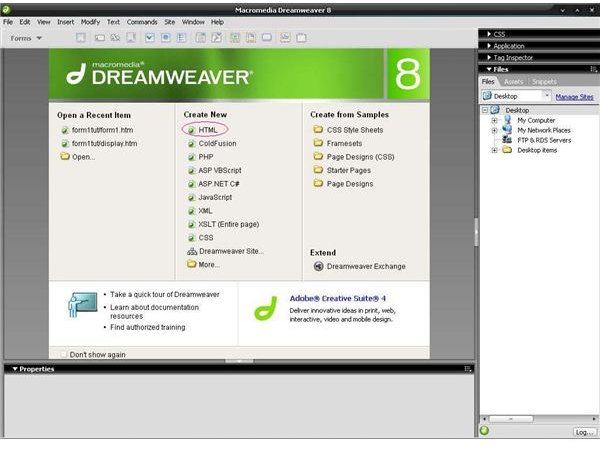
Next, choose File > New… then select basic page HTML.
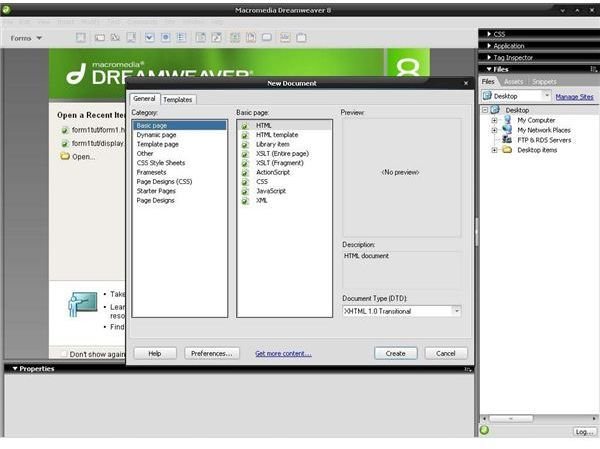
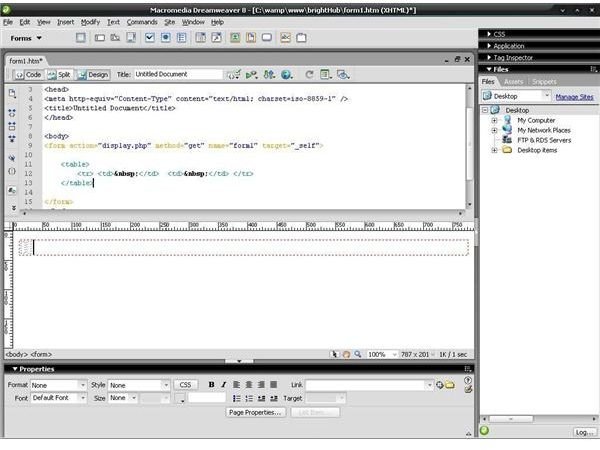
Third Step: Now here comes the fun part, designing the form on the webpage itself. We will be using the split view on this tutorial, where you can see the code as well as the results immediately. Now we should have something like this:
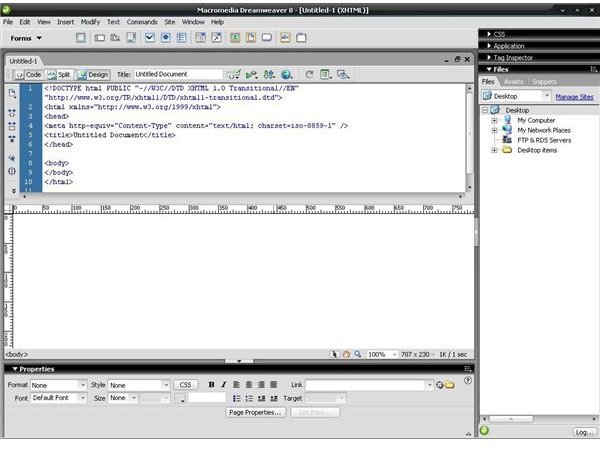
This is a blank .htm file with all the required tags for it to work.
How to Make Forms in Dreamweaver (continued)
Fourth Step: In the menu bar, click Insert > Form > Form - As shown in this image:
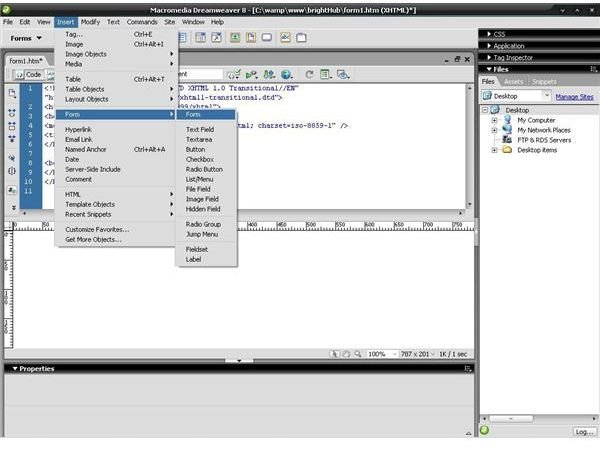
Make sure that you have the cursor in between the
tags.Subsequently, you should get something like this:
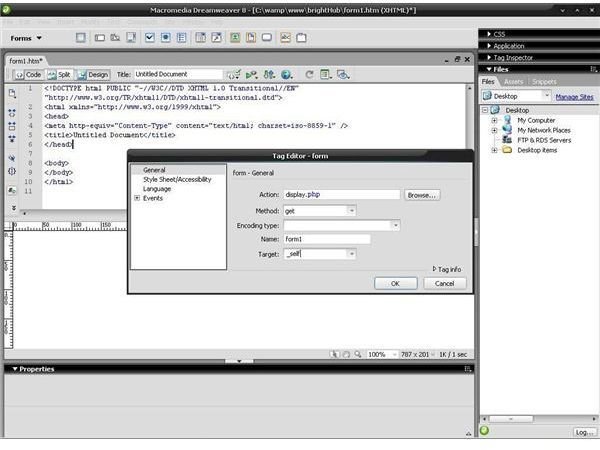
Fill up the dialog box to match the image. It would be best for you to take note of the following explanations:
Action – This is where our form will throw the data. We will use display.php, which will be created later on.
Method – This is how our server will handle the data or how it will pass the data to display.php. We will use the word “get." In using “get," you will be able to see the variables and the data sent through the address bar. You can also use a counterpart called “post”. However, if you will be using “post," it will not show the data being passed on the address bar of your browser.
Encoding – Leave this part blank, as this tutorial is focused on how to make forms in Dreamweaver rather than web security. This feature is mainly used for web data security.
Name – This is what our form will be called. The variable name we will be using for the form will be “form1".
Target – This is the behavior of our form on the browser when we click the submit button. It will have choices like “_blank” and “_self”. We will use “_self” in this tutorial because we would like to reload the page rather than open a new tab or window. “_blank” on the other hand will do the opposite by calling display.php into a new window or a new tab.
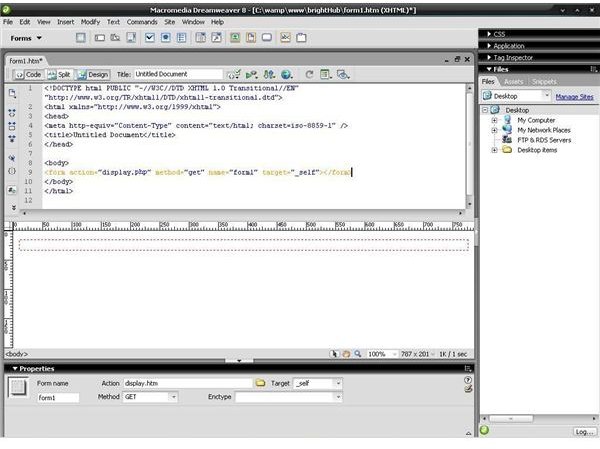
Now, we should have something like this:
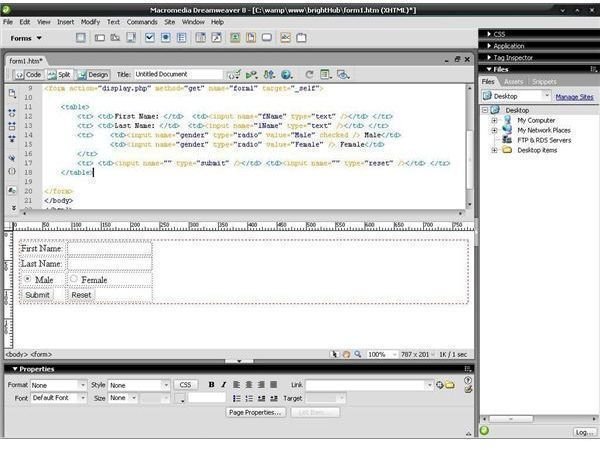
Fifth Step: It’s now time to insert the form elements. Let’s start things off with a table with “two columns” to make our form neat and presentable. It is not required, but it is a good practice to make your HTML code easier to manage. You should have something like this:
We now have a place for our text field, so it’s time to insert one. Just be sure to remove the “ ” on the cells. Now place the cursor in between the
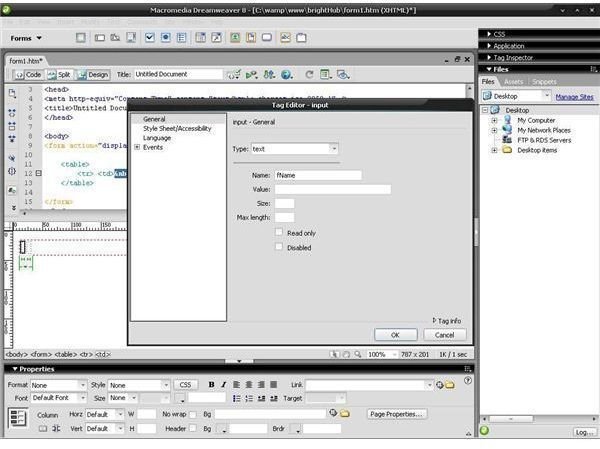
Take note that we put a value of “fName” on the Name field of the dialog box. This will be the variable name of our text field once we retrieve it through PHP. We leave the other fields blank so we get the default values for the text field. After that we should have something like this:
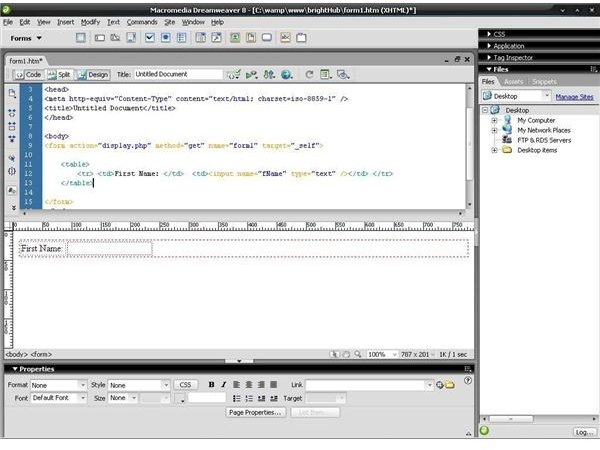
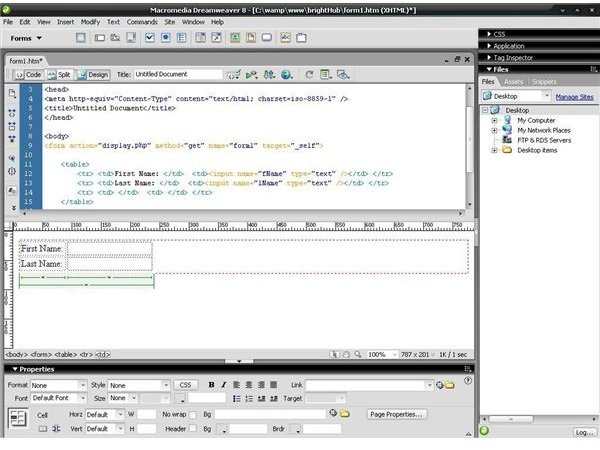
Notice that the other table cell was filled-up with the label “First Name” so that the user filling up this web form will know what the text field is asking for. Now try adding another row like the First Name text field on the table; but instead, use lName as a variable for the text field and label the table as “Last Name”. It will then look like this:

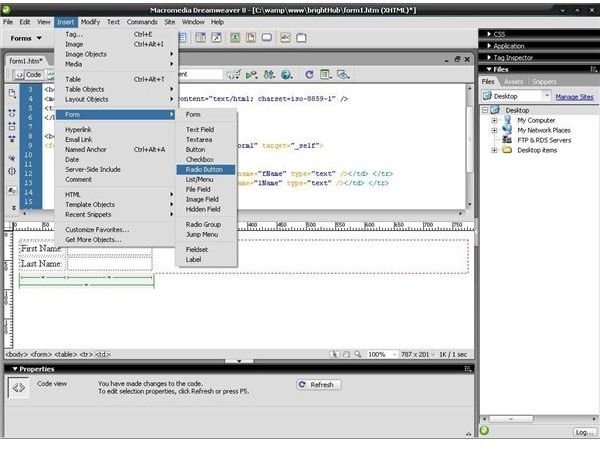
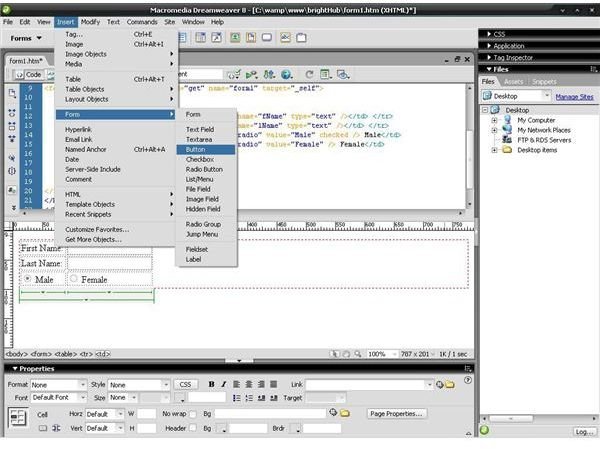
Sixth Step: Now it’s time to add the other form elements. This time we will be adding a radio button selection. A radio button selection allows you to select only one in a group of choices. Hence, we will add a new row which the user will use to select a gender.
Then, while the cursor is in the first cell of our new row, click Insert > Form > Radio Button:
A dialog box will then appear:
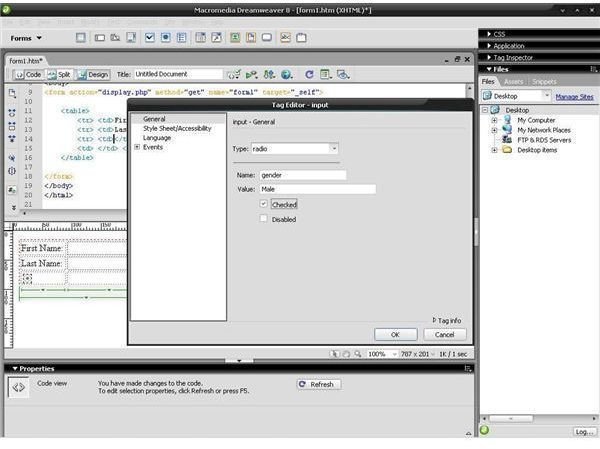
After clicking the Ok button it should look like this; then just add the text “Male” beside it:
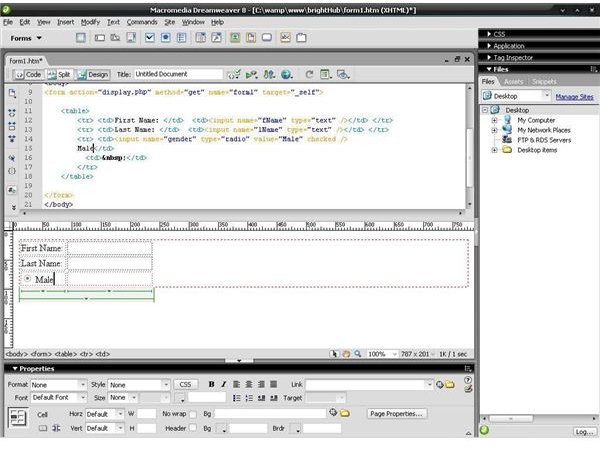
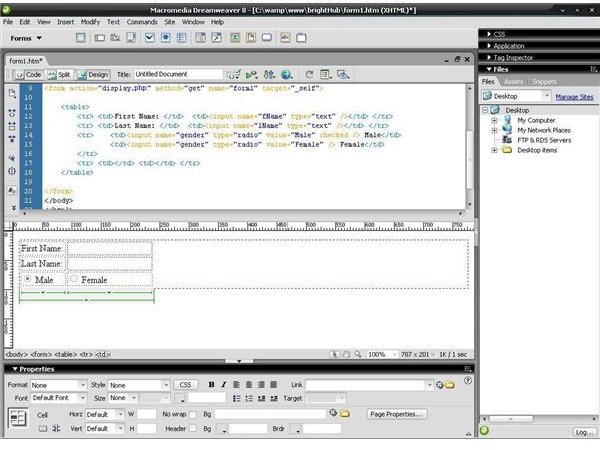
As you can see on the image, we named the radio button as “gender” and gave it a value of “Male”. Now let’s create the female radio button on the adjacent cell. Note: The variable names for the “Male” and “Female” radio button should be the same; otherwise both buttons will have the freedom of being selected at the same time.

Seventh Step: As a way of telling the browser what to do with the data, we will use the “submit” and “clear” buttons. The submit button will send the data to the server and follow the “action” attribute of your form which is “display.php”. The reset button on the other hand will just delete or reset the fields to their original state and do nothing. It is useful if the user wants to start all over again with the form.
To do this, we need to add another row with two columns in our table as seen here:
Next, with the first column selected, click Insert > Form > Button.
A dialog box will appear once again. Now it will look like this:
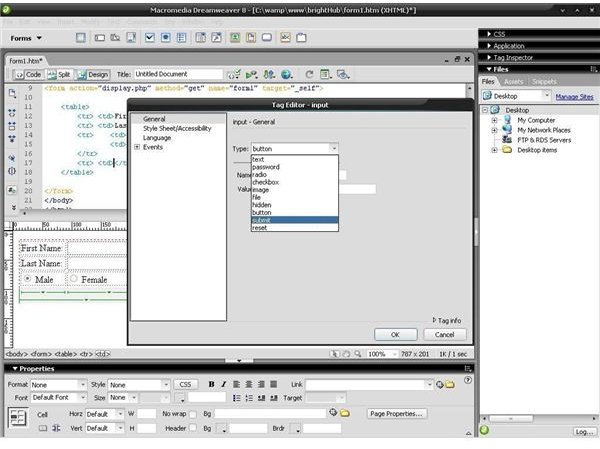
From the drop down menu labeled Type: choose Submit. Leave the other fields the way they are. Click Ok. Now it should look like this:

Place the reset button on the adjacent cell by using the same method we used with the “submit” button. However, instead of choosing “submit” on the drop down, choose “reset”. It should look like this:
Save the file in the created “C:\wamp\www\brightHub\” folder as ‘form1.htm’. Now you have successfully made a form in Dreamweaver using HTML.
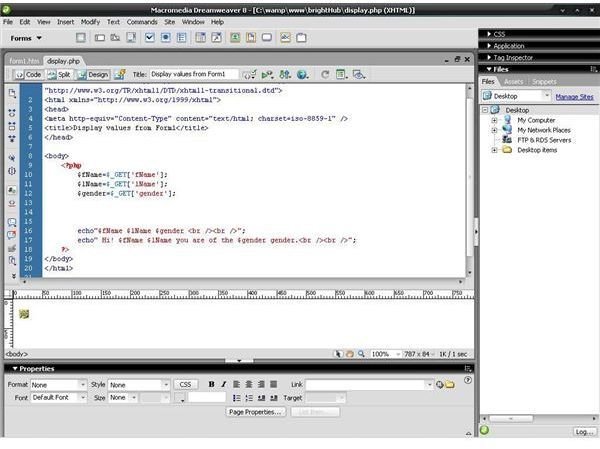
To understand how this form works, we will put it into use by means of PHP. Create a new .php file in the same directory and name it as “display.php’. This is where our values will go. See the image in step 2, but rename it as .php; in case Windows displays a warning about “file instability”. Click Ok to proceed.
In ‘display.php’, paste this code between the body tags:
"; echo" Hi! $fName $lName you are of the $gender gender.
"; ?>
It should look like this:
Note: Be sure to have the WAMP server up and running before testing it on your browser.
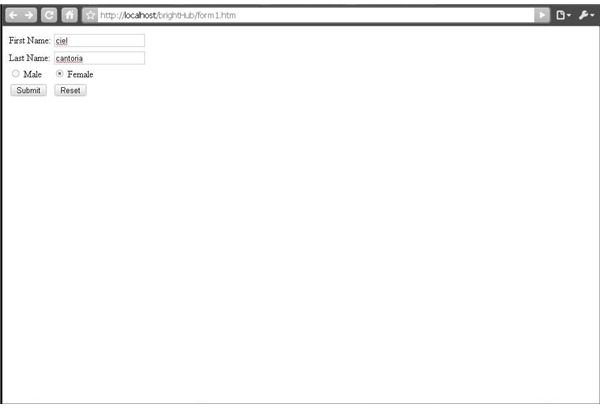
Now, to test, enter https://localhost/brightHub/form1.htm in your browser. You will know that your form is working if your browser will show this image using your own titles:
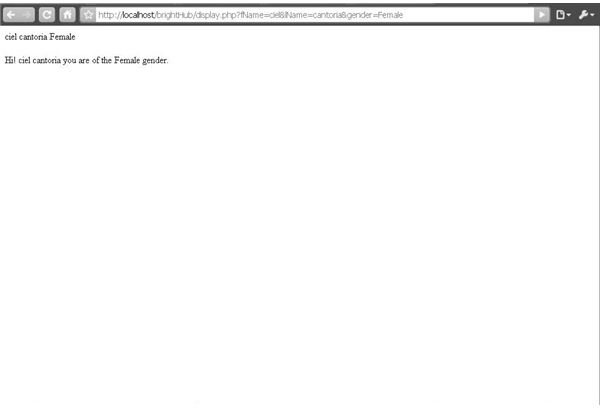
By clicking the submit button, you were transferred to the display.php page, as shown below:
This is now your complete basic tutorial on how to make forms in Dreamweaver. This tutorial also teaches how the data is utilized by the web server. In case you need to brush-up on your HTML, you may want to visit this article entitled: How to Create a Simple Web Page with HTML Basics.
You can now create other forms for getting feedbacks and asking about your viewer’s preferences. However, you should also keep in mind that most viewers prefer the radio button. Thus, they can simply click on the selection over filling-up text fields. Be sure to make every web form user-friendly, simple, and workable.
Reference:
- Instructions and screenshot images were created for this article by the author.


