
Creating a database for a major application requires software like Microsoft SQL Server or Oracle. Otherwise, it is easy to build database tables using the Visual Web Developer (VWD) that accompanies ASP.NET and a free database system like MySQL or SQL Server Express Edition.
Four operations are possible after creating a database. These are: 1) Data entry; 2) Data retrieval; 3) Data changes; and 4) Data deletion. This article describes the initial step of creating tables and adding data using the free Microsoft Visual Web Developer 2008 Express Edition SP1 available through the URL listed below in Resources. You will also need the free Microsoft .NET Framework Version 3.5 SP1 from the same site.
Create the Database Structure
First, open the Visual Web Developer software and create a new website using the ASP.NET website template. You find this by clicking on “File” and then on “New Website.” You can leave all but one of the default settings on this template as they are. You should change the pre-selected name and file location of the new website to your own choice. Click “OK” to proceed.
As part of creating a database for the website , VWB adds a folder named “App_Data” to the website. This folder will be where the database creation takes place. Locate the folder in the Solution Explorer pane on the right of the screen and right-click on it. Select “Add a New item.” For the type of item, choose a new SQL Server Database. Rename it to something of your choosing with the extension “.mdf.” VWD will create the necessary elements of the new database, which are viewable in the Database Explorer pane. If you do not see this, click on “View” in the Main Menu and select the Database Explorer window. The image shows how all this should look at this point.
Create Database Tables and Columns
Before you can store any data in tables in the new database, you must define the structure of the tables. Do this by right clicking on the “Tables” folder in the Database Explorer and selecting “Add New Table.” This will open an editor screen to apply names to the columns, set the types of data each column can hold and decide whether to permit null (empty) values. The pre-designed data types are self-explanatory such as Integer, Date, Text, and so forth. For textual information, there are options for plain text or a limited number of characters. Selecting “nvarchar( ) and inserting a maximum character number between parentheses will restrict input in this column to that number.
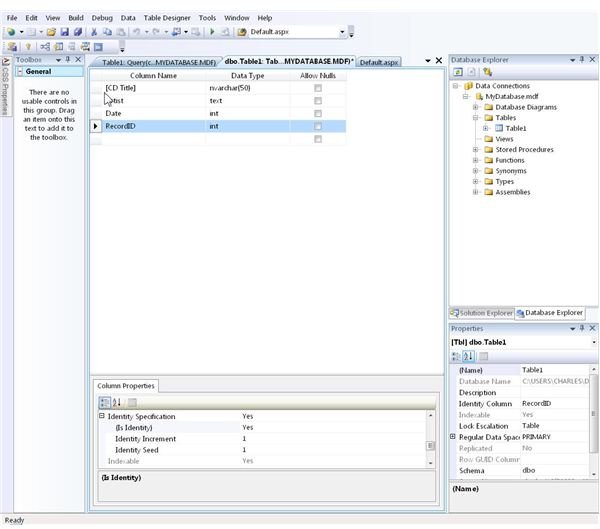
Create Database Tables and Columns (Continued)
Finally, every database creation process should include a unique way to identify each record. Unless one column in the table will always hold a unique value, this happens by adding one more column, named something like “RecordID.” After adding this column, there is an icon in the toolbar at the top to “Set Primary Key.” Click on this to set the column as a key identifier. Then, when you click on the new Primary Key column, the properties will display below the table. Scroll down to the line reading “Identity Specification” and change the [IsIdentity] value from “No” to “Yes.” This will automatically increment the RecordID value of each new record added. Create additional tables in the same way. When the design is finished, click on “File” and “Save Table.”
Adding Data to Tables
Having created a database, you need to aAdd new information for the database table either through the Visual Web Developer or by a separate ASP.NET page, which requires more development. Using the VWB is the easiest route to go at this point. Later, by creating an ASP.NET page for data entry, other users can add to the database. With VWB, expand the Tables folder in the Database Explorer view to see the list of existing tables. You can expand a table to verify the column titles. By right clicking on the table and selecting “Show Table Data,” a window will open with the first empty record showing nulls. At this point, you can begin entering data, using the Tab Key to move across the fields. At the end of the row, the cursor will move on to a new record and the identifier will increment. The format of information entered must match the choices made while creating the table or an error will occur. The display width of the columns is increased or decreased by clicking on the vertical bar between columns and dragging to the left or right.
Creating a database, adding tables, and entering data with ASP.NET and Visual Web Developer is a quick and easy way to set up simple databases for home or business use. The process is straightforward and nothing is set in stone. Add or remove tables and columns later; revise or delete data, and modify the presentation of the information
Additional Resource
ASP.NET Essential Downloads https://www.asp.net/downloads/essential/


