Building an online store from scratch with Dreamweaver and maintaining it on your own server is a complicated, time-consuming and expensive process. It can be done, and this article will lay out the basic principles. Alternatively, consider for-sale Dreamweaver add-ins or commercial products.
Preliminary Notes
All suggestions in this article are based on Windows Vista and either Macromedia Dreamweaver 8 or Adobe Dreamweaver CS3. The examples do not include the customized graphics needed to make the storefront attractive to visitors nor the steps involved in setting up a secure checkout system. A simple way to handle the latter would be to integrate the result with PayPal.
Requirements
As a first step Internet Information Services (IIS) must be installed on the PC. This is a service that is included in Vista (and was in earlier Microsoft OS’s as well). It may not have been installed by default. Check this by looking for a folder on the C: drive named inetpub. If that is present there also should be a folder included called wwwroot. If not installed, use the Add Windows components process to install IIS. This is where your Web services will run from if you are running your own server. If you are mounting everything on a remote server, the files will need to be uploaded.
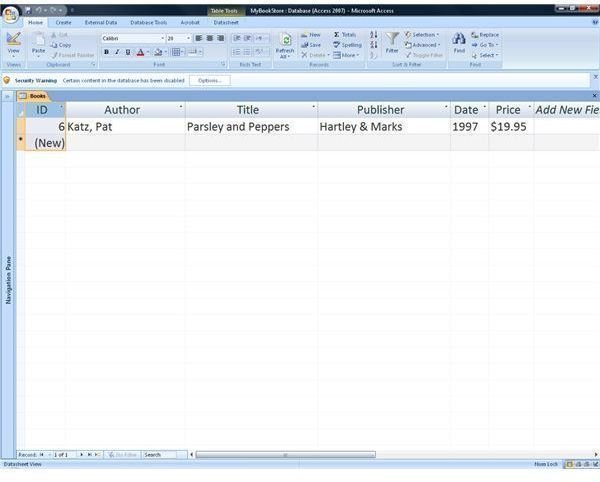
Create a prototype database to hold your catalog of goods for sale. If you are going to run Microsoft Exchange Server 2003 or 2007 and Microsoft SQL server (or your Web host uses this) then create a Windows Access database. If operating with PHP and MySql then start with a PHP database. Dreamweaver integrates nicely with PHP—and good books on the subject can be found on the Web. The image captioned “Database” is a simple one item catalog.
Data Services Linkage
Next, you’ll need to link the database to data services. For an Access database, follow these steps:
- Go to Start/Control Panel/Administrative Tools/Data Sources where you should see Microsoft Access database and Microsoft Access Driver listed.
-
Click System DSN tab
-
Click Add
Advertisement -
Highlight Microsoft Access Driver ((*.mdb, *.accdb) (earlier and current versions of Access databases)and Click Finish
-
Now you should see a setup screen. Enter the name of database, a description if you wish and a user name and password if desired.
Advertisement -
Click Select under the Database section and locate the new database under c:\inetpub\wwwroot. Click OK and then close.
Dreamweaver Setup
Open Dreamweaver. Either choose File/New/Dynamic Page and ASP Javascript under the page type or on the screen under “Create New” click More. Fortype choose ASP Javascript, and then Create. Name this something meaningful such as MYBookStoreAPP with the extension asp. Now click on Window and in the drop down menu choose Databases. Click the plus (+) sign and select Data Source Name. You should see the DataSource name you gave to the database. Give the Connection a name like MyStore. Click OK.
A window should pop up showing the new database connection. You can view the database scheme by opening the databases tab under Window. Click on the + sign until you expand the Tables list at which point you should see the fields you created. If anything fails go back and check the URL connection and the Data Source name. (Note: Server Behaviors panel settings will depend on what server technology you will be using on your final host.) When finished with this part you should set up a testing server and site on your PC if testing locally or on the remote host. Dreamweaver will walk you through this. It is done just like setting up remote site.
Enable Searching Capabilities
Now you have to create a Recordset that will let users locate an item in your bookstore. On the Bindings tab click the plus (+) sign then Recordset. Fill out the information on the Recordset window—name, (add rs to the front to distinguish these terms). For example, you might call this item rsSearchBook. Select Connection name from the drop down list. MyStore should be there and once selected, the Books table should appear. Leave the default All selected in the columns choice. Click OK.
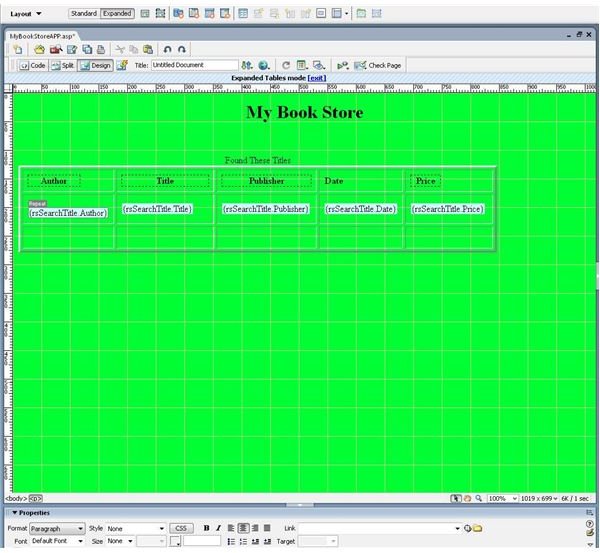
Using Dreamweaver’s Insert/Table layout a table that will display the results of a search. In this example there are columns for Author, Title, Publisher, Date and Price. These now have to be linked to the Fields in the database. Open the RecordSet panel as above. Use the plus sign to expand the Table links, and then Click and drag the data items from the RecordSet list to the appropriate column. Allowing for more than one item to be retrieved from a search is easy. On the same Bindings window and click on the Server Behavior. One of the items listed here is Repeat Region. Click and drag this to the item in the first column. The image captioned “My Book Store” represents the work to this point.
Search Form

The last step in this part of the operation is to set up a simple HTML search page form with Dreamweaver’s Insert/Form. The only required items in the form is a bit of explanation, a text box with a label reading something like “Find” plus a “Submit” and “Reset” button. Give one button the value of “Submit” and the other “Reset” and Dreamweaver will insert the proper actions automatically. The only thing left is to direct the Action of the Submit button to the ASP form that you created earlier. You can do this by using the Code view in Dreamweaver. The remaining step is to add the necessary query structure to find items, using either Microsoft SQL or the open source MySQL. Of course, for a finished product, both pages need to be dressed up considerably. The image captioned “My Book Store Search” is a basic example with one simple graphic.
Setting up a checkout and payment system is a matter of linking an item located in the database catalog to a PayPal or other online transaction processing system and goes beyond the scope of this introductory article.


