Do you need to create a PayPal Donation Button for your Drupal website? Part one of this tutorial will show you, step by step, how to create the PayPal Donation Button.
You can create and add a PayPal Donation Button to your Drupal site in a few easy steps. You will first need to create the button and then you will need to create a new block and add it to your Drupal site. In this tutorial, I will show you how to create the button. In part two of this tutorial, I will show you how to add the PayPal button to your Drupal site.
Creating the PayPal Button for Drupal
First, you will need to create the button. Login to your PayPal account. Once you are logged in, click the Merchant Services tab. Look for the section that says Create Buttons. In that section you will see the Donate button link. Click that link and you will be carried to the page where you can create your button.
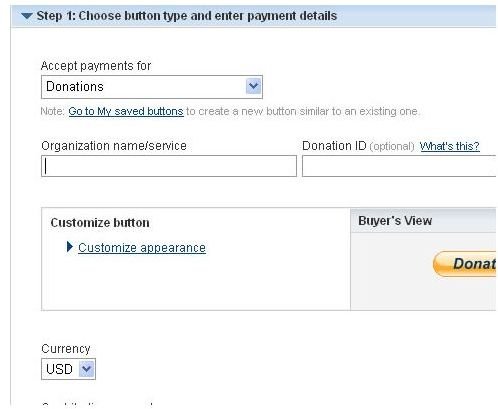
On the next page you will see the fields that you will need to fill in. Organization Name can be the name of your site or any name that you want to use. ID number can also be anything. The next section is where you customize the button. Click the Customize link to expand that section. In this section you can select if you want the credit cards to appear under the button, if you want to use a small button, and the country that you are in.
The next section is the Currency section. Drop the box down and select the currency of your choice. Then you will have two questions below that section. Do you want donors to enter their own amount or do you want to set an amount. Tick the field of your choice. If you ticked the set amount field, a box will appear and you can enter the amount in the box. It is best to let the donor set the amount, but it is your decision.
The next section is asking how you want to be identified. You can use your merchant ID which is your PayPal ID or you can use your email. The choice is up to you, but if you use your email address, you will receive a lot of spam. So, it is safer to use the merchant ID.
Click Step 2 to expand the section. This section is simply asking if you want to save the button on the PayPal website. By saving the button on PayPal, you can edit it at any time.
Step 3 does not need to be expanded. Step 3 is for customers who are creating a check out button. So, this section does not apply to you since you are creating a donation button for PayPal.
You are almost finished creating the donation button. To complete the button, click the Create Button button at the bottom of the page. On the next page you will see the code that you will need. You can copy the code and paste it in notepad until you get your site ready for it to be used.
Add Button To Your Site
In part two of this tutorial, I am going to show you how to add the PayPal Donation button to your Drupal website. You will need to create a new block in order to add the Donation button to the site. I will walk you step by step through all of that. Go ahead and login to your admin panel of Drupal.
Creating a New Block for the PayPal Donation Block
We will start off by creating the new block for the donation button. Click the Administration button in the left navigation. Then click the Site Building button in the left navigation. In the center of the page, click the Blocks link.
On the Blocks page, you will see the Lists tab and the Add a Block tab. Click the Add a Block tab. Enter a description for the block in the first field. This field will not be visible to your visitors, this is what you will see in the admin panel. You can name it something like PayPal button. In the second field, you will need to enter the title for the block. This title will be seen by your visitors. In the Block Body, you will need to copy the code that you got from PayPal and paste it in this field.
Click the Input Field link to expand it. You will have two HTML options in this section. In order for the code to work, you will need to tick the Full HTML field. Then click the User specific visibility settings link to expand it. This choice is up to you. You can choose whether to let a user hide the donation button or not.
Under the Page Specifics section, you can choose to have the donation button shown on every page of your website, or you can choose to have it on certain pages. To have it only show on certain pages, you will need to list the pages in that box. After you have finished with this section, click the Save Block button at the bottom of the page.
Your block is now created and the code has been added. Next, you will need to activate the block and position it where you want it. After clicking the Save Block button, you were redirected back to the Lists page. Scroll down to the bottom of the page and look for the block that you just created. Beside the name of the block, you will see the drop down box. Drop the box down and select where you want the new block to be. Click the Save Block button after you have made your selection.
Your PayPal Donation button will now appear where you chose for it to be positioned. To learn how to create and use your own buttons, see part three of this tutorial.


