
Creating a website button in Photoshop Elements may seem hard but is actually not that difficult. This guide will give you some tips and get you moving in the right direction. Keep reading.
Planning
This guide on how to create a website button in Photoshop Elements covers the basics of how to design two good looking website buttons. One will be a curved surface button and the other will be a glassy button as seen in the image on the left. Without focusing on any particular version of Photoshop Elements I show that it is more about creativity and techniques that you can only master through months or better still; years of hands on practice with Photoshop Elements.
The techniques here are unlike the HTML image techniques mentioned here .
Initial Steps
When you run Photoshop Elements depending on your preferences you may need to select Edit > Enhance Photos. Then when the application starts up go to File > New > Blank File. Pick the dimensions you would like the button to be including effects such as shadows or outer glows. Make sure the resolution is 72 DPI and the background is set to Transparent. . Click Ok to get started. By now a blank canvas will appear depending on the setup of Photoshop Elements.
Creating a Curved Surface Website Button with Photoshop Elements
The website buttons can be drawn using rounded corner rectangles from the toolbox with the radius of the corners set to your preference. The buttons in the image use a radius of 60 pixels. On the Layer panel, right clicking on the layer with the rectangle then selecting Blending Options gives you access to the Gradient Overlay which when clicked opens its property page.
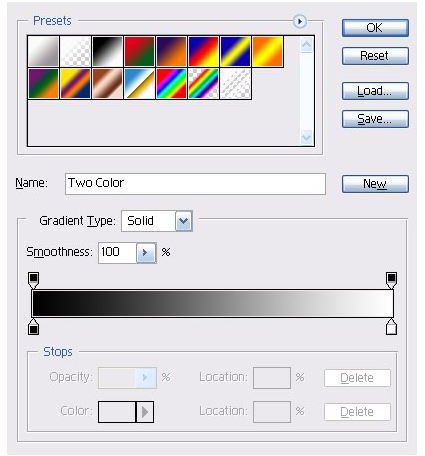
Click on the control labeled Gradient to access the Gradient Editor. In the Gradient Editor there are preset gradients as well as a Gradient Bar below it for custom gradients. The Gradient Bar has little handles on each corner which can be clicked to set the desired color. The changes made on the Gradient Bar can be seen in real-time on the actual button you are creating.
Usually taking time to tweak the colors can give you the desired result by just looking at the button and deciding what you want. The idea is to give the top half of the button a lighter shade of the color and the bottom half a darker shade. The image above illustrates this.
Creating a Glassy Website Button with Photoshop Elements
The secret with glassy buttons is drag out at least four handles from the corners. Two are used to create a gradient on the top half of the button and two to create another gradient on the bottom half that is slightly lighter. This is to give the illusion of the reflective properties of glass. You would then need to add another white rectangle on the top to give the illusion of a highlight. Add a stroke or border of about 3 pixels from the Blending Option dialog to darken the edges. This is to emulate another property of glass.
To enhance the buttons you need to place an Outer Glow from the Blending Options panel. This gives the button a clean finish. The Outer Glow should be either Black or the same color as the button but slightly darker for the best effect.
Finally Add some text. Text can be typed in and used as is on the button or can be added as plain text in on the web page using CSS or even used in Flash. See this example on Creating a drop down menu in Flash . For glassy buttons, the best effect is achieved with white text set with an opacity of about 50%. Again see the complete image above for visual reference.
Conclusion
As you will have probably noticed by now, this guide assumes you have a good understanding of the Photoshop Elements interface. Learning the details of the user interface beyond the scope of this guide. The most important thing to note is use your eyes and do not be afraid to do a lot of trial and error. If you need further help you can always place your comments below. I hope you are now comfortable in knowing how to make a web site button in Photoshop Elements.
References
Source: author’s own experience.
Images and Screenshots provided by writer


