Learning how to make a compost tumbler takes less time than gathering the materials you will need. Since you can use many common items found in your garage, you could easily finish this project in just a few hours.
What You Will Need
Before you start learning how to make a compost tumbler, make sure you have (or can acquire) the following necessities.
- Large plastic barrel with lid
- 10ft of 2x4s or 2x6s boards
- Galvanized pipe with caps
- Galvanized screws or carriage bolts
- Drain valve
- Drill with ¼ or ½ inch bit, as well as bit equal to your pipe size
- Circular Saw
When it comes to your supplies and materials, ingenuity truly is the mother of invention. You can use any solid, non-transparent plastic barrel. Some good suggestions include 55 gal food barrels or garbage cans with very rigid sides. You can also find similar barrels from car washes, feed stores, or anywhere that gets materials in 55 gal plastic drums.
If you use a garbage can, keep in mind you need a lid that seals tightly and has rigid sides that can support a full load of heavy, moist compost. You will be inserting a metal pipe through the sides, so the plastic will have to support the entire weight of the full barrel without splitting or tearing. No matter your barrel particulars, you may want to consider using grommets with the pipe to protect the plastic from wear.
Greens, Browns, Moisture, and Air
All compost methods , whether enclosed or open piles, need four crucial elements to form the black gold you need for your garden. They are nitrogen, carbon, water, and air. Building a compost tumbler, no matter your materials, relies on balancing the amount of air and water inside the container. Adding green and brown vegetative material produces the necessary nitrogen and carbon. (Suggested ratio is a 60/40 mix of green to brown, adjusted as needed to maintain damp sponge-like moisture for your compost.)
Air and moisture controls are addressed during construction. Using a ¼” or ½” drill bit, simply perforate the entire drum from top to bottom, all the way around. Evenly space your holes so as not to degrade the structural integrity of your barrel, while still providing ventilation. Approximately 2-3” between holes is sufficient. Tumbling the barrel once or twice per week helps aerate compost, providing the fresh air exchange needed to convert vegetative material to nitrogen and carbon-rich compost.
Build the Frame
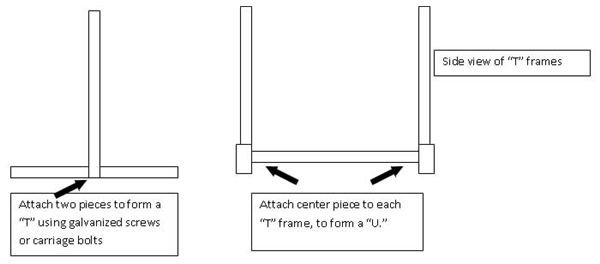
Cut 4 pieces of wood to a size of 24-28 inches, depending on the length of your barrel. Screw or bolt into two “T” shaped frames. Cut another piece of wood the width of your barrel. Invert your T frames so the top of the “T” is on the floor and the joint is facing inside. Screw or bolt the single piece of wood to the two T frames at the base. You should now have a frame that resembles a “U,” with two flat feet and a stilt on each side. If the feet of your frame seem too long, you can trim them back. However, they should be no more than a few inches shorter than the stilts to maintain balance.
Attach the Barrel
The next step in learning how to make a compost tumbler is attaching the barrel. However, before attaching it, install the drain valve at the barrel’s base. Follow the instructions included with the drain and use plumber putty or other sealant to get a tight seal. Be sure your valve is at a comfortable height to drain compost tea without removing the barrel. Plastic drain values are ideal, but with a little creativity, you can get a brass outdoor drain to work as well.
Halfway down the barrel, drill holes on either side. Holes should be level to each other and large enough to accommodate your pipe. Drill matching holes in the top of each stilt. Slide the pipe through one stilt, in one side of the barrel, out the other, and through to the second stilt. Attach pipe ends. Unthreaded pipe with cotter pins or carriage bolts serves the same purpose. Just be sure to sand pipe edges until they are smooth, to prevent metal spurs or splinters.
Start Your Compost Tumbler
Add brown material to your tumbler (dead leaves, hay, kitchen scraps, etc.) as well as green (garden scraps like leaves, stalks, and other cast-offs, grass clippings, etc.) Include some topsoil from your garden. Once your tumbler is full, you can simply turn or flip the barrel once or twice a week to mix and aerate. It takes approximately 10 weeks to form compost, if you carefully monitor moisture levels and keep it aerated. Learning to build a compost tumbler is not difficult. However, learning to manage compost processes takes a little experimenting.
Troubleshooting and Helpful Tips
One you have learned how to make a compost tumbler and successfully started composting, you may find yourself running into a few snags. This is normal. The most common problems and their solutions are as follows:
If your compost resembles a rotting, slimy mess, it is too moist. One solution is to add more dry brown material such as straw, hay, or dry leaves. Another solution is to leave the lid off your barrel for a day. Be sure to tumble well when you reinstall the lid. You can also try draining a little compost tea and using it to spray plant leaves indoors.
If your compost is too dry, add approximately one cup of water and tumble several times to mix it in. Alternatively, you can add green material such as grass clippings or garden cast offs.
Periodically check your ventilation holes to clear away any blockages that may occur. This helps maintain the delicate balance of air and moisture needed to create good compost.
When determining the exact height of your compost tumbler frame, think about how you will empty the barrel. This design allows you to easily tip the barrel and pour compost directly into a wheelbarrow when it is ready. However, think about the height of your wheelbarrow when building your frame and adjust accordingly.
References and Resources
Boy’s Life Magazine https://boyslife.org/hobbies-projects/projects/6184/make-a-compost-tumbler/
Mother Earth News https://www.motherearthnews.com/Nature-Community/2003-04-01/Compost-Tumblers.aspx
HowtoHomestead.org PDF directions for Tumbler https://www.howtohomestead.org/Graze%20the%20Roof/HowtoTumbler.pdf
Images courtesy of Sandi Johnson


