
Blu Ray movies are precious and valuable to their owners that paid to be able to watch their movies, but how do they protect their investment? Copying the movie to your hard drive will insure that if anything happens to the disc, you will still be able to watch it. Let’s find out how.
Introduction
In a previous article, I covered the details of Blu-ray Decryption - what it is, why it exists, how to get rid of, etc. Now we can cover the fun part of actually using the software available to help you copy that Blu-ray movie anywhere you want. Anyone who has ever lost a movie or had their kids scratch their discs can appreciate the need for creating a backup of the movie for their own personal use.
The actual process of copying a movie is quite simple, but it’s the additional options you can choose which really can make your watching of the copied movie that much more pleasant. For starters, you will need to obtain a copy of Slysoft’s AnyDVD HD from their website. If you’re nervous or unsure, they offer a fully unlimited two week trial for evaluation. Otherwise, the cost is 63 Euros (which converts to approximately $86 US), and this includes unlimited upgrades for a period of one year.
Images
Installation and Configuration
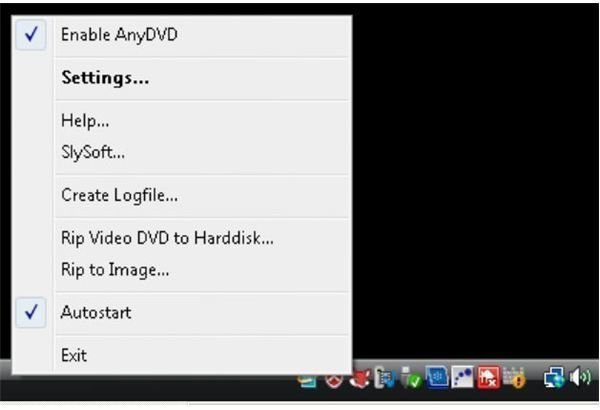
Installation is a breeze, but it will require a reboot after it has completed. Upon restart, you will notice the AnyDVD fox icon appear in your taskbar. In addition to being easily accessible, this also serves to decrypt movies on the fly, in case your display configuration does not meet HDCP approval requirements.
There are two methods for copying Blu-ray movies. One is an image-based rip and the other is a folder based rip. The image-based rip allows the copying of the movie to a single file (with a *.ISO extension) and even allows the user to maintain the copy protection. The majority of consumers will utilize the standard folder copying method which decrypts the disc and copies the identical movie folders to the hard drive. This creates a lot more files, but this method is very common for most movie collection software.
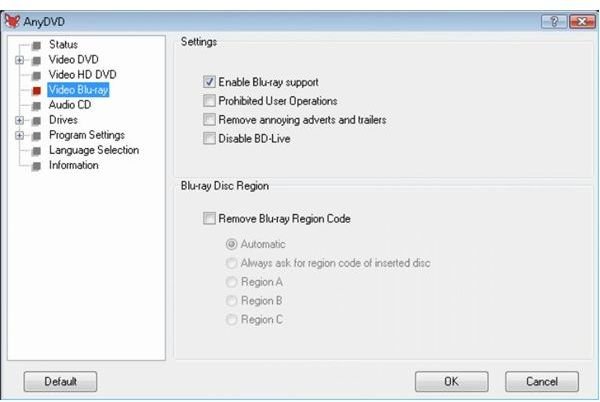
Before you get started copying, you will want to configure the settings within AnyDVD HD to make sure the movies are copied with the exact settings you desire. Right click on the Slysoft fox icon in the tray and select “Settings.” From there, click on “Video Blu-ray.” Here is where all your tweaks can be made. You obviously want “Enable Blu-ray support” checked as it is by default. For users who hate waiting for the warning screens, which the movie will prevent you from skipping past, you can check the box for “Prohibited User Operations.”
“Remove annoying adverts and trailers” will help get you to the movie instantly, so I would enable that as well. The “Disable BD-Live” box will disable this feature of Blu-ray movies and the components required. Since for the most part BD-Live has not been very useful, I would enable this as well. If a movie is released with some interesting BD-Live features, you can always uncheck it.
The final setting is the Disc Region setting. This is a valuable option if you find yourself needing to copy international or foreign movies on a regular basis, for simpler playback. Note, that the majority of these settings, in addition to making your movie the way you want it, will also take up less storage space. This is very important when a Blu-ray movie can be upwards of 40 GIGABYTES! Combine that with making a more efficient version of the movie (no annoying previews!) and you can see why this settings stage is so important.
Copy that Movie
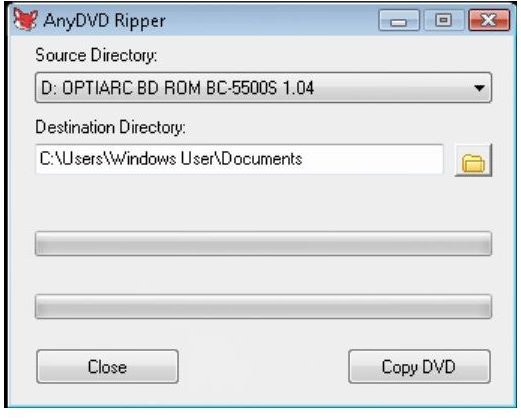
Copying the movie is actually the simplest task. To begin, Right click on the fox icon, and select “Rip Video DVD to Hard Disk.” This will bring up a small dialog window with just a few options. First, is selecting your “Source Directory,” which is the drive which contains the Blu-ray disc. (Often the default should be correct.) The second is “Destination Directory” which is where the movie will be stored. As I mentioned, Blu-rays can range anywhere from 20GB to as high as 50GB for a single movie, so make sure that your hard drive has sufficient storage space. AnyDVD supports ripping to a local, external, and even network drive, so your options for expansion are plentiful.
The final step is to press the “Copy DVD” button. The progress bar will begin and you will be shown “Time remaining” informing you how long it should take. Feel free to continue utilizing the computer as you normally would, but you will be unable to play the disc until it has finished copying. It might run a bit slower than normal, but for most tasks you should not notice. And that’s it, once complete you will now have a fully playable movie in the folder you previously selected!


