The Amazon Kindle remains one of the most popular E-Reader devices with millions of books available at some of the lowest prices you will find. If you decide to start using the Kindle for your electronic library, here are the steps you need to get it set up for your first use.
Electronic reading devices have become incredibly popular over the years and the Amazon Kindle leads the way. The Kindle has one huge advantage over the competition like Barnes & Noble’s Nookcolor and Canada’s Kobo . The biggest advantage the Amazon Kindle has is the Amazon store. When choosing which E-Reader to purchase my wife, one of the first things I researched was the price of books and Amazon won out big time in that category. Not only were new releases almost $15 cheaper than the hard cover alternatives but also were at least $10 cheaper than other E-Readers offerings. Plus, Amazon has millions of books available with older titles as low as $5 and some free of charge.
So, I purchased the E-Reader for my wife and when it arrived, it was time to figure out how to set up the Kindle.
Getting the Amazon Kindle Ready to Roll
The Amazon Kindle ships with a power adapter and a micro USB-cable. Luckily, the Amazon Kindle and my cell phone use the same USB charger, so I have numerous options both on my computer and in my car to charge the device. It is important to understand that Amazon does not recommend using any power device not supplied by Amazon, such as power converters and USB wall chargers from other companies.
However, I love the power adapter that came with the Kindle that plugs directly into the wall. That is the first thing you need to do when your Kindle arrives in the mail. The Amazon Kindle charges very quickly, often in only two hours, a welcome surprise for people who are used to charging a new device for up to 24-hours before gaining use of it.
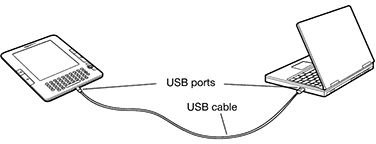
When charging the Amazon Kindle with the USB hookup to your computer, it takes longer to charge, often from four to six hours. Amazon recommends not to plug the USB cable into a hub, keyboard or monitor and to plug it in directly to the computer. It is also recommended to make sure your computer is plugged into a power outlet while charging your Kindle because some smaller laptops are not powerful enough to deliver a full charge.
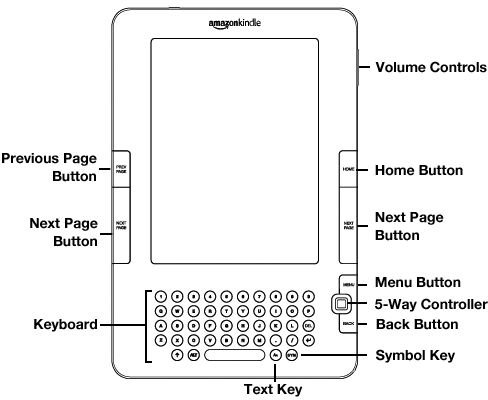
After your Amazon Kindle is fully charged for the first time, it is time to turn it on. The power switch is on top of the Kindle. To turn on the Kindle, just slide and release the power switch. When you are finished using the Kindle, you repeat this action to put it to sleep. If you want to turn it off when not using it, which is smart to conserve battery power, slide the switch over and hold it in place until the screen goes blank and then release it.
Register Your Amazon Kindle
The next step when figuring out how to set up the Kindle is to register the device. This is necessary for you to purchase and download books and content for the E-Reader. The steps for registering the Amazon Kindle are simple and straightforward.
If you do not have an Amazon.com account yet, you need to create one first.
- Head over to Amazon.com at https://www.amazon.com/manageyourkindle .
- There will be a sign in screen. On this screen, enter an email address you want to use.
- Next, ignore the password box and click “No, I am a new customer” and then click SIGN IN.
- Enter your name and verify your email address.
- Now, choose a password for your new account. Click Continue.
Now, you have an Amazon.com account, it is time to register the device. Make sure you are on the HOME screen on the Amazon Kindle. If you are not, press the HOME button.
- Click the MENU button and make sure “Whispernet” is on.
- Use the controller and scroll to “SETTINGS.” Click on it to choose this option.
- Now, use the controller to scroll to “REGISTER” and click on it.
- Next, enter your Amazon.com USER NAME and password (press the symbol key if your user name or password has symbols not found on the Amazon Kindle keyboard.
- Click OK to finish registering the Amazon Kindle.
Setting Up Your Preferences
You can now set up a password on your Amazon Kindle device to make sure only you have access to the Kindle. Make sure you are on the Kindle’s home screen first.
- Use the controller to choose SETTINGS.
- Select the option “TURN ON” next to Device Password.
- Enter a password and then enter it a second time to make sure you got it right.
- Click SUBMIT to finish.
Next up, it is time to tell the Amazon Kindle how you will pay for your purchases. Head back to your computer and visit the Amazon.com page for managing your Kindle from the “Register” section above.
Click on the link on the page that reads “Your 1-Click payment method.” It is located on the right side of the page. Click on EDIT and follow the instructions to enter your credit card or bank options to pay for your purchases. Now, when you want to buy something on the Kindle, it takes it from that payment method. Also, while on Amazon.com, you can click the “1-Click” option on any book page and it automatically buys the book and prepares it to be downloaded to your device.
Once you have completed all these steps, your Amazon Kindle is ready to use. You can shop for Kindle content either on the device or while visiting the website on your computer and will have your book collection at your fingertips wherever you are as long as you keep your Kindle by your side.
References
All information and images from Amazon.com


