Coming to grips with an email client of the scale and power of Microsoft Outlook can be difficult - especially when all you want to do is send an email!
Getting Started with Microsoft Outlook for Email
As email clients go, Microsoft Outlook is the daddy – it’s sturdy, functional, secure (particularly the most recent versions) and is the default choice for anyone wanting desktop access email from an Exchange server. It also comes bundled with all editions of Office 2010 starting with Office 2010 Home and Business and above.
Extremely functional, Microsoft Outlook can be configured to be pretty much any type of communications tool you want it to be. Integration with internet explorer allows you to browse directly from the app, while support for RSS since Outlook 2007 and integration with online calendars and Microsoft SharePoint make it the hub of any enterprise-level office.
Of course with all of this comes the basic task of writing and sending an email, a task that can easily be overlooked with all of these other options.
Getting Ready to Send an Email
At this point, we assume that the email account is ready to use, (if not, read Creating Email Accounts in Outlook 2007 ) and that you’re ready to start using Outlook in earnest.
Your first act will probably be to send an email. This might be a test message, a quick hello to someone or you might want to attach something.
First, make sure you are in the email view – you should have the inbox in the centre, the email preview view on the right and a folder list on the left. The email icon become this list should be highlighted.
Creating a New Email Message
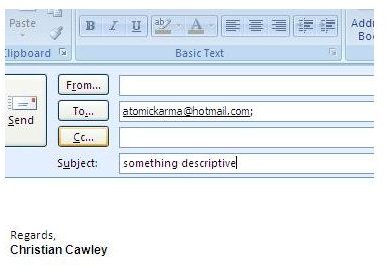
To create a new email, go to File > New Mail Message or press CTRL + N on your keyboard. In the To: field, enter an email address. This can be from memory, or you can access an Outlook Address Book by clicking To:
Next, enter a subject line for your message. This should be descriptive of what you intend to discuss.
The next step is to write your email. This can be as long or as short as you like; when you have completed the email, don’t forget to bid farewell to the recipient with a short sign off (“Regards, Elsie” or some such) – when you’re happy, it’s time to click Send.
Of course, you’re not done yet - no “using Microsoft Outlook for email” tutorial would be complete without notes on how to reply to an email message.
Replying To and Receiving Email Messages
Once you have sent your email, hopefully your friend or colleague will respond. A new email will appear in the inbox list – select the message to read it in the preview pane, or double click to view in its own window.
With an email received, there are a couple of things you can do. You might wish to reply, or forward it to a third party; you might also decide to reply with an attachment.
To reply to an email, select the message and click Reply (or press CTRL + R on your keyboard) – you can also opt to Forward (CTRL + F). When replying, you will notice that you don’t have to enter an address, unless you wish to carbon copy (CC) in a third party. Clicking the CC option displays your address book; you might opt to simply type in the email address.
Forwarding Emails
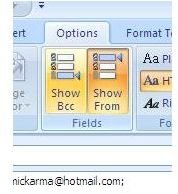
It is worth mentioning that the BCC option can also be used here; this option sends a carbon copy to a colleague without the main recipient being aware of this.
With a reply typed, and you have said all that you want, click Send. Should you want to attach a file, use the paperclip icon to open a window to browse for a file to add to the message. The size of this file will impact on how easy it is for you to send – and your recipient receive – the email, so try to keep this low.
Click Send to dispatch the message, and complete a simple emailing procedure in Outlook!


