Want to change the desktop background on your PC? Read on for a simple overview of one of the new and fun tools that comes with Windows 7.
Tired of the same, but also a bit lazy?
Then, the Windows 7 Background Changer is for you! With it, you can have a new picture on your desktop at an interval you choose. (Well, you have 16 different choices anyway.)
There are some built-in libraries of similar pictures to scroll through for this or you can create your own. It can be handy, especially if you enjoy going the extra mile for birthdays or holidays. Set up a slideshow for any occasion that you deem appropriate: Halloween, a timeline for your child’s graduation, a patriotic theme, cartoons or just do as I do and have a folder of random pictures from the Internet.
Whichever you want to do, setting up and changing the photos is very simple and will be walked through in the next section.
Changing and Setting Up Your Slide Shows
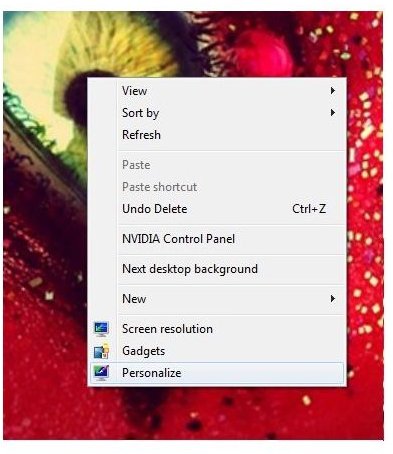
As mentioned, there are built-in slide shows or themes that you can use. Also you can download new themes from Microsoft Online. First off, to start the process you need to right click on your desktop and click on Personalize.
After you click on Personalize, the settings box will pop up looking like the image shown below. (Click any image for a larger view.)
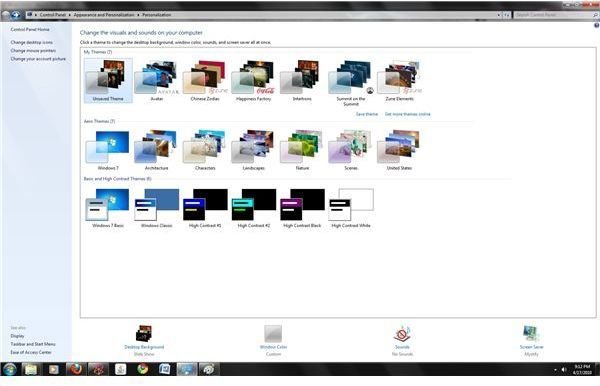
From here you may select one of the built-in Aero themes, or continue on to create your own. To create your own, click on the lower left hand icon that says Desktop Background. After that, click on the drop down menu to select where the location of the pictures that you want to use are. If they are not on that menu, then click on the Browse button to find what pictures you want to use. Please note that all of the pictures you want to use should be in the same folder, so before setting this up it might be handy to organize your pictures into different themed folders that you may want to use. If you aren’t picky and just want to use all of your pictures then browse to the main folder that the pictures are stored in and use it.
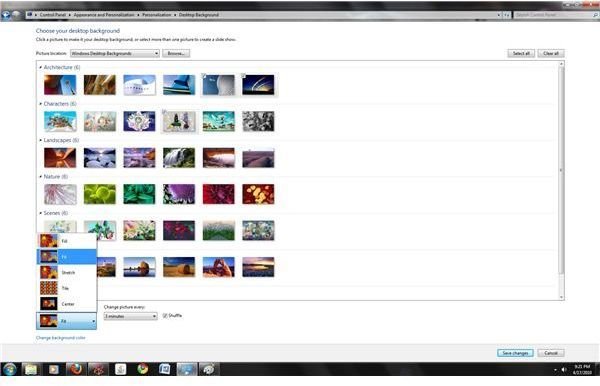
When you do get to the folder that you want to use, hover the mouse over the pictures and click the check mark above each picture to be used, or if you did set up folders that are to be used then click select all.
Other than that, the only real worries are the length of time that you want each picture to stay as the desktop background and how you want the pictures to fit on the screen. For the background length of time, you may set it anywhere from 10 seconds to one day. For how it fits on your screen the options are:
- Fill – make the image fill the entire screen even if parts of it end up off being larger than the screen
- Fit – fits the entire image crossways in the screen
- Stretch – stretches the image to fit the entire screen
- Tile – tiles the image in its native resolution
- Center – centers the picture in the center of the screen in its native resolution
All that you have to do after that is to click on save and your slide show is set up.


