Windows Defender is intended to protect your computer from spyware and other malicious programs. If you do not like or want to use Windows Defender, however, you have options depending on your operating system. Find out how to uninstall Windows Defender in XP or disable it in Vista or Windows 7.
Overview
Windows Defender is a security program that protects against spyware and other malware in Windows XP, Vista and 7. XP users must intentionally download the application, but it comes as part and parcel of the Vista and 7 operating systems. Because of this, you can easily and completely remove it from an XP computer, but it is safest to simply disable the program from startup in Vista and Windows 7. Learn how to uninstall Windows Defender using Windows XP or disable it in Windows Vista or Windows 7.
Windows XP
It is usually quite easy to uninstall Windows Defender in Windows XP. In fact, you can typically do so just the way you would uninstall any other program from Windows XP. Click Start and select Control Panel. Go to Add or Remove Programs and wait for the list of currently installed programs to be populated. Find and select Windows Defender. Click Remove and follow the prompts to uninstall Windows Defender.
However, if you are not able to uninstall Windows Defender, it is likely due to a corrupted DLL library. When this occurs there are a couple of solutions that may help. The first solution to try is to download and run the Windows Installer CleanUp Utility . This utility does not actually remove Windows Defender from your computer. Rather, it removes installation files. After running this utility, go back to Add or Remove Programs and uninstall Windows Defender.
Finally, you can uninstall Windows Defender by running the uninstall command from Run. Click the Start button and select Run. Enter
msiexec /uninstall windowsdefender.msi /quiet /log uninstall.log into the Open box and click OK.
Windows Vista or Windows 7
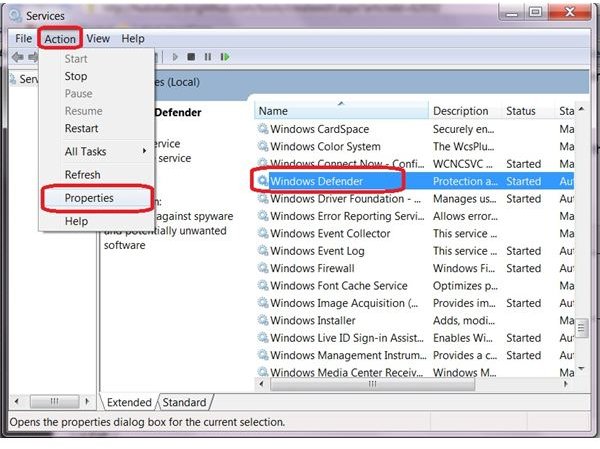
While you cannot so easily uninstall Windows Defender from Windows Vista or Windows 7, disabling the program is quite simple. Click the Start button and type Services into the Instant Search box at the bottom of the Start menu. Select Services under Programs in the list of results. The Services window will open.
Scroll down the list of names until you find Windows Defender and select it. Go to the Actions menu and select Properties. The Windows Defender Properties dialog box will open.
Make sure that you are on the General tab of the dialog box. Click the drop-down list next to Startup Type and select Disabled. This will disable Windows Defender at startup. Click OK to apply the changes and close the dialog box. Close the Services window and restart your computer. Windows Defender will no longer start up with your system.
Related Articles
To find out more about Windows Defender, read the Bright Hub articles Windows Defender vs. Spybot-Search & Destroy ,Troubleshooting Windows Defender Update Error Codes and How to Start Windows Defender Manually .


