
With modern PCs a hub for multimedia entertainment, it can be confusing keeping track of the various controls and settings. We explain how to make sure you get the sounds you want at the right volume.
Changing volume
1) You can adjust the volume of a particular program through its own controls. This will only affect that specific program.
2) You can click on the Volume icon (see picture 1) in the bottom right of your screen. Clicking it once brings up a slider control to set the overall volume. Double-clicking it brings up controls for several different settings (depending on your set-up), such as the CD player and ‘WAV’ format playback. Check carefully that you are altering the settings for playback rather than recording (which is used for microphones, webcams and so on).
3) Some keyboards have built-in media control keys such as Play and Stop. Often you’ll find there are buttons for changing volume or muting the sound. Consult your computer documentation for the location of these controls.
4) Some speakers have built-in sound controls and mute buttons. These are usually the type which plug into a power socket rather than drawing power from a USB connection.
Controlling audio settings
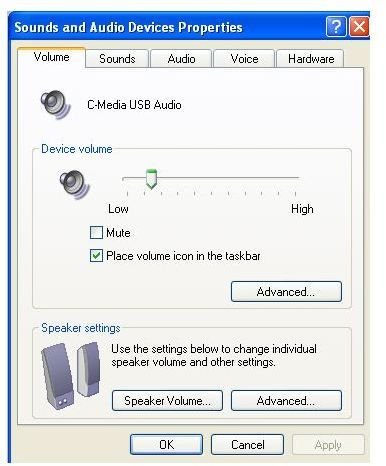
There are two main ways to get into the controls for Windows audio settings. One is to launch the Control Panel and click on ‘Sounds and Audio Properties’. (If you have Categories view, you’ll find this icon under ‘Sounds, Speech and Audio Devices’.) The other is to find the Volume icon in the bottom right of your screen (see picture 1), right-click it, and select Adjust Audio Properties.
You can then choose from several tabs (see picture 2):
Volume contains the master volume settings and options to change individual speaker volume. This is mainly for surround sound settings, but can be useful if you don’t have room to put your speakers in an ideal position for stereo sound and need to tweak the sound balance.
Sounds allows you to change the particular sounds which play when a designated event takes place, such as Windows starting up or shutting down, a USB device connecting or disconnecting, and error alerts. As well as Windows events, the list may include sounds from specific programs such as AOL’s Instant Messenger service.
To change the sound associated with an event, choose that event from the ‘Program events’ list, then select a sound from the ‘Sounds’ list below. You can preview a sound by pressing the Play (triangle) button). If you prefer, you can opt for no sound to play. By clicking on Browse, you can choose your own audio file to play for that event. However, this only works for Wave (.WAV) format, so you will need to convert other types of files.
After selecting the sounds you want, you can click on ‘Save As’ to set up a sound scheme recording all your chosen options. This can be handy if you want to experiment with future changes or transfer to a new machine.
Audio lets you choose which devices you want to use for playing and recording sounds. You should only need to use this menu if you have added an audio device (such as a microphone or speakers**)** plugged into your machine through a USB port. If there’s a device you don’t recognize, it’s probably the sockets which are built in to your machine.
Voice works in much the same way as Audio.
Hardware simply lists all the devices and drivers on your PC that relate to sounds. This menu gives you pretty much the same options as the Device Manager, which you can access in the Control Panel; it simply makes it quicker to find the sound-related settings.
Images
Related reading
>» Building the Perfect Gamer PC - Part 6: The Top Speakers
>» How To Use Your Computer as a Phone


