Excel 2007 and Word 2007 are two programs designed to work seamlessly together to print mailing labels. Learn how to set up Excel to make printing labels as easy as possible.
Creating Mailing Labels in Excel
Microsoft Excel 2007 and Word 2007 were designed to work seamlessly together to create powerful and useful documents. Word contains a useful Mail Merge function allowing you to create a variety of mass mailing documents such as envelopes and mailing labels. Long gone are the days of individually typing and printing out one envelope or label at a time.
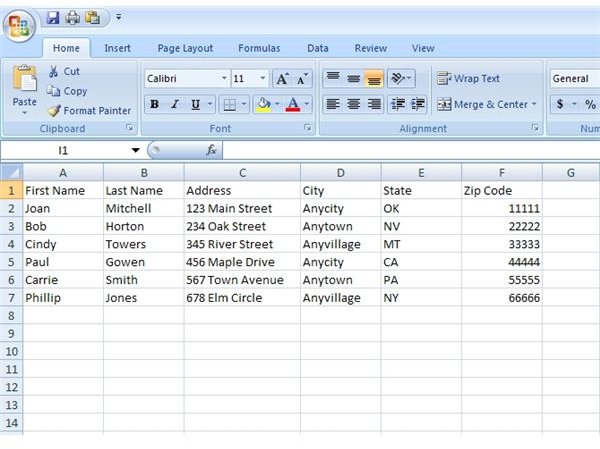
However, before you can do a mail merge in Word 2007, you must first have an Excel file that contains the mailing information in an orderly format. In essence, each field must not only contain only one piece of data, it must contain a specific type of data so the labels turn out right. Read on to learn how to set up Excel so Word read each part of your addresses correctly. For the remainder of the document, refer to the Figure for guidance.
Example of an Excel 2007 Mailing Data File
- Create Useful Field Names in Excel 2007
To start making your mailing labels, open up Excel and create useful field names in the first row. Note, as illustrated in the Figure, that each column represents one and only one field name. You could, of course, just use Excel’s column labels (A, B, C, etc.), but when you want to insert the field names into Word, you will find that descriptive field names are easier to use. The typical field names used for mailing labels are:
First Name
Last Name
Address
City
State (or Province)
Zip Code (or Postal Code)
However, you are not limited to these fields. In fact, you can include any information you want. For example, you may want to include a title field (Mr. Ms. Dr., etc.), a date field (September 23rd, 2009), or a business name field. You need to include any fields you intend to print on your mailing labels. However, you do not need to use all of the fields in the Excel file on your labels; you may have a “title” field in your Excel file, but that does not mean you must use each person’s title on the labels. You may simply have that information included in the Excel file for some other use.
- Type Your Mailing Data into Excel 2007
Now is the time for you to enter your address information into Excel. You need to type all of your addresses into your Excel 2007 worksheet under the appropriate fields. The biggest mistake people make when typing in address information is to either skip over information they do not have or type incorrect information under each field name. For example, let’s say you are missing someone’s city information and you intend to look it up and add it to your Excel worksheet later. In this case, you must leave the city field empty for that person. Do not put the person’s zip code in the city field just because that is the next empty cell. Doing so will create incorrect labels during the Mail Merge.
Remember, though, that once you save your Excel file with the addresses, you can edit, print, or use it later for another mailing to the same addresses. Be efficient and save your work. This is the power of using Mail Merge; you can save your addresses and reuse them the next time you have a mailing going to the same recipients.
- Leave the Formatting of Your Labels for Word 2007
You may want to format your labels to look a certain way once printed. For example, you may want to print the person’s name in bold or print the zip code (postal code) in a slightly larger font that the rest of the address. The best place to do this is in Word, not in Excel.
The reason for this is simple. By saving your formatting until you add the fields into the Word Mail Merge, you save yourself the trouble of having to change the font attributes (bold, italic, etc.) every time you do a Mail Merge. You can change the Mailing Fields in Word just like any other text. So, if you want to bold each recipient’s name in the address, do it in Word, not in Excel.
Conclusion
The Mail Merge is one of the most convenient and laborsaving functions available in the Microsoft Office 2007 Suite. Using Excel, you can create anywhere from one to thousands of mailing labels without having to type in the recipients’ addresses each time you have a mailing. However, to get the labels to print correctly, you must setup Excel properly so that Word can read the address information. By following the advice in this document, you can get Excel and Word to work seamlessly together to create mailing labels that are quick and easy to print.


