If your Windows XP Service Pack 3 won’t boot, then you are not alone. Here are the possible causes and their solutions with our Bright Hub tip at the end.
Introduction
After releasing the Service Pack 3, forums were stormed with the posts about Windows XP not booting. Many users experienced continuous reboots, some immediate crashes, and some Blue Screen of Deaths (BSOD). But there are basically just a few issues that caused all these unpleasant surprises. In this article we will go one by one and see how we can correct the errors.
Problems with Installation: Possible Malware Infection
This is rather a precaution than a solution. If your computer is infected with malware then installing SP3 will make it worse. I suggest you to scan your computer for infection before attempting to install Service Pack 3 and make sure that it does not have any malware.
Problems with Installation: Antivirus/Antispyware/Firewall Program is Running
Windows Service Packs alter critical system files, which anti-malware programs hate to see. Many users experienced broken/erroneous installations because they left their antivirus program running during the update. Before installing any Service Pack, make sure that you have closed your antivirus/firewall program and disabled it from the system tray (right click on the program icon and select Quit, Close, or Exit).
Continuous Boot Cycle: AMD Computers with OEM Images
Most of the continuous boot cycles are experienced by the users who are using HP computers with AMD processors. I believe this is a mistake by the manufacturer who deployed Intel images on AMD computers, because they are basically the same. But there is one critical file, which puts the system in a continuous boot cycle: intelppm.sys.
Intelppm.sys is responsible for power management on Intel computers. In AMD part, amdk8.sys does the same job. When the registry points to the intelppm.sys but could not find it in place, it goes to reboot and during the boot it cannot find the file -again- and it boots again. Users also experienced crashes or freezes before the computer goes for a reboot.
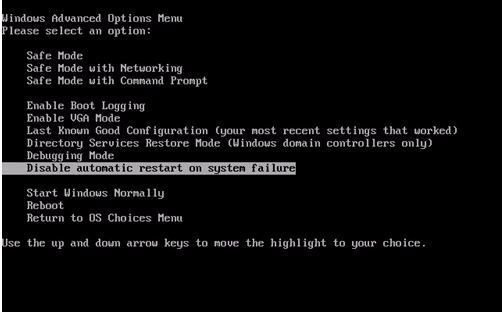
To manage this issue, we need to get to the safe mode at least. There are three possible ways to do this (or their combination:)
- Repeatedly press F7 or F8 during boot to open the Windows Advanced Options menu. Select “Disable automatic start on system failure”
- Plug a USB thumb drive to your USB port before boot
- Change your mouse from PS2 to USB and then back to PS2
Items 2 and 3 sound strange but may let you solve the problem (empirical findings by the users).
When you reach the desktop or safe mode screen, click Start, Run and type regedit, hit Enter. The Registry Editor will open, on the left pane select HKEY_LOCAL_MACHINE, SYSTEM, ControlSet001, Services, Intelppm. In the right pane right click Start, select Modify and enter 4 in the Value data box. Exit registry editor and reboot your computer.
If all above fails, go to the Recovery Console (described below under Stop: C0000139 Error Message section) and type disable intelppm and hit Enter.
Stop: C0000139 Error Message
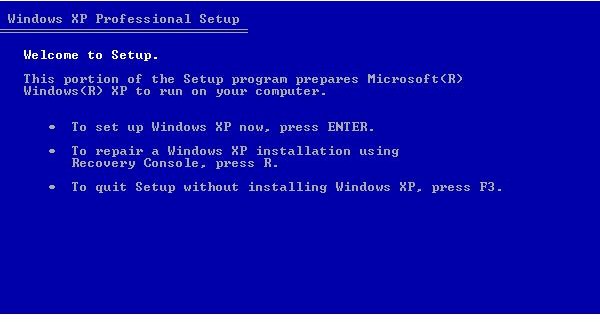
The problem is caused by the RPCRT4.dll file. The only solution is to replace it with the original file. However you can not do that when you boot to Windows, therefore you have to use the Recovery Console. To open up the Recovery Console, you need to have a Windows XP CD-ROM with you.
Boot your computer from Windows XP CD-ROM and when prompted press R to switch to Recovery Console. Select the number of the installation which you want to repair, hit Enter, enter the Administrator password (often the password is blank). You will be greeted with the command prompt. Assuming that your hard disk drive letter is C and CD/DVD drive letter is D (replace these with your drive letters if yours are different), enter the following commands:
cd C:\Windows\system32
ren RPCRT4.dll RPCRT4.bak
d:
cd i386
expand RPCRT4.dll c:\windows\system32
Do not forget to hit Enter after each command. When finished, type exit and go for a restart.
Bright Hub Tip: Creating a Windows XP ISO with All the Service Packs and Updates
If you have your Windows XP installation CD then you can create a customized installation CD with all the downloads and patches applied. You have to download a small freeware program called NLite for this purpose. Before running the program copy the Windows XP installation CD contents to a folder to your hard disk, visit the Microsoft’s Update site, validate your copy and download the Service Packs and the relevant updates to your computer. After you download everything, open up NLite, and select the ISO file and the updates. When finished, NLite will create an ISO file on your computer, which you can burn to a CD (make sure that you burn it as an ISO image, not a regular file.) With that CD, you can boot up your computer and install a fresh copy with all the updates.
This is a tip as a last resort if you cannot get Windows XP Service to boot properly.


